
In the previous article we have seen how to install OEM agent in silent mode using a response file. In the present articl, we shall look at an alternative way of silent installation of agent using RPM.
Environment details:
OMS Hostname: ora1-2
Agent to be deployed on : ora1-5
Below is the detail of the OMS status. This is checked from the OMS server.
[oracle@ora1-2 bin]$ ./emctl status oms -details
Oracle Enterprise Manager Cloud Control 12c Release 4
Copyright (c) 1996, 2014 Oracle Corporation.  All rights reserved.
Enter Enterprise Manager Root (SYSMAN) Password :
SYSMAN password provided is invalid
[oracle@ora1-2 bin]$ ./emctl status oms -details
Oracle Enterprise Manager Cloud Control 12c Release 4
Copyright (c) 1996, 2014 Oracle Corporation.  All rights reserved.
Enter Enterprise Manager Root (SYSMAN) Password :
Console Server Host        : ora1-2.mydomain
HTTP Console Port          : 7788
HTTPS Console Port         : 7802
HTTP Upload Port           : 4889
HTTPS Upload Port          : 4903
EM Instance Home           : /u01/app/oracle/gc_inst1/em/EMGC_OMS1
OMS Log Directory Location : /u01/app/oracle/gc_inst1/em/EMGC_OMS1/sysman/log
OMS is not configured with SLB or virtual hostname
Agent Upload is locked.
OMS Console is locked.
Active CA ID: 1
Console URL: https://ora1-2.mydomain:7802/em
Upload URL: https://ora1-2.mydomain:4903/empbs/upload

WLS Domain Information
Domain Name            : GCDomain
Admin Server Host      : ora1-2.mydomain
Admin Server HTTPS Port: 7102
Admin Server is RUNNING

Oracle Management Server Information
Managed Server Instance Name: EMGC_OMS1
Oracle Management Server Instance Host: ora1-2.mydomain
WebTier is Up
Oracle Management Server is Up

BI Publisher is not configured to run on this host.
[oracle@ora1-2 bin]$
Login to the “Enterprise Manager Command Line Interface” client from the OMS host with username as SYSMAN and it’s password.
[oracle@ora1-2 ~]$ cd /u01/app/oracle/oms12c/oms/bin
[oracle@ora1-2 bin]$ ./emcli login -username=sysman -password=Micromot10n
Login successful
[oracle@ora1-2 bin]$
Once logged in successfully, synchronize the EMCLI.
[oracle@ora1-2 bin]$ ./emcli sync
Synchronized successfully
[oracle@ora1-2 bin]$
Identify the list of Operating Systems for which the Agent software is available. This can be obtained by running the “get_supported_platforms” from the EMCLI interface.
[oracle@ora1-2 bin]$ ./emcli get_supported_platforms
-----------------------------------------------
Version = 12.1.0.4.0
 Platform = Linux x86-64
-----------------------------------------------
Platforms list displayed successfully.
[oracle@ora1-2 bin]$
Get the Agent “.rpm” for the required Operating system by specifying the “platform” option and the relevant agent version by passing “version” option. This will be saved on to the OMS host at the location specifed under the “destination” option.
Here, I’m getting the “.rpm” for “Linux x86-64” platform and of version “12.1.0.4.0” as stated above and saving it to “/u03/agent_software” location on the OMS host.
As a pre-requisite, make sure that the directory “/usr/lib/oracle” exists and has write permissions on the OMS server. Else the “get_agentimage_rpm” command might fail as shown below.
[oracle@ora1-2 bin]$ ./emcli get_agentimage_rpm -destination=/u03/agent_software -platform="Linux x86-64" -version="12.1.0.4.0"
Platform:Linux x86-64
Destination:/u03/agent_software
Exalogic:false
 Checking for disk space requirements...
 === Partition Detail ===
Space free : 15 GB
Space required : 1 GB
Space check pereq has failed. Make sure that you have 2 GB of space on /usr/lib/oracle directory
[oracle@ora1-2 bin]$
[oracle@ora1-2 bin]$ su -
Password:
[root@ora1-2 ~]# mkdir -p /usr/lib/oracle
[root@ora1-2 ~]#
[root@ora1-2 ~]# chmod 777 /usr/lib/oracle
Retry to get the agent image rpm after creating “/usr/lib/oracle” directory with write permission.
[oracle@ora1-2 bin]$ ./emcli get_agentimage_rpm -destination=/u03/agent_software -platform="Linux x86-64" -version="12.1.0.4.0"
Platform:Linux x86-64
Destination:/u03/agent_software
Exalogic:false
 Checking for disk space requirements...
 === Partition Detail ===
Space free : 15 GB
Space required : 1 GB
RPM Creation in progress ...
Check the logs at /u01/app/oracle/gc_inst1/em/EMGC_OMS1/sysman/emcli/setup/.emcli/get_agentimage_rpm_2016-05-12_12-29-54-PM.log
This operation may take few minutes, please wait ...
Agent image to rpm conversion completed successfully
Copy this downloaded AgentImage RPM on to the target server where the Agent needs to be installed. In my case, it’s host ora1-5 where the agent will be installed.
[oracle@ora1-2 agent_software]$ pwd
/u03/agent_software
[oracle@ora1-2 agent_software]$ scp oracle-agt-12.1.0.4.0-1.0.x86_64.rpm oracle@ora1-5:/u03/agent_software/
The authenticity of host 'ora1-5 (192.168.56.107)' can't be established.
RSA key fingerprint is cb:5b:3b:bd:51:e9:86:77:e8:f5:8f:be:59:f9:fa:73.
Are you sure you want to continue connecting (yes/no)? yes
Warning: Permanently added 'ora1-5,192.168.56.107' (RSA) to the list of known hosts.
oracle@ora1-5's password:
oracle-agt-12.1.0.4.0-1.0.x86_64.rpm                                                                                                 100%  224MB  11.2MB/s   00:20
[oracle@ora1-2 agent_software]$
On the target server, as ROOT user, install the copied agent-image rpm
[oracle@ora1-5 ~]$ cd /u03/agent_software/
[oracle@ora1-5 agent_software]$ ls -lrt
total 229736
-rw-r-----. 1 oracle oinstall 235009376 May 13 10:23 oracle-agt-12.1.0.4.0-1.0.x86_64.rpm
[oracle@ora1-5 agent_software]$
[root@ora1-5 ~]# rpm -Uivh /u03/agent_software/oracle-agt-12.1.0.4.0-1.0.x86_64.rpm
Preparing...                ########################################### [100%]
Running the prereq
   1:oracle-agt             ########################################### [100%]
Agent RPM installation is completed successfully. Now to configure the agent follow the below steps:
1. Edit the properties file: /usr/lib/oracle/agent/agent.properties with the correct values
2. Execute the script /etc/init.d/oracle-agt RESPONSE_FILE=/usr/lib/oracle/agent/agent.properties
[root@ora1-5 ~]#
Please note that when a “.rpm” file is used to install the agent, the default agent base directory location is “/usr/lib/oracle/agent”. So before installing the rpm, make sure the directory “/usr/lib/oracle” exists with write permissions on the target server where the agent will be installed.
If the agent needs to be installed on to a custom agent base directory location, then specify the “–relocate” option while installing the copied “.rpm” file.
For example:
rpm -Uivh --relocate /usr/lib/oracle/agent=<your_custom_agent_base_directory_location> <copied_rpm_file_with_complete_path>

rpm -Uivh --relocate /usr/lib/oracle/agent=/u01/app/oracle/agent /u03/agent_software/oracle-agt-12.1.0.4.0-1.0.x86_64.rpm
Also note that, when an agent is installed using rpm file, the inventory location is the AGENT_BASE_DIR/oraInventory. So, by default the inventory location will be “/usr/lib/oracle/agent/oraInventory”.
Once the agent rpm is installed successfully, we would be provided with sequence of steps to be followed to complete the cnfiguration.
Edit the “/usr/lib/oracle/agent/agent.properties” file with appropriate values such as OMS Hostname, OMS Port number (upload port number to communicate with OMS), Agent registration password (used to secure the agent), Agent username (username with which the agent needs to be installed), agent group (group to which the agent user belongs), agent port (optional – port where agent process will be started), hostname where you want the agent to be installed.
[root@ora1-5 ~]# cat /usr/lib/oracle/agent/agent.properties
#-------------------------------------------------------------------------------
#OMS_HOST:<String> OMS host info required to connect to OMS
#OMS_PORT:<String> OMS port info required to connect to OMS
#AGENT_REGISTRATION_PASSWORD:<String> Agent Registration Password needed to
#     establish a secure connection to the OMS.
#-------------------------------------------------------------------------------
OMS_HOST=ora1-2.mydomain
OMS_PORT=4903
AGENT_REGISTRATION_PASSWORD=oracle123
#-------------------------------------------------------------------------------
#AGENT_USERNAME:<String> User name with which the agent should be installed.
#AGENT_GROUP:<String> Group to which the agent user belogs.
#AGENT_PORT:<String> Port in which the agent process will come up.
#-------------------------------------------------------------------------------
AGENT_USERNAME=oracle
AGENT_GROUP=oinstall
#AGENT_PORT=3873
#-------------------------------------------------------------------------------
#ORACLE_HOSTNAME:<String> Virtual hostname where the agent is deployed.
#Example: ORACLE_HOSTNAME=hostname.domain
#-------------------------------------------------------------------------------
ORACLE_HOSTNAME=ora1-5.mydomain
As ROOT user using the above edited properties file, run the below command to cofigure the agent as directed after the agent rpm installation.
[root@ora1-5 ~]# /etc/init.d/oracle-agt RESPONSE_FILE=/usr/lib/oracle/agent/agent.properties
/usr/lib/oracle/agent/parameter.lst
Response File:/usr/lib/oracle/agent/agent.properties


Starting Oracle Universal Installer...

Checking swap space: must be greater than 500 MB.   Actual 10239 MB    Passed
Preparing to launch Oracle Universal Installer from /tmp/OraInstall2016-05-13_10-29-42AM. Please wait ...
LD_LIBRARY_PATH environment variable :
-------------------------------------------------------
Total args: 31
Command line argument array elements ...
Arg:0:/tmp/OraInstall2016-05-13_10-29-42AM/jre/bin/java:
Arg:1:-Doracle.installer.library_loc=/tmp/OraInstall2016-05-13_10-29-42AM/oui/lib/linux64:
Arg:2:-Doracle.installer.oui_loc=/tmp/OraInstall2016-05-13_10-29-42AM/oui:
Arg:3:-Doracle.installer.bootstrap=TRUE:
Arg:4:-Doracle.installer.startup_location=/usr/lib/oracle/agent/core/12.1.0.4.0/oui/bin:
Arg:5:-Doracle.installer.jre_loc=../../jre:
Arg:6:-Doracle.installer.nlsEnabled="TRUE":
Arg:7:-Doracle.installer.prereqConfigLoc= :
Arg:8:-Doracle.installer.unixVersion=2.6.32-71.el6.x86_64:
Arg:9:-mx160m:
Arg:10:-cp:
Arg:11:/tmp/OraInstall2016-05-13_10-29-42AM::/tmp/OraInstall2016-05-13_10-29-42AM/oui/jlib/OraInstaller.jar:/tmp/OraInstall2016-05-13_10-29-42AM/oui/jlib/oneclick.jar:/tmp/OraInstall2016-05-13_10-29-42AM/oui/jlib/xmlparserv2.jar:/tmp/OraInstall2016-05-13_10-29-42AM/oui/jlib/share.jar:/tmp/OraInstall2016-05-13_10-29-42AM/oui/jlib/OraInstallerNet.jar:/tmp/OraInstall2016-05-13_10-29-42AM/oui/jlib/emocmutl.jar:/tmp/OraInstall2016-05-13_10-29-42AM/oui/jlib/emCfg.jar:/tmp/OraInstall2016-05-13_10-29-42AM/oui/jlib/OraPrereq.jar:/tmp/OraInstall2016-05-13_10-29-42AM/oui/jlib/jsch.jar:/tmp/OraInstall2016-05-13_10-29-42AM/oui/jlib/ssh.jar:/tmp/OraInstall2016-05-13_10-29-42AM/oui/jlib/remoteinterfaces.jar:/tmp/OraInstall2016-05-13_10-29-42AM/oui/jlib/http_client.jar:/tmp/OraInstall2016-05-13_10-29-42AM/oui/jlib/OraSuiteInstaller.jar:/tmp/OraInstall2016-05-13_10-29-42AM/OPatch/jlib/opatch.jar:/tmp/OraInstall2016-05-13_10-29-42AM/OPatch/jlib/opatchactions.jar:/tmp/OraInstall2016-05-13_10-29-42AM/OPatch/jlib/opatchprereq.jar:/tmp/OraInstall2016-05-13_10-29-42AM/OPatch/jlib/opatchutil.jar:/tmp/OraInstall2016-05-13_10-29-42AM/oui/jlib/InstImages.jar:/tmp/OraInstall2016-05-13_10-29-42AM/oui/jlib/InstHelp.jar:/tmp/OraInstall2016-05-13_10-29-42AM/oui/jlib/InstHelp_de.jar:/tmp/OraInstall2016-05-13_10-29-42AM/oui/jlib/InstHelp_es.jar:/tmp/OraInstall2016-05-13_10-29-42AM/oui/jlib/InstHelp_fr.jar:/tmp/OraInstall2016-05-13_10-29-42AM/oui/jlib/InstHelp_it.jar:/tmp/OraInstall2016-05-13_10-29-42AM/oui/jlib/InstHelp_ja.jar:/tmp/OraInstall2016-05-13_10-29-42AM/oui/jlib/InstHelp_ko.jar:/tmp/OraInstall2016-05-13_10-29-42AM/oui/jlib/InstHelp_pt_BR.jar:/tmp/OraInstall2016-05-13_10-29-42AM/oui/jlib/InstHelp_zh_CN.jar:/tmp/OraInstall2016-05-13_10-29-42AM/oui/jlib/InstHelp_zh_TW.jar:/tmp/OraInstall2016-05-13_10-29-42AM/oui/jlib/oracle_ice.jar:/tmp/OraInstall2016-05-13_10-29-42AM/oui/jlib/help4.jar:/tmp/OraInstall2016-05-13_10-29-42AM/oui/jlib/help4-nls.jar:/tmp/OraInstall2016-05-13_10-29-42AM/oui/jlib/ewt3.jar:/tmp/OraInstall2016-05-13_10-29-42AM/oui/jlib/ewt3-swingaccess.jar:/tmp/OraInstall2016-05-13_10-29-42AM/oui/jlib/ewt3-nls.jar:/tmp/OraInstall2016-05-13_10-29-42AM/oui/jlib/swingaccess.jar::/tmp/OraInstall2016-05-13_10-29-42AM/oui/jlib/jewt4.jar:/tmp/OraInstall2016-05-13_10-29-42AM/oui/jlib/jewt4-nls.jar:/tmp/OraInstall2016-05-13_10-29-42AM/oui/jlib/orai18n-collation.jar:/tmp/OraInstall2016-05-13_10-29-42AM/oui/jlib/orai18n-mapping.jar:/tmp/OraInstall2016-05-13_10-29-42AM/oui/jlib/ojmisc.jar:/tmp/OraInstall2016-05-13_10-29-42AM/oui/jlib/xml.jar:/tmp/OraInstall2016-05-13_10-29-42AM/oui/jlib/srvm.jar:/tmp/OraInstall2016-05-13_10-29-42AM/oui/jlib/classes12.jar:
Arg:12:oracle.sysman.oii.oiic.OiicInstaller:
Arg:13:-scratchPath:
Arg:14:/tmp/OraInstall2016-05-13_10-29-42AM:
Arg:15:-sourceType:
Arg:16:network:
Arg:17:-timestamp:
Arg:18:2016-05-13_10-29-42AM:
Arg:19:-clone:
Arg:20:-forceClone:
Arg:21:-force:
Arg:22:-silent:
Arg:23:ORACLE_HOME=/usr/lib/oracle/agent/core/12.1.0.4.0:
Arg:24:ORACLE_HOME_NAME=agent12c0:
Arg:25:-waitForCompletion:
Arg:26:-debug:
Arg:27:OMS_HOST=ora1-2.mydomain:
Arg:28:EM_UPLOAD_PORT=4903:
Arg:29:AGENT_BASE_DIR=/usr/lib/oracle/agent:
Arg:30:EM_PROTOCOL=https:
-------------------------------------------------------
Initializing Java Virtual Machine from /tmp/OraInstall2016-05-13_10-29-42AM/jre/bin/java. Please wait...
Oracle Universal Installer, Version 11.1.0.12.0 Production
Copyright (C) 1999, 2014, Oracle. All rights reserved.

You can find the log of this install session at:
 /u01/app/oraInventory/logs/cloneActions2016-05-13_10-29-42AM.log
.................................................................................................... 100% Done.


Installation in progress (Friday, May 13, 2016 10:30:06 AM IST)
...................................................              51% Done.
Install successful

Linking in progress (Friday, May 13, 2016 10:30:15 AM IST)
Link successful

Setup in progress (Friday, May 13, 2016 10:30:15 AM IST)
...............................                                 100% Done.
Setup successful

End of install phases.(Friday, May 13, 2016 10:30:29 AM IST)
The cloning of agent12c0 was successful.
Please check '/u01/app/oraInventory/logs/cloneActions2016-05-13_10-29-42AM.log' for more details.
copying /u01/app/oraInventory/logs/silentInstall2016-05-13_10-29-42AM.log to /usr/lib/oracle/agent/core/12.1.0.4.0/cfgtoollogs/oui/silentInstall2016-05-13_10-29-42AM.log
copying /u01/app/oraInventory/logs/cloneActions2016-05-13_10-29-42AM.log to /usr/lib/oracle/agent/core/12.1.0.4.0/cfgtoollogs/oui/cloneActions2016-05-13_10-29-42AM.log
copying /u01/app/oraInventory/logs/oraInstall2016-05-13_10-29-42AM.err to /usr/lib/oracle/agent/core/12.1.0.4.0/cfgtoollogs/oui/oraInstall2016-05-13_10-29-42AM.err
copying /u01/app/oraInventory/logs/oraInstall2016-05-13_10-29-42AM.out to /usr/lib/oracle/agent/core/12.1.0.4.0/cfgtoollogs/oui/oraInstall2016-05-13_10-29-42AM.out
Starting Oracle Universal Installer...

Checking swap space: must be greater than 500 MB.   Actual 10239 MB    Passed
Preparing to launch Oracle Universal Installer from /tmp/OraInstall2016-05-13_10-30-30AM. Please wait ...
LD_LIBRARY_PATH environment variable :
-------------------------------------------------------
Total args: 26
Command line argument array elements ...
Arg:0:/tmp/OraInstall2016-05-13_10-30-30AM/jre/bin/java:
Arg:1:-Doracle.installer.library_loc=/tmp/OraInstall2016-05-13_10-30-30AM/oui/lib/linux64:
Arg:2:-Doracle.installer.oui_loc=/tmp/OraInstall2016-05-13_10-30-30AM/oui:
Arg:3:-Doracle.installer.bootstrap=TRUE:
Arg:4:-Doracle.installer.startup_location=/usr/lib/oracle/agent/core/12.1.0.4.0/oui/bin:
Arg:5:-Doracle.installer.jre_loc=../../jre:
Arg:6:-Doracle.installer.nlsEnabled="TRUE":
Arg:7:-Doracle.installer.prereqConfigLoc= :
Arg:8:-Doracle.installer.unixVersion=2.6.32-71.el6.x86_64:
Arg:9:-mx160m:
Arg:10:-cp:
Arg:11:/tmp/OraInstall2016-05-13_10-30-30AM::/tmp/OraInstall2016-05-13_10-30-30AM/oui/jlib/OraInstaller.jar:/tmp/OraInstall2016-05-13_10-30-30AM/oui/jlib/oneclick.jar:/tmp/OraInstall2016-05-13_10-30-30AM/oui/jlib/xmlparserv2.jar:/tmp/OraInstall2016-05-13_10-30-30AM/oui/jlib/share.jar:/tmp/OraInstall2016-05-13_10-30-30AM/oui/jlib/OraInstallerNet.jar:/tmp/OraInstall2016-05-13_10-30-30AM/oui/jlib/emocmutl.jar:/tmp/OraInstall2016-05-13_10-30-30AM/oui/jlib/emCfg.jar:/tmp/OraInstall2016-05-13_10-30-30AM/oui/jlib/OraPrereq.jar:/tmp/OraInstall2016-05-13_10-30-30AM/oui/jlib/jsch.jar:/tmp/OraInstall2016-05-13_10-30-30AM/oui/jlib/ssh.jar:/tmp/OraInstall2016-05-13_10-30-30AM/oui/jlib/remoteinterfaces.jar:/tmp/OraInstall2016-05-13_10-30-30AM/oui/jlib/http_client.jar:/tmp/OraInstall2016-05-13_10-30-30AM/oui/jlib/OraSuiteInstaller.jar:/tmp/OraInstall2016-05-13_10-30-30AM/OPatch/jlib/opatch.jar:/tmp/OraInstall2016-05-13_10-30-30AM/OPatch/jlib/opatchactions.jar:/tmp/OraInstall2016-05-13_10-30-30AM/OPatch/jlib/opatchprereq.jar:/tmp/OraInstall2016-05-13_10-30-30AM/OPatch/jlib/opatchutil.jar:/tmp/OraInstall2016-05-13_10-30-30AM/oui/jlib/InstImages.jar:/tmp/OraInstall2016-05-13_10-30-30AM/oui/jlib/InstHelp.jar:/tmp/OraInstall2016-05-13_10-30-30AM/oui/jlib/InstHelp_de.jar:/tmp/OraInstall2016-05-13_10-30-30AM/oui/jlib/InstHelp_es.jar:/tmp/OraInstall2016-05-13_10-30-30AM/oui/jlib/InstHelp_fr.jar:/tmp/OraInstall2016-05-13_10-30-30AM/oui/jlib/InstHelp_it.jar:/tmp/OraInstall2016-05-13_10-30-30AM/oui/jlib/InstHelp_ja.jar:/tmp/OraInstall2016-05-13_10-30-30AM/oui/jlib/InstHelp_ko.jar:/tmp/OraInstall2016-05-13_10-30-30AM/oui/jlib/InstHelp_pt_BR.jar:/tmp/OraInstall2016-05-13_10-30-30AM/oui/jlib/InstHelp_zh_CN.jar:/tmp/OraInstall2016-05-13_10-30-30AM/oui/jlib/InstHelp_zh_TW.jar:/tmp/OraInstall2016-05-13_10-30-30AM/oui/jlib/oracle_ice.jar:/tmp/OraInstall2016-05-13_10-30-30AM/oui/jlib/help4.jar:/tmp/OraInstall2016-05-13_10-30-30AM/oui/jlib/help4-nls.jar:/tmp/OraInstall2016-05-13_10-30-30AM/oui/jlib/ewt3.jar:/tmp/OraInstall2016-05-13_10-30-30AM/oui/jlib/ewt3-swingaccess.jar:/tmp/OraInstall2016-05-13_10-30-30AM/oui/jlib/ewt3-nls.jar:/tmp/OraInstall2016-05-13_10-30-30AM/oui/jlib/swingaccess.jar::/tmp/OraInstall2016-05-13_10-30-30AM/oui/jlib/jewt4.jar:/tmp/OraInstall2016-05-13_10-30-30AM/oui/jlib/jewt4-nls.jar:/tmp/OraInstall2016-05-13_10-30-30AM/oui/jlib/orai18n-collation.jar:/tmp/OraInstall2016-05-13_10-30-30AM/oui/jlib/orai18n-mapping.jar:/tmp/OraInstall2016-05-13_10-30-30AM/oui/jlib/ojmisc.jar:/tmp/OraInstall2016-05-13_10-30-30AM/oui/jlib/xml.jar:/tmp/OraInstall2016-05-13_10-30-30AM/oui/jlib/srvm.jar:/tmp/OraInstall2016-05-13_10-30-30AM/oui/jlib/classes12.jar:
Arg:12:oracle.sysman.oii.oiic.OiicAttachHome:
Arg:13:-scratchPath:
Arg:14:/tmp/OraInstall2016-05-13_10-30-30AM:
Arg:15:-sourceType:
Arg:16:network:
Arg:17:-timestamp:
Arg:18:2016-05-13_10-30-30AM:
Arg:19:-attachHome:
Arg:20:ORACLE_HOME=/usr/lib/oracle/agent/sbin:
Arg:21:ORACLE_HOME_NAME=sbin12c0:
Arg:22:-waitForCompletion:
Arg:23:-debug:
Arg:24:-invPtrLoc:
Arg:25:/usr/lib/oracle/agent/core/12.1.0.4.0/oraInst.loc:
-------------------------------------------------------
Initializing Java Virtual Machine from /tmp/OraInstall2016-05-13_10-30-30AM/jre/bin/java. Please wait...
The inventory pointer is located at /usr/lib/oracle/agent/core/12.1.0.4.0/oraInst.loc
'AttachHome' was successful.
Starting Oracle Universal Installer...

Checking swap space: must be greater than 500 MB.   Actual 10239 MB    Passed
Preparing to launch Oracle Universal Installer from /tmp/OraInstall2016-05-13_10-30-34AM. Please wait ...
LD_LIBRARY_PATH environment variable :
-------------------------------------------------------
Total args: 25
Command line argument array elements ...
Arg:0:/tmp/OraInstall2016-05-13_10-30-34AM/jre/bin/java:
Arg:1:-Doracle.installer.library_loc=/tmp/OraInstall2016-05-13_10-30-34AM/oui/lib/linux64:
Arg:2:-Doracle.installer.oui_loc=/tmp/OraInstall2016-05-13_10-30-34AM/oui:
Arg:3:-Doracle.installer.bootstrap=TRUE:
Arg:4:-Doracle.installer.startup_location=/usr/lib/oracle/agent/core/12.1.0.4.0/oui/bin:
Arg:5:-Doracle.installer.jre_loc=../../jre:
Arg:6:-Doracle.installer.nlsEnabled="TRUE":
Arg:7:-Doracle.installer.prereqConfigLoc= :
Arg:8:-Doracle.installer.unixVersion=2.6.32-71.el6.x86_64:
Arg:9:-mx160m:
Arg:10:-cp:
Arg:11:/tmp/OraInstall2016-05-13_10-30-34AM::/tmp/OraInstall2016-05-13_10-30-34AM/oui/jlib/OraInstaller.jar:/tmp/OraInstall2016-05-13_10-30-34AM/oui/jlib/oneclick.jar:/tmp/OraInstall2016-05-13_10-30-34AM/oui/jlib/xmlparserv2.jar:/tmp/OraInstall2016-05-13_10-30-34AM/oui/jlib/share.jar:/tmp/OraInstall2016-05-13_10-30-34AM/oui/jlib/OraInstallerNet.jar:/tmp/OraInstall2016-05-13_10-30-34AM/oui/jlib/emocmutl.jar:/tmp/OraInstall2016-05-13_10-30-34AM/oui/jlib/emCfg.jar:/tmp/OraInstall2016-05-13_10-30-34AM/oui/jlib/OraPrereq.jar:/tmp/OraInstall2016-05-13_10-30-34AM/oui/jlib/jsch.jar:/tmp/OraInstall2016-05-13_10-30-34AM/oui/jlib/ssh.jar:/tmp/OraInstall2016-05-13_10-30-34AM/oui/jlib/remoteinterfaces.jar:/tmp/OraInstall2016-05-13_10-30-34AM/oui/jlib/http_client.jar:/tmp/OraInstall2016-05-13_10-30-34AM/oui/jlib/OraSuiteInstaller.jar:/tmp/OraInstall2016-05-13_10-30-34AM/OPatch/jlib/opatch.jar:/tmp/OraInstall2016-05-13_10-30-34AM/OPatch/jlib/opatchactions.jar:/tmp/OraInstall2016-05-13_10-30-34AM/OPatch/jlib/opatchprereq.jar:/tmp/OraInstall2016-05-13_10-30-34AM/OPatch/jlib/opatchutil.jar:/tmp/OraInstall2016-05-13_10-30-34AM/oui/jlib/InstImages.jar:/tmp/OraInstall2016-05-13_10-30-34AM/oui/jlib/InstHelp.jar:/tmp/OraInstall2016-05-13_10-30-34AM/oui/jlib/InstHelp_de.jar:/tmp/OraInstall2016-05-13_10-30-34AM/oui/jlib/InstHelp_es.jar:/tmp/OraInstall2016-05-13_10-30-34AM/oui/jlib/InstHelp_fr.jar:/tmp/OraInstall2016-05-13_10-30-34AM/oui/jlib/InstHelp_it.jar:/tmp/OraInstall2016-05-13_10-30-34AM/oui/jlib/InstHelp_ja.jar:/tmp/OraInstall2016-05-13_10-30-34AM/oui/jlib/InstHelp_ko.jar:/tmp/OraInstall2016-05-13_10-30-34AM/oui/jlib/InstHelp_pt_BR.jar:/tmp/OraInstall2016-05-13_10-30-34AM/oui/jlib/InstHelp_zh_CN.jar:/tmp/OraInstall2016-05-13_10-30-34AM/oui/jlib/InstHelp_zh_TW.jar:/tmp/OraInstall2016-05-13_10-30-34AM/oui/jlib/oracle_ice.jar:/tmp/OraInstall2016-05-13_10-30-34AM/oui/jlib/help4.jar:/tmp/OraInstall2016-05-13_10-30-34AM/oui/jlib/help4-nls.jar:/tmp/OraInstall2016-05-13_10-30-34AM/oui/jlib/ewt3.jar:/tmp/OraInstall2016-05-13_10-30-34AM/oui/jlib/ewt3-swingaccess.jar:/tmp/OraInstall2016-05-13_10-30-34AM/oui/jlib/ewt3-nls.jar:/tmp/OraInstall2016-05-13_10-30-34AM/oui/jlib/swingaccess.jar::/tmp/OraInstall2016-05-13_10-30-34AM/oui/jlib/jewt4.jar:/tmp/OraInstall2016-05-13_10-30-34AM/oui/jlib/jewt4-nls.jar:/tmp/OraInstall2016-05-13_10-30-34AM/oui/jlib/orai18n-collation.jar:/tmp/OraInstall2016-05-13_10-30-34AM/oui/jlib/orai18n-mapping.jar:/tmp/OraInstall2016-05-13_10-30-34AM/oui/jlib/ojmisc.jar:/tmp/OraInstall2016-05-13_10-30-34AM/oui/jlib/xml.jar:/tmp/OraInstall2016-05-13_10-30-34AM/oui/jlib/srvm.jar:/tmp/OraInstall2016-05-13_10-30-34AM/oui/jlib/classes12.jar:
Arg:12:oracle.sysman.oii.oiic.OiicUpdateHomeDeps:
Arg:13:-scratchPath:
Arg:14:/tmp/OraInstall2016-05-13_10-30-34AM:
Arg:15:-sourceType:
Arg:16:network:
Arg:17:-timestamp:
Arg:18:2016-05-13_10-30-34AM:
Arg:19:-updateHomeDeps:
Arg:20:HOME_DEPENDENCY_LIST={/usr/lib/oracle/agent/sbin:/usr/lib/oracle/agent/core/12.1.0.4.0}:
Arg:21:-waitForCompletion:
Arg:22:-debug:
Arg:23:-invPtrLoc:
Arg:24:/usr/lib/oracle/agent/core/12.1.0.4.0/oraInst.loc:
-------------------------------------------------------
Initializing Java Virtual Machine from /tmp/OraInstall2016-05-13_10-30-34AM/jre/bin/java. Please wait...
The inventory pointer is located at /usr/lib/oracle/agent/core/12.1.0.4.0/oraInst.loc
'UpdateHomeDeps' was successful.
Finished product-specific root actions.
/etc exist

Creating /etc/oragchomelist file...
/usr/lib/oracle/agent/core/12.1.0.4.0
Setting the invPtrLoc to /usr/lib/oracle/agent/core/12.1.0.4.0/oraInst.loc

perform - mode is starting for action: configure

** Agent Port Check completed successfully.**

perform - mode finished for action: configure

You can see the log file: /usr/lib/oracle/agent/core/12.1.0.4.0/cfgtoollogs/oui/configActions2016-05-13_10-30-39-AM.log
Agent Configuration completed successfully
[root@ora1-5 ~]#
Once the configuration is a success, check the agent status.
[oracle@ora1-5 ~]$
[oracle@ora1-5 ~]$ cd /usr/lib/oracle/agent/agent_inst/bin
[oracle@ora1-5 bin]$ ./emctl status agent
Oracle Enterprise Manager Cloud Control 12c Release 4
Copyright (c) 1996, 2014 Oracle Corporation.  All rights reserved.
---------------------------------------------------------------
Agent Version          : 12.1.0.4.0
OMS Version            : 12.1.0.4.0
Protocol Version       : 12.1.0.1.0
Agent Home             : /usr/lib/oracle/agent/agent_inst
Agent Log Directory    : /usr/lib/oracle/agent/agent_inst/sysman/log
Agent Binaries         : /usr/lib/oracle/agent/core/12.1.0.4.0
Agent Process ID       : 20280
Parent Process ID      : 20238
Agent URL              : https://ora1-5.mydomain:3872/emd/main/
Local Agent URL in NAT : https://ora1-5.mydomain:3872/emd/main/
Repository URL         : https://ora1-2.mydomain:4903/empbs/upload
Started at             : 2016-05-13 10:32:33
Started by user        : oracle
Operating System       : Linux version 2.6.32-71.el6.x86_64 (amd64)
Last Reload            : (none)
Last successful upload                       : 2016-05-13 10:34:25
Last attempted upload                        : 2016-05-13 10:34:33
Total Megabytes of XML files uploaded so far : 0.33
Number of XML files pending upload           : 0
Size of XML files pending upload(MB)         : 0
Available disk space on upload filesystem    : 86.76%
Collection Status                            : Collections enabled
Heartbeat Status                             : Ok
Last attempted heartbeat to OMS              : 2016-05-13 10:35:44
Last successful heartbeat to OMS             : 2016-05-13 10:35:44
Next scheduled heartbeat to OMS              : 2016-05-13 10:36:44

---------------------------------------------------------------
Agent is Running and Ready
[oracle@ora1-5 bin]$
COPYRIGHT
© Shivananda Rao P, 2012 to 2018. Unauthorized use and/or duplication of this material without express and written permission from this blog’s author and/or owner is strictly prohibited. Excerpts and links may be used, provided that full and clear credit is given to Shivananda Rao and http://www.shivanandarao-oracle.com with appropriate and specific direction to the original content.
DISCLAIMER
The views expressed here are my own and do not necessarily reflect the views of any other individual, business entity, or organization. The views expressed by visitors on this blog are theirs solely and may not reflect mine
We have come across OEM agent installation from the Cloud Control tool. This article demonstrates on how to install 12c cloud control agent uisng “silent” mode which makes use of the “response” file.
Environment details is as follows:
OMS hostname              : ora1-2
Agent will be deployed on : ora1-1
Below is the details of the OMS status. This is checked from the OMS server.
[oracle@ora1-2 bin]$ ./emctl status oms -details
Oracle Enterprise Manager Cloud Control 12c Release 4
Copyright (c) 1996, 2014 Oracle Corporation.  All rights reserved.
Enter Enterprise Manager Root (SYSMAN) Password :
Console Server Host        : ora1-2.mydomain
HTTP Console Port          : 7788
HTTPS Console Port         : 7802
HTTP Upload Port           : 4889
HTTPS Upload Port          : 4903
EM Instance Home           : /u01/app/oracle/gc_inst1/em/EMGC_OMS1
OMS Log Directory Location : /u01/app/oracle/gc_inst1/em/EMGC_OMS1/sysman/log
OMS is not configured with SLB or virtual hostname
Agent Upload is locked.
OMS Console is locked.
Active CA ID: 1
Console URL: https://ora1-2.mydomain:7802/em
Upload URL: https://ora1-2.mydomain:4903/empbs/upload

WLS Domain Information
Domain Name            : GCDomain
Admin Server Host      : ora1-2.mydomain
Admin Server HTTPS Port: 7102
Admin Server is RUNNING

Oracle Management Server Information
Managed Server Instance Name: EMGC_OMS1
Oracle Management Server Instance Host: ora1-2.mydomain
WebTier is Up
Oracle Management Server is Up

BI Publisher is not configured to run on this host.
[oracle@ora1-2 bin]$
Login to the “Enterprise Manager Command Line Interface” client from the OMS host with username as SYSMAN and it’s password.
[oracle@ora1-2 bin]$ pwd
/u01/app/oracle/oms12c/oms/bin
[oracle@ora1-2 bin]$
[oracle@ora1-2 bin]$ ./emcli login -username=sysman -password=Micromot10n
Login successful
Once logged in successfully, synchronize the EMCLI.
[oracle@ora1-2 bin]$ ./emcli sync
Synchronized successfully
[oracle@ora1-2 bin]$
Identify the list of Operating Systems for which the Agent software is available. This can be obtained by running the “get_supported_platforms” from the EMCLI interface.
[oracle@ora1-2 bin]$ ./emcli get_supported_platforms
-----------------------------------------------
Version = 12.1.0.4.0
 Platform = Linux x86-64
-----------------------------------------------
Platforms list displayed successfully.
Get the Agent software for the required Operating system by specifying the “platform” option and the relevant agent version by passing “version” option.
The image will be saved on to the OMS host at the location specifed under the “destination” option. Here, I’m getting the AgentImage for “Linux x86-64” platform and of version “12.1.0.4.0” as stated above and saving the AgentImage to “/u03/agent_software” location on the OMS host.
[oracle@ora1-2 bin]$ ./emcli get_agentimage -destination=/u03/agent_software -platform="Linux x86-64" -version="12.1.0.4.0"
 === Partition Detail ===
Space free : 15 GB
Space required : 1 GB
Check the logs at /u01/app/oracle/gc_inst1/em/EMGC_OMS1/sysman/emcli/setup/.emcli/get_agentimage_2016-04-08_18-49-33-PM.log
Downloading /u03/agent_software/12.1.0.4.0_AgentCore_226.zip
File saved as /u03/agent_software/12.1.0.4.0_AgentCore_226.zip
Downloading /u03/agent_software/12.1.0.4.0_PluginsOneoffs_226.zip
File saved as /u03/agent_software/12.1.0.4.0_PluginsOneoffs_226.zip
Downloading /u03/agent_software/unzip
File saved as /u03/agent_software/unzip
Agent Image Download completed successfully.
[oracle@ora1-2 bin]$
Copy this downloaded AgentImage on to the target server where the Agent needs to be installed. In my case, it’s host ora1-1 where the agent will be installed.
[oracle@ora1-2 bin]$ cd /u03/agent_software
[oracle@ora1-2 agent_software]$ ls -lrt
total 250000
-rw-r--r--. 1 oracle oinstall 255744050 Apr  8 18:52 12.1.0.4.0_AgentCore_226.zip
[oracle@ora1-2 agent_software]$
[oracle@ora1-2 agent_software]$
[oracle@ora1-2 agent_software]$
[oracle@ora1-2 agent_software]$ scp 12.1.0.4.0_AgentCore_226.zip oracle@ora1-1:/u03/
oracle@192.168.56.101's password:
12.1.0.4.0_AgentCore_226.zip                                                                                                         100%  244MB   9.0MB/s   00:27
[oracle@ora1-2 agent_software]$
[oracle@ora1-1 ~]$ cd /u03
[oracle@ora1-1 u03]$ ls -lrt
total 1196388
drwx------. 2 oracle oinstall     16384 Jan  1 17:25 lost+found
-rw-r--r--. 1 oracle oinstall 915338678 Mar 27 11:25 p19954978_121020_Linux-x86-64.zip
drwxr-xr-x. 3 oracle oinstall      4096 Mar 27 11:43 121022_gi_psu
-rw-r--r--. 1 oracle oinstall  52774823 Mar 27 13:38 p6880880_121010_Linux-x86-64.zip
-rw-r--r--. 1 oracle oinstall 255744050 Apr  8 19:11 12.1.0.4.0_AgentCore_226.zip
[oracle@ora1-1 u03]$
On the target server, unzip the AgentImage software received from the OMS host.
[oracle@ora1-1 u03]$
[oracle@ora1-1 u03]$ mkdir 12104_agent
[oracle@ora1-1 u03]$
[oracle@ora1-1 u03]$ unzip -d 12104_agent 12.1.0.4.0_AgentCore_226.zip
Archive:  12.1.0.4.0_AgentCore_226.zip
  inflating: 12104_agent/unzip
  inflating: 12104_agent/agentDeploy.sh
  inflating: 12104_agent/agentimage.properties
  inflating: 12104_agent/agent.rsp
 extracting: 12104_agent/agentcoreimage.zip
 extracting: 12104_agent/12.1.0.4.0_PluginsOneoffs_226.zip
[oracle@ora1-1 u03]$
Edit the “agent.rsp” (AgentResponseFile) to add the details such as OMS Hostname, EM Upload Port (the HTTPS port number of OMS), Agent Registration Password (used to secure the agent), Agent Instance Home location, Agent Port number (port where Agent process will be started),b_startAgent (True if the agent needs to be started automatically after installed and configured, ORACLE_HOSTNAME (host name of the target server where the agent will be installed), s_agentHomeName (name for the Agent Home).
Below are the details suiting my environment.
OMS_HOST=ora1-2.mydomain
EM_UPLOAD_PORT=4903
AGENT_REGISTRATION_PASSWORD=oracle123
AGENT_INSTANCE_HOME=
AGENT_PORT=3873
b_startAgent=true
ORACLE_HOSTNAME=ora1-1.mydomain
s_agentHomeName=agent12cr1
[oracle@ora1-1 12104_agent]$ cat agent.rsp
<output trimmed>

OMS_HOST=ora1-2.mydomain
EM_UPLOAD_PORT=4903
AGENT_REGISTRATION_PASSWORD=oracle123
AGENT_INSTANCE_HOME=
AGENT_PORT=3873
b_startAgent=true
ORACLE_HOSTNAME=ora1-1.mydomain
s_agentHomeName=agent12cr1


<output trimmed>
[oracle@ora1-1 oracle]$ cd /u03/12104_agent/
[oracle@ora1-1 12104_agent]$ ls -lrt
total 250112
-rw-rw-r--. 1 oracle oinstall       178 May 24  2014 agentimage.properties
-rwxr-xr-x. 1 oracle oinstall    145976 May 24  2014 unzip
-rwxrwxr-x. 1 oracle oinstall     27905 May 24  2014 agentDeploy.sh
-rw-rw-r--. 1 oracle oinstall 248704435 May 24  2014 agentcoreimage.zip
-rw-r--r--. 1 oracle oinstall   6958959 Apr  8 18:52 12.1.0.4.0_PluginsOneoffs_226.zip
-rwxrwxr-x. 1 oracle oinstall      3726 Apr  8 19:26 agent.rsp
[oracle@ora1-1 12104_agent]$ ./agentDeploy.sh AGENT_BASE_DIR=/u01/app/oracle/agent12c RESPONSE_FILE=/u03/12104_agent/agent.rsp

Validating the OMS_HOST & EM_UPLOAD_PORT
Executing command : /u01/app/oracle/agent12c/core/12.1.0.4.0/jdk/bin/java -classpath /u01/app/oracle/agent12c/core/12.1.0.4.0/jlib/agentInstaller.jar:/u01/app/oracle/agent12c/core/12.1.0.4.0/oui/jlib/OraInstaller.jar oracle.sysman.agent.installer.AgentInstaller /u01/app/oracle/agent12c/core/12.1.0.4.0 /u03/12104_agent /u01/app/oracle/agent12c -prereq

Validating oms host & port with url: http://ora1-2.mydomain:4903/empbs/genwallet
Validating oms host & port with url: https://ora1-2.mydomain:4903/empbs/genwallet
Return status:3-oms https port is passed
Unzipping the agentcoreimage.zip to /u01/app/oracle/agent12c ....
12.1.0.4.0_PluginsOneoffs_226.zip
Executing command : /u03/12104_agent/unzip -o /u03/12104_agent/12.1.0.4.0_PluginsOneoffs_226.zip -d /u01/app/oracle/agent12c
Executing command : /u01/app/oracle/agent12c/core/12.1.0.4.0/jdk/bin/java -classpath /u01/app/oracle/agent12c/core/12.1.0.4.0/oui/jlib/OraInstaller.jar:/u01/app/oracle/agent12c/core/12.1.0.4.0/oui/jlib/xmlparserv2.jar:/u01/app/oracle/agent12c/core/12.1.0.4.0/oui/jlib/srvm.jar:/u01/app/oracle/agent12c/core/12.1.0.4.0/oui/jlib/emCfg.jar:/u01/app/oracle/agent12c/core/12.1.0.4.0/jlib/agentInstaller.jar:/u01/app/oracle/agent12c/core/12.1.0.4.0/oui/jlib/share.jar oracle.sysman.agent.installer.AgentInstaller /u01/app/oracle/agent12c/core/12.1.0.4.0 /u03/12104_agent /u01/app/oracle/agent12c /u01/app/oracle/agent12c/agent_inst AGENT_BASE_DIR=/u01/app/oracle/agent12c


Executing agent install prereqs...
Executing command: /u01/app/oracle/agent12c/core/12.1.0.4.0/oui/bin/runInstaller -debug -ignoreSysPrereqs   -prereqchecker -silent -ignoreSysPrereqs -waitForCompletion  -prereqlogloc /u01/app/oracle/agent12c/core/12.1.0.4.0/cfgtoollogs/agentDeploy -entryPoint oracle.sysman.top.agent_Complete -detailedExitCodes PREREQ_CONFIG_LOCATION=/u01/app/oracle/agent12c/core/12.1.0.4.0/prereqs  -J-DORACLE_HOSTNAME=ora1-1.mydomain -J-DAGENT_PORT=3873 -J-DAGENT_BASE_DIR=/u01/app/oracle/agent12c

Agent install prereqs completed successfully

Cloning the agent home...
Executing command: /u01/app/oracle/agent12c/core/12.1.0.4.0/oui/bin/runInstaller -debug -ignoreSysPrereqs   -clone -forceClone -silent -waitForCompletion -nowait ORACLE_HOME=/u01/app/oracle/agent12c/core/12.1.0.4.0 -responseFile /u03/12104_agent/agent.rsp  AGENT_BASE_DIR=/u01/app/oracle/agent12c AGENT_BASE_DIR=/u01/app/oracle/agent12c RESPONSE_FILE=/u03/12104_agent/agent.rsp -noconfig  ORACLE_HOME_NAME=agent12cr1 -force b_noUpgrade=true

Cloning of agent home completed successfully

Attaching sbin home...
Executing command: /u01/app/oracle/agent12c/core/12.1.0.4.0/oui/bin/runInstaller -debug -ignoreSysPrereqs   -attachHome -waitForCompletion -nowait ORACLE_HOME=/u01/app/oracle/agent12c/sbin ORACLE_HOME_NAME=sbin12c1 -force

Attach home for sbin home completed successfully.

Updating home dependencies...
Executing command: /u01/app/oracle/agent12c/core/12.1.0.4.0/oui/bin/runInstaller -debug -ignoreSysPrereqs   -updateHomeDeps -waitForCompletion HOME_DEPENDENCY_LIST={/u01/app/oracle/agent12c/sbin:/u01/app/oracle/agent12c/core/12.1.0.4.0} -invPtrLoc /u01/app/oracle/agent12c/core/12.1.0.4.0/oraInst.loc -force

Update home dependency completed successfully.
Executing command: /u01/app/oracle/agent12c/core/12.1.0.4.0/oui/bin/runConfig.sh ORACLE_HOME=/u01/app/oracle/agent12c/core/12.1.0.4.0 RESPONSE_FILE=/u01/app/oracle/agent12c/core/12.1.0.4.0/agent.rsp ACTION=configure MODE=perform COMPONENT_XML={oracle.sysman.top.agent.11_1_0_1_0.xml} RERUN=true

ERROR: Agent Configuration Failed SEVERE:emctl secure agent command has failed with status=1SEVERE:emctl secure agent command has failed with status=1SEVERE:emctl secure agent command has failed with status=1

Agent Deploy Log Location:/u01/app/oracle/agent12c/core/12.1.0.4.0/cfgtoollogs/agentDeploy/agentDeploy_2016-04-09_12-34-49-PM.log
The Agent configuration failed with error “ERROR: Agent Configuration Failed SEVERE:emctl secure agent command has failed with status=1SEVERE:emctl secure agent command has failed with status=1SEVERE:emctl secure agent command has failed with status=1”. This error signifies that the configuration failed while securing the agent.
Does that mean that the agent is not installed ? Let’s check the status and try securing the agent manually.
[oracle@ora1-1 12104_agent]$
[oracle@ora1-1 12104_agent]$
[oracle@ora1-1 12104_agent]$
[oracle@ora1-1 12104_agent]$
[oracle@ora1-1 12104_agent]$ /u01/app/oracle/agent12c/core/12.1.0.4.0/bin/emctl status agent
Oracle Enterprise Manager Cloud Control 12c Release 4
Copyright (c) 1996, 2014 Oracle Corporation.  All rights reserved.
---------------------------------------------------------------
Agent is Not Running
The agent is installed but seems to be not running. Expected.
Not sure why the “agentdeploy” script failed securing the agent even though the Agent_Registration_Password is right. Let me try securing it manually with the same password.
[oracle@ora1-1 12104_agent]$
[oracle@ora1-1 12104_agent]$
[oracle@ora1-1 12104_agent]$ /u01/app/oracle/agent12c/core/12.1.0.4.0/bin/emctl secure agent oracle123
Oracle Enterprise Manager Cloud Control 12c Release 4
Copyright (c) 1996, 2014 Oracle Corporation.  All rights reserved.
Agent is already stopped...   Done.
Securing agent...   Started.
Securing agent...   Successful.
[oracle@ora1-1 12104_agent]$
Ok, good to see that it’s success 🙂
Let me check the status of the agent.
[oracle@ora1-1 12104_agent]$ /u01/app/oracle/agent12c/core/12.1.0.4.0/bin/emctl status agent
Oracle Enterprise Manager Cloud Control 12c Release 4
Copyright (c) 1996, 2014 Oracle Corporation.  All rights reserved.
---------------------------------------------------------------
Agent is Not Running
Agent seems to be not running. Again as expected. Let me start the agent and add the targets manually using the “addinternaltargets” option at the EMCTL prompt.
[oracle@ora1-1 12104_agent]$
[oracle@ora1-1 12104_agent]$ /u01/app/oracle/agent12c/core/12.1.0.4.0/bin/emctl start agent
Oracle Enterprise Manager Cloud Control 12c Release 4
Copyright (c) 1996, 2014 Oracle Corporation.  All rights reserved.
Starting agent ........... started.
[oracle@ora1-1 12104_agent]$ /u01/app/oracle/agent12c/core/12.1.0.4.0/bin/emctl config agent addinternaltargets
Oracle Enterprise Manager Cloud Control 12c Release 4
Copyright (c) 1996, 2014 Oracle Corporation.  All rights reserved.
Check the status of the agent.
[oracle@ora1-1 12104_agent]$ /u01/app/oracle/agent12c/core/12.1.0.4.0/bin/emctl status agent
Oracle Enterprise Manager Cloud Control 12c Release 4
Copyright (c) 1996, 2014 Oracle Corporation.  All rights reserved.
---------------------------------------------------------------
Agent Version          : 12.1.0.4.0
OMS Version            : 12.1.0.4.0
Protocol Version       : 12.1.0.1.0
Agent Home             : /u01/app/oracle/agent12c/
Agent Log Directory    : /u01/app/oracle/agent12c//sysman/log
Agent Binaries         : /u01/app/oracle/agent12c/core/12.1.0.4.0
Agent Process ID       : 6703
Parent Process ID      : 6610
Agent URL              : https://ora1-1.mydomain:3873/emd/main/
Local Agent URL in NAT : https://ora1-1.mydomain:3873/emd/main/
Repository URL         : https://ora1-2.mydomain:4903/empbs/upload
Started at             : 2016-04-09 12:42:25
Started by user        : oracle
Operating System       : Linux version 2.6.32-71.el6.x86_64 (amd64)
Last Reload            : (none)
Last successful upload                       : 2016-04-09 12:56:26
Last attempted upload                        : 2016-04-09 12:56:26
Total Megabytes of XML files uploaded so far : 0
Number of XML files pending upload           : 33
Size of XML files pending upload(MB)         : 0.02
Available disk space on upload filesystem    : 41.15%
Collection Status                            : Collections enabled
Heartbeat Status                             : Ok
Last attempted heartbeat to OMS              : 2016-04-09 12:55:47
Last successful heartbeat to OMS             : 2016-04-09 12:55:47
Next scheduled heartbeat to OMS              : 2016-04-09 12:56:47

---------------------------------------------------------------
Agent is Running and Ready
[oracle@ora1-1 12104_agent]$
COPYRIGHT
© Shivananda Rao P, 2012 to 2018. Unauthorized use and/or duplication of this material without express and written permission from this blog’s author and/or owner is strictly prohibited. Excerpts and links may be used, provided that full and clear credit is given to Shivananda Rao and http://www.shivanandarao-oracle.com with appropriate and specific direction to the original content.
DISCLAIMER
The views expressed here are my own and do not necessarily reflect the views of any other individual, business entity, or organization. The views expressed by visitors on this blog are theirs solely and may not reflect mine
In this article, I’d like to demonstrate how to installing OEM 12c Release 4 on a linux machine. In the upcoming posts, I’d demonstrate on upgrading this OEM 12c to 13c.
Environment:
OS                          : OEL 6
OEM 12c Software            : 12c Release 4 (12.1.0.4)
Repository Database version : 11.2.0.3
Repositry Database Name     : omsdb
Hostname                    : ora1-2
This article assumes that oracle 11.2.0.3 binary is pre installed on the server and that the repository database “omsdb” is created on it. Do not have the Enterprise Manager DB control configured for this database. If already configured, then have it removed using the “emca” utility with “-deconfig” option.
Download the OEM 12c Release 4 software from here http://www.oracle.com/technetwork/oem/grid-control/downloads/index.html The software consists of 3 disks.
Unzip all the 3 disks into a single directory. Here, I have unzipped them into “/u03/oem12c” directory.
[oracle@ora1-2 ~]$ cd /u03/
[oracle@ora1-2 u03]$ ls -lrt
total 6647416
drwxrwxrwx.  2 oracle oinstall      16384 Feb 26 16:14 lost+found
-rw-r--r--.  1 oracle oinstall 2195693096 Mar 25 14:22 em12104_linux64_disk1.zip
-rw-r--r--.  1 oracle oinstall 1877449643 Mar 25 14:26 em12104_linux64_disk2.zip
-rw-r--r--.  1 oracle oinstall 2727123784 Mar 25 14:31 em12104_linux64_disk3.zip
drwxr-xr-x. 11 oracle oinstall       4096 Mar 25 14:46 oem12c
[oracle@ora1-2 u03]$ cd oem12c
[oracle@ora1-2 oem12c]$ ls -lrt
total 1496020
-rwxr-xr-x. 1 oracle oinstall       5375 Dec 26  2013 runInstaller
drwxr-xr-x. 4 oracle oinstall       4096 Jan 15  2014 bipruntime
-rwxr-xr-x. 1 oracle oinstall 1530333315 May 24  2014 WT.zip
drwxr-xr-x. 4 oracle oinstall       4096 May 24  2014 oms
drwxr-xr-x. 4 oracle oinstall       4096 May 24  2014 jdk
drwxrwxr-x. 2 oracle oinstall       4096 May 24  2014 response
drwxrwxr-x. 2 oracle oinstall       4096 May 24  2014 wls
drwxr-xr-x. 7 oracle oinstall       4096 May 24  2014 install
drwxrwxr-x. 4 oracle oinstall       4096 May 24  2014 libskgxn
drwxr-xr-x. 9 oracle oinstall       4096 May 24  2014 stage
drwxr-xr-x. 2 oracle oinstall       4096 May 24  2014 plugins
-rw-r--r--. 1 oracle oinstall      42623 May 26  2014 release_notes.pdf
Create the required directories for the OMS and the agent installation.
[oracle@ora1-2 ~]$ cd /u01/app/oracle/
[oracle@ora1-2 oracle]$ ls -lrt
total 28
drwxr-xr-x.  2 oracle oinstall 4096 Mar 25 13:32 Clusterware
drwxr-xr-x.  3 oracle oinstall 4096 Mar 25 13:32 ora1-2
drwxr-xr-x.  3 oracle oinstall 4096 Mar 25 13:40 product
drwxrwxr-x. 11 oracle oinstall 4096 Mar 25 13:54 diag
drwxr-x---.  4 oracle oinstall 4096 Mar 25 13:57 admin
drwxr-xr-x.  7 oracle oinstall 4096 Mar 25 14:07 cfgtoollogs
drwxr-xr-x.  2 oracle oinstall 4096 Mar 25 14:12 checkpoints
[oracle@ora1-2 oracle]$
[oracle@ora1-2 oracle]$

[oracle@ora1-2 oracle]$ mkdir oms12c
[oracle@ora1-2 oracle]$ mkdir 12cagent
Start the installation by running the “runInstaller” script.
[oracle@ora1-2 oem12c]$ ./runInstaller
I wish to not receive any updates as this is my own test machine and hence I un-check the “I wish to receive security updates via My Oracle Support”

Select the “Skip” option.

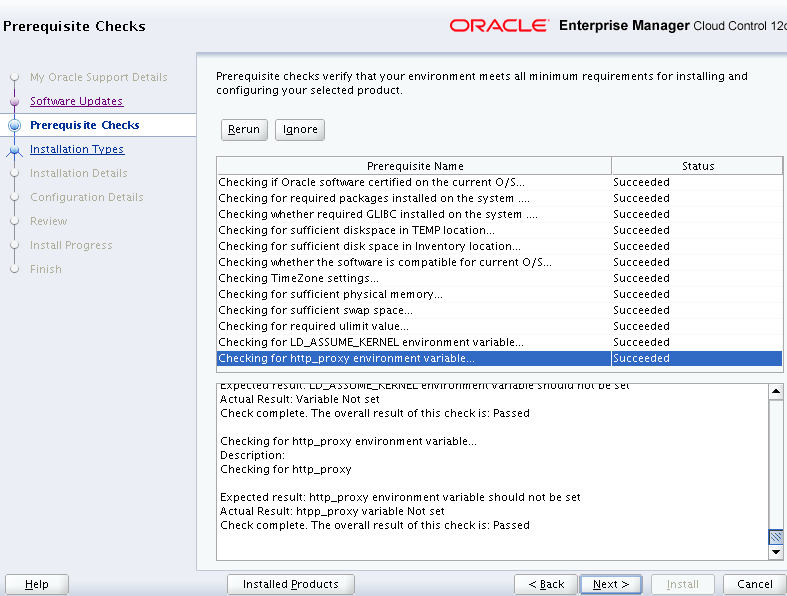
Run the “Prerequisite” checks in the next step. Look out for the Status section to know if the respective check Succeeded or Failed.
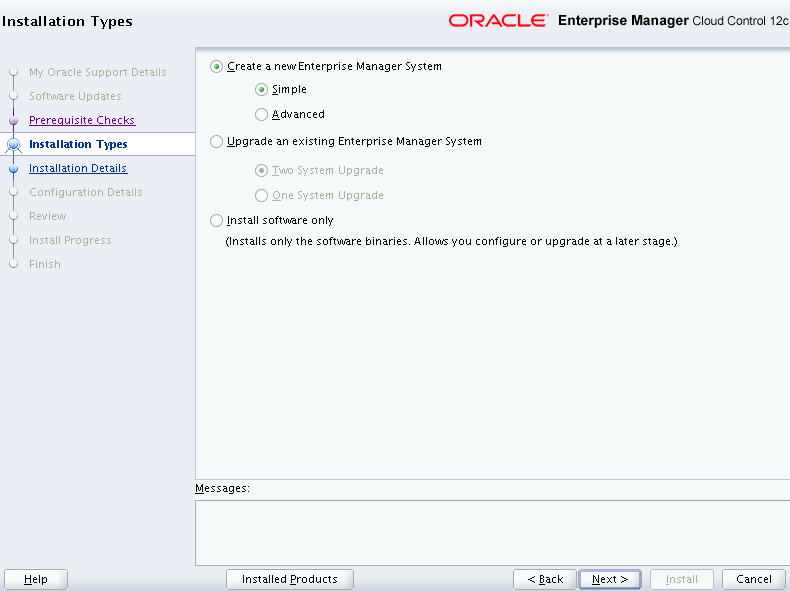
Select the “Create a new Enterprise Manager System” option with “Simple”. You can choose the Advanced option for more options.
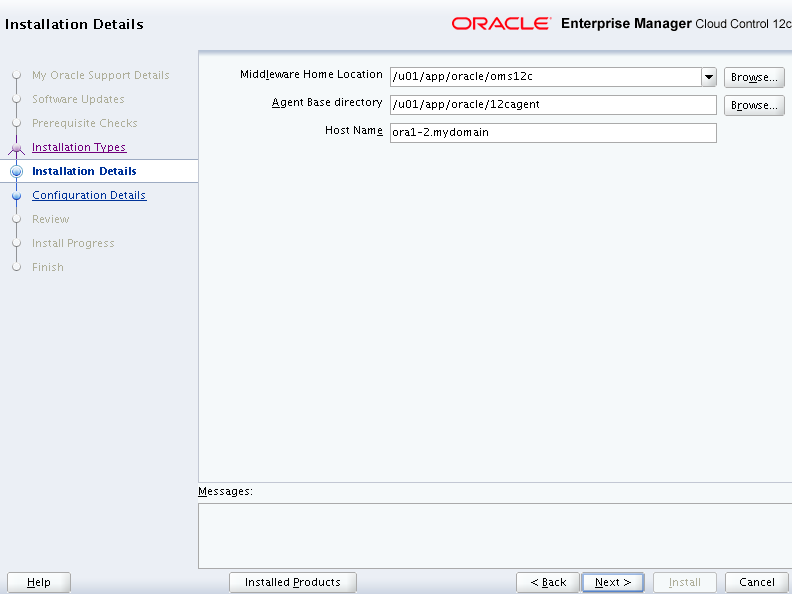
Provide the Middleware Home Location (OMS Home), Agent Base Directory Location and the Host names on which it has to be installed.
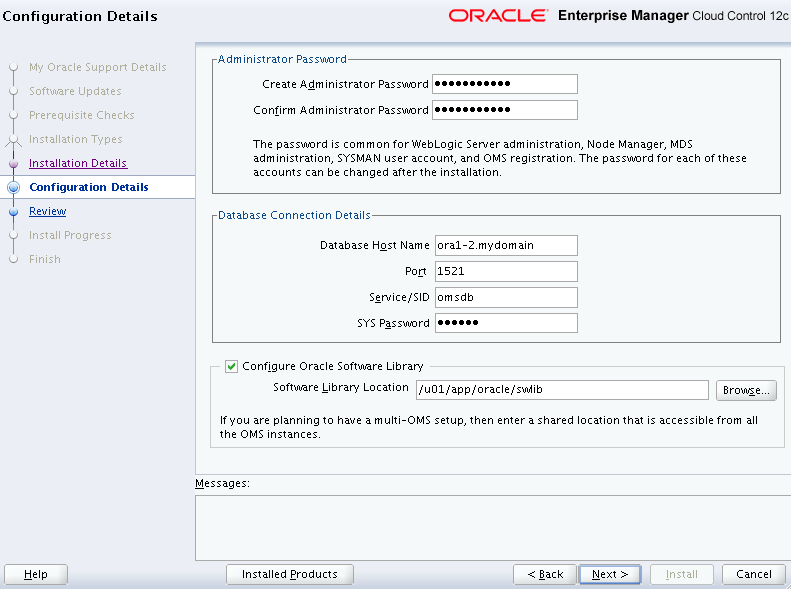
Provide the configuration details such as “Administrative Password”, OMS repository database details such as host name of the OMS repository database, the Port number on which the listener on this host servicing OMS repository database is listening to and the SYS password.
You can opt the “Configure Oracle Software Library” if planning to have a multi-OMS setup, else you may skip this.
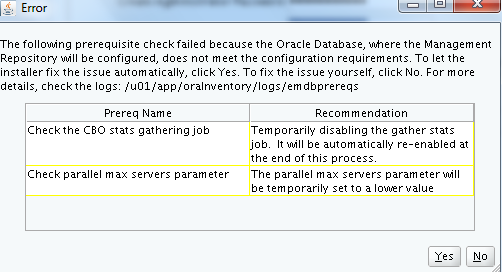
There would be some pre-requisite checks performed on the repository database and would be reported if any violations. If there are any other recommendations with changing of the repository database parameters, then necessary actions need to be taken upon accordingly.
Review the summary.
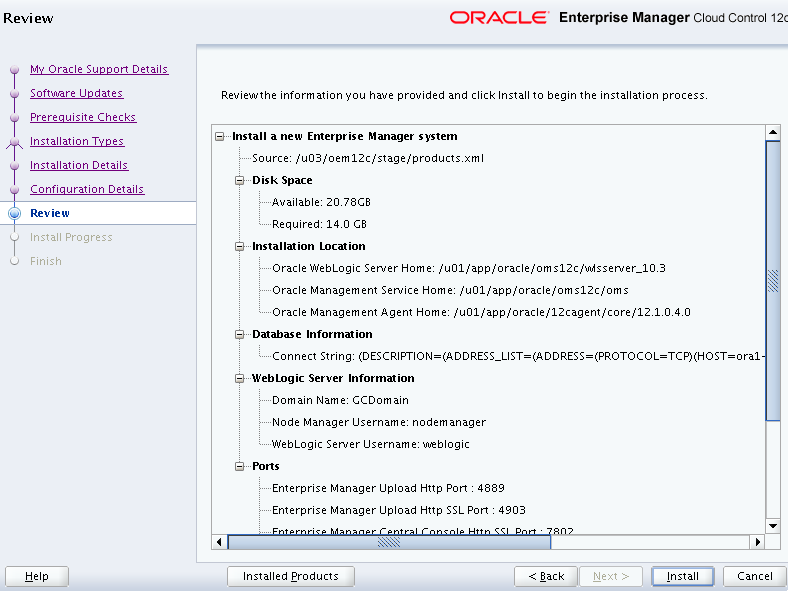
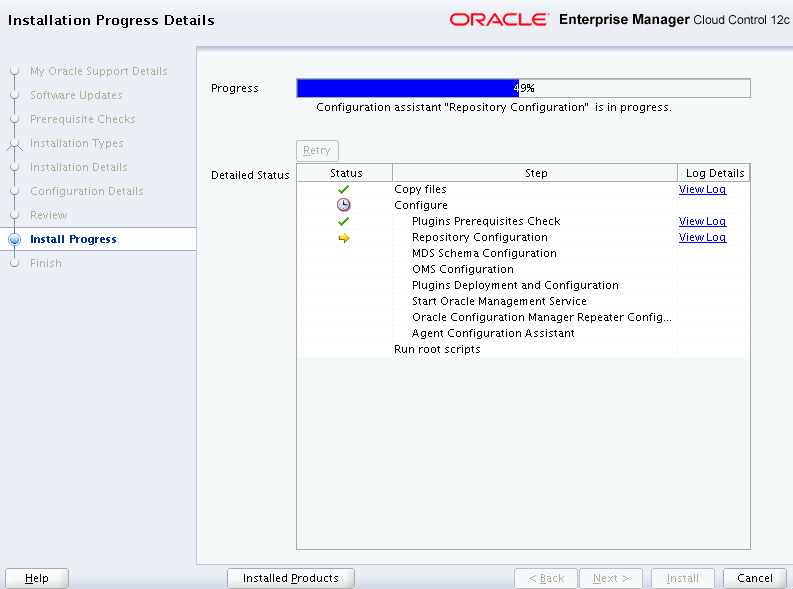
If all perfect, then proceed with the Install option.
Run the script “allroot.sh” as ROOT user when prompted.
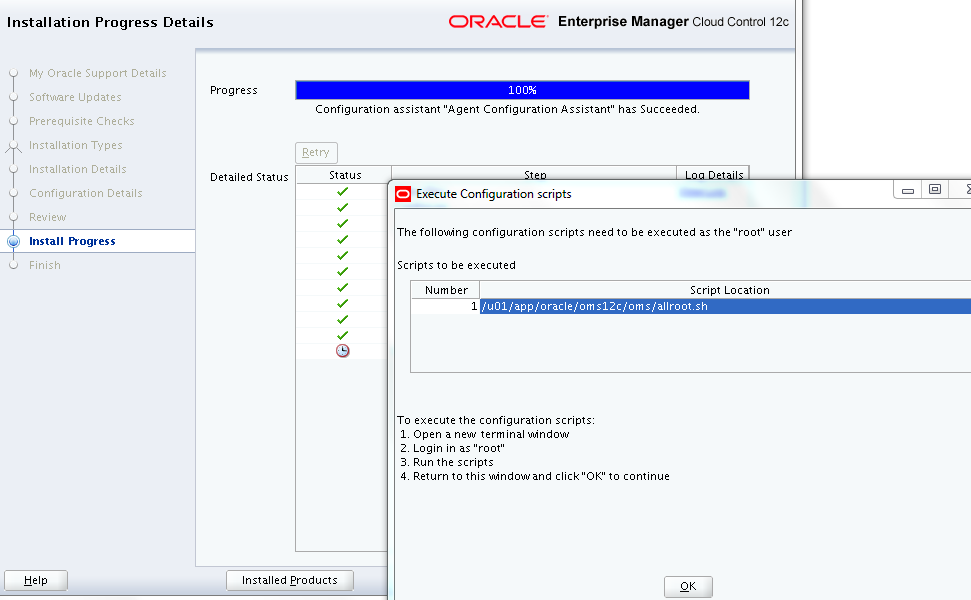
[root@ora1-2 ~]# /u01/app/oracle/oms12c/oms/allroot.sh

Starting to execute allroot.sh .........

Starting to execute /u01/app/oracle/oms12c/oms/root.sh ......
Running Oracle 11g root.sh script...

The following environment variables are set as:
    ORACLE_OWNER= oracle
    ORACLE_HOME=  /u01/app/oracle/oms12c/oms

Enter the full pathname of the local bin directory: [/usr/local/bin]:
The file "dbhome" already exists in /usr/local/bin.  Overwrite it? (y/n)
[n]:
The file "oraenv" already exists in /usr/local/bin.  Overwrite it? (y/n)
[n]:
The file "coraenv" already exists in /usr/local/bin.  Overwrite it? (y/n)
[n]:

Entries will be added to the /etc/oratab file as needed by
Database Configuration Assistant when a database is created
Finished running generic part of root.sh script.
Now product-specific root actions will be performed.
/etc exist

Creating /etc/oragchomelist file...
/u01/app/oracle/oms12c/oms
Finished execution of  /u01/app/oracle/oms12c/oms/root.sh ......

Starting to execute /u01/app/oracle/12cagent/core/12.1.0.4.0/root.sh ......
Finished product-specific root actions.
/etc exist
Finished execution of  /u01/app/oracle/12cagent/core/12.1.0.4.0/root.sh ......
[root@ora1-2 ~]#
Review the final page consisting of the details of accessing the OEM 12c.
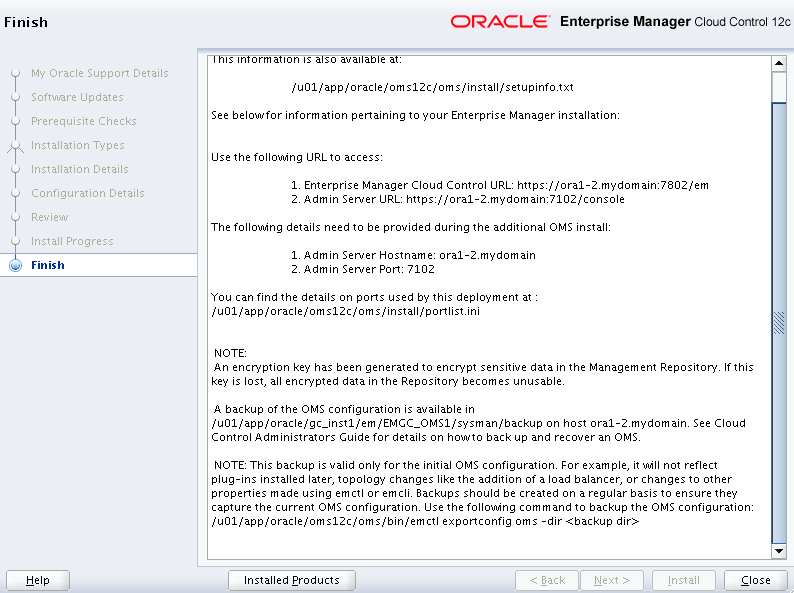
Login to the OEM 12c using the URL mentioned in the above page.
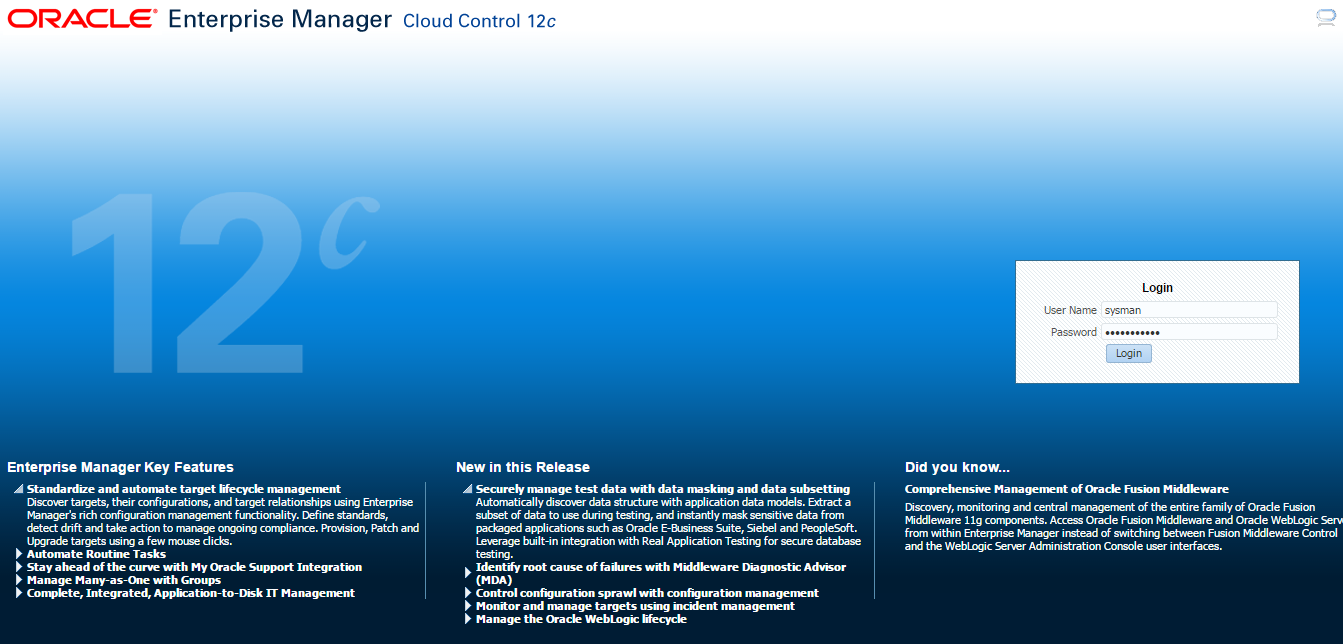
Accept the License Agreement.

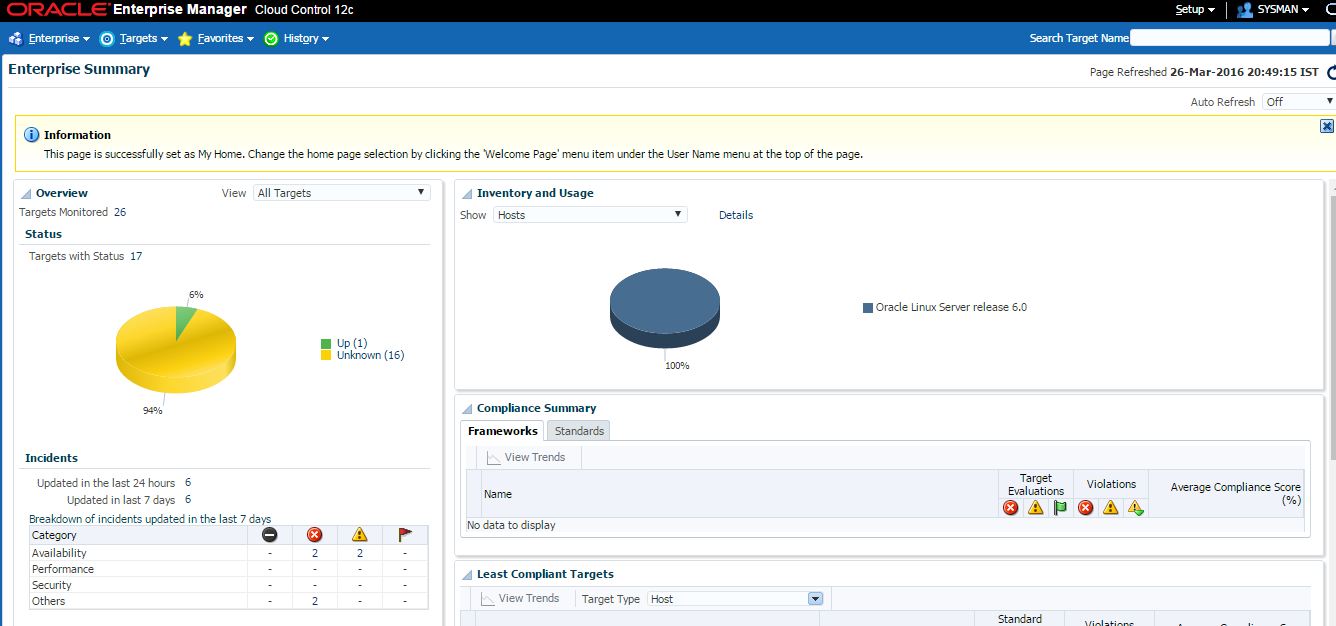
The selected homepage (“Summary” page in my case) will be shown up.
COPYRIGHT
© Shivananda Rao P, 2012 to 2018. Unauthorized use and/or duplication of this material without express and written permission from this blog’s author and/or owner is strictly prohibited. Excerpts and links may be used, provided that full and clear credit is given to Shivananda Rao and http://www.shivanandarao-oracle.com with appropriate and specific direction to the original content.
DISCLAIMER
The views expressed here are my own and do not necessarily reflect the views of any other individual, business entity, or organization. The views expressed by visitors on this blog are theirs solely and may not reflect mine.
This article demonstrates on how to add a node to a RAC cluster in oracle 12c. The environment used here makes use of ASM as a storage area for the OCR/Voting disks and database physical files.
Environment:
OS              : OEL 6
Existing nodes  : 12cnode1, 12cnode2
Node to be added: 12cnode3
Database Name   : srprim
DB Version      : 12.1.0.2
It is assumed that the new node to be added is configured to access the ASM disks that are shared between the existing nodes. OS installation, oracle or grid user creation and network configuraiton steps are not outlined in this document.
Lets move on with the node addition.
Add Public and private interfaces IP (eth0 and eth1)on the new node. I have assigned the IPs as follows
Public Interface    : 192.168.0.120
Private interface   : 192.168.1.109
Virtual IP interface: 192.168.0.121
Update the the above IP addresses of the new node in the “/etc/hosts” file on all the nodes of the cluster.
Sample of “/etc/hosts” file on the new node. The same entries exists on the other nodes of the cluster.
[root@12cnode3 u02]# cat /etc/hosts

127.0.0.1       localhost.localdomain   localhost
::1           	localhost6.localdomain6 localhost6
################ PUBLIC ###################

192.168.0.115   12cnode1.mydomain       12cnode1
192.168.0.116   12cnode2.mydomain       12cnode2
192.168.0.120   12cnode3.mydomain       12cnode3

############### PRIVATE ###################

192.168.1.107   12cnode1-priv.mydomain  12cnode1-priv
192.168.1.108   12cnode2-priv.mydomain  12cnode2-priv
192.168.1.109   12cnode3-priv.mydomain  12cnode3-priv

############### VIP #######################

192.168.0.117   12cnode1-vip.mydomain   12cnode1-vip
192.168.0.118   12cnode2-vip.mydomain   12cnode2-vip
192.168.0.121   12cnode3-vip.mydomain   12cnode3-vip

############## SCAN #######################

192.168.0.119   node12c-scan.mydomain   node12c-scan

#################################################################
As a pre-requisite check, install the “cvuqdisk-1”, “nfs-utils” rpm on the new node.
[root@12cnode3 u02]# rpm -Uivh cvuqdisk-1.0.9-1.rpm
Preparing...                ########################################### [100%]
Using default group oinstall to install package
   1:cvuqdisk               ########################################### [100%]

[root@12cnode3 u02]# rpm -Uivh nfs-utils-1.2.3-15.el6.x86_64.rpm --force --nodeps
warning: nfs-utils-1.2.3-15.el6.x86_64.rpm: Header V4 DSA/SHA1 Signature, key ID 192a7d7d: NOKEY
Preparing...                ########################################### [100%]
   1:nfs-utils              ########################################### [100%]
[root@12cnode3 u02]#
Update the /etc/sysctl.conf file on the new node with the required kernel parameters. The values can be obtained from the existing nodes.
fs.file-max = 6815744
kernel.sem = 250 32000 100 128
kernel.shmmni = 4096
kernel.shmall = 1073741824
kernel.shmmax = 4398046511104
net.core.rmem_default = 262144
net.core.rmem_max = 4194304
net.core.wmem_default = 262144
net.core.wmem_max = 1048576
fs.aio-max-nr = 1048576
net.ipv4.ip_local_port_range = 9000 65500
Update /etc/security/limits.conf file on the new node. The values can be obtained from the existing nodes.
oracle   soft   nofile    1024
oracle   hard   nofile    65536
oracle   soft   nproc    2047
oracle   hard   nproc    16384
oracle   soft   stack    10240
oracle   hard   stack    32768

oracle soft memlock unlimited
oracle hard memlock unlimited
Disable the firewall between the nodes.
[root@12cnode3 u02]# service iptables status
Table: filter
Chain INPUT (policy ACCEPT)
num  target     prot opt source               destination
1    ACCEPT     all  --  0.0.0.0/0            0.0.0.0/0           state RELATED,ESTABLISHED
2    ACCEPT     icmp --  0.0.0.0/0            0.0.0.0/0
3    ACCEPT     all  --  0.0.0.0/0            0.0.0.0/0
4    ACCEPT     tcp  --  0.0.0.0/0            0.0.0.0/0           state NEW tcp dpt:22
5    REJECT     all  --  0.0.0.0/0            0.0.0.0/0           reject-with icmp-host-prohibited

Chain FORWARD (policy ACCEPT)
num  target     prot opt source               destination
1    REJECT     all  --  0.0.0.0/0            0.0.0.0/0           reject-with icmp-host-prohibited

Chain OUTPUT (policy ACCEPT)
num  target     prot opt source               destination
[root@12cnode3 u02]# service iptables stop
iptables: Flushing firewall rules:                         [  OK  ]
iptables: Setting chains to policy ACCEPT: filter          [  OK  ]
iptables: Unloading modules:                               [  OK  ]
[root@12cnode3 u02]#
[root@12cnode3 u02]# chkconfig iptables off
[root@12cnode3 u02]# service iptables status
iptables: Firewall is not running.
Check if avahi-daemon is running and if so, then stop it.
[root@12cnode3 u02]# chkconfig --list | grep avahi
avahi-daemon    0:off   1:off   2:off   3:on    4:on    5:on    6:off
[root@12cnode3 u02]#
[root@12cnode3 u02]# service avahi-daemon stop
Shutting down Avahi daemon:                                [  OK  ]
[root@12cnode3 u02]# chkconfig avahi-daemon off
[root@12cnode3 u02]# chkconfig --list | grep avahi
avahi-daemon    0:off   1:off   2:off   3:off   4:off   5:off   6:off
Set parameter NOZEROCONF to YES in the /etc/sysconfig/network file.
[root@12cnode3 u02]# cat /etc/sysconfig/network
NETWORKING=yes
HOSTNAME=12cnode3.mydomain
NOZEROCONF=yes
I have my ASM disks configured using UDEV. Configure UDEV rules as defined on the other nodes of the cluster.
This step can be skipped if UDEV is not being used to configure the disks.
[root@12cnode3 dev]# cat /etc/udev/rules.d/99-oracle-asmdevices.rules
KERNEL =="sd?1", BUS=="scsi", PROGRAM=="/sbin/scsi_id -g -u -d /dev/$parent", RESULT=="1ATA_VBOX_HARDDISK_VB1cd37fc0-cc66bbc6", NAME="DSK1", OWNER="oracle", GROUP="oinstall", MODE="0660"
KERNEL =="sd?1", BUS=="scsi", PROGRAM=="/sbin/scsi_id -g -u -d /dev/$parent", RESULT=="1ATA_VBOX_HARDDISK_VBc62708e8-ee54011f", NAME="DSK2", OWNER="oracle", GROUP="oinstall", MODE="0660"
KERNEL =="sd?1", BUS=="scsi", PROGRAM=="/sbin/scsi_id -g -u -d /dev/$parent", RESULT=="1ATA_VBOX_HARDDISK_VB668ac5ba-619c34bb", NAME="DSK3", OWNER="oracle", GROUP="oinstall", MODE="0660"
KERNEL =="sd?1", BUS=="scsi", PROGRAM=="/sbin/scsi_id -g -u -d /dev/$parent", RESULT=="1ATA_VBOX_HARDDISK_VB1dfcc4bc-fc73fb86", NAME="DSK4", OWNER="oracle", GROUP="oinstall", MODE="0660"
Create passwordless ssh between the existing nodes of the cluster and with the new node. This can be done by running the “sshUserSetup.sh” script available with the GI software.
[root@12cnode3 ~]# cd /u03
[root@12cnode3 u03]# ls -lrt
total 52
drwxrwxrwx. 2 oracle oinstall 16384 Mar  7 19:26 lost+found
-rwxr-xr-x. 1 oracle oinstall 32334 Mar 16 20:10 sshUserSetup.sh
[root@12cnode3 u03]#
[root@12cnode3 u03]#
[root@12cnode3 u03]#
[root@12cnode3 u03]# ./sshUserSetup.sh -user oracle -hosts "12cnode1 12cnode2 12cnode3" -noPromptPassphrase -confirm -advanced
The output of this script is also logged into /tmp/sshUserSetup_2016-03-16-20-13-42.log
Hosts are 12cnode1 12cnode2 12cnode3
user is oracle
Platform:- Linux
Checking if the remote hosts are reachable
PING 12cnode1.mydomain (192.168.0.115) 56(84) bytes of data.
64 bytes from 12cnode1.mydomain (192.168.0.115): icmp_seq=1 ttl=64 time=1.33 ms
64 bytes from 12cnode1.mydomain (192.168.0.115): icmp_seq=2 ttl=64 time=0.338 ms
64 bytes from 12cnode1.mydomain (192.168.0.115): icmp_seq=3 ttl=64 time=0.237 ms
64 bytes from 12cnode1.mydomain (192.168.0.115): icmp_seq=4 ttl=64 time=0.360 ms
64 bytes from 12cnode1.mydomain (192.168.0.115): icmp_seq=5 ttl=64 time=0.243 ms

--- 12cnode1.mydomain ping statistics ---
5 packets transmitted, 5 received, 0% packet loss, time 4002ms
rtt min/avg/max/mdev = 0.237/0.502/1.332/0.417 ms
PING 12cnode2.mydomain (192.168.0.116) 56(84) bytes of data.
64 bytes from 12cnode2.mydomain (192.168.0.116): icmp_seq=1 ttl=64 time=0.787 ms
64 bytes from 12cnode2.mydomain (192.168.0.116): icmp_seq=2 ttl=64 time=0.250 ms
64 bytes from 12cnode2.mydomain (192.168.0.116): icmp_seq=3 ttl=64 time=0.267 ms
64 bytes from 12cnode2.mydomain (192.168.0.116): icmp_seq=4 ttl=64 time=0.260 ms
64 bytes from 12cnode2.mydomain (192.168.0.116): icmp_seq=5 ttl=64 time=0.229 ms

--- 12cnode2.mydomain ping statistics ---
5 packets transmitted, 5 received, 0% packet loss, time 4001ms
rtt min/avg/max/mdev = 0.229/0.358/0.787/0.215 ms
PING 12cnode3.mydomain (192.168.56.113) 56(84) bytes of data.
64 bytes from 12cnode3.mydomain (192.168.56.113): icmp_seq=1 ttl=64 time=0.010 ms
64 bytes from 12cnode3.mydomain (192.168.56.113): icmp_seq=2 ttl=64 time=0.018 ms
64 bytes from 12cnode3.mydomain (192.168.56.113): icmp_seq=3 ttl=64 time=0.068 ms
64 bytes from 12cnode3.mydomain (192.168.56.113): icmp_seq=4 ttl=64 time=0.058 ms
64 bytes from 12cnode3.mydomain (192.168.56.113): icmp_seq=5 ttl=64 time=0.069 ms

--- 12cnode3.mydomain ping statistics ---
5 packets transmitted, 5 received, 0% packet loss, time 3999ms
rtt min/avg/max/mdev = 0.010/0.044/0.069/0.026 ms
Remote host reachability check succeeded.
The following hosts are reachable: 12cnode1 12cnode2 12cnode3.
The following hosts are not reachable: .
All hosts are reachable. Proceeding further...
firsthost 12cnode1
numhosts 3
The script will setup SSH connectivity from the host 12cnode3.mydomain to all
the remote hosts. After the script is executed, the user can use SSH to run
commands on the remote hosts or copy files between this host 12cnode3.mydomain
and the remote hosts without being prompted for passwords or confirmations.

NOTE 1:
As part of the setup procedure, this script will use ssh and scp to copy
files between the local host and the remote hosts. Since the script does not
store passwords, you may be prompted for the passwords during the execution of
the script whenever ssh or scp is invoked.

NOTE 2:
AS PER SSH REQUIREMENTS, THIS SCRIPT WILL SECURE THE USER HOME DIRECTORY
AND THE .ssh DIRECTORY BY REVOKING GROUP AND WORLD WRITE PRIVILEDGES TO THESE
directories.

Do you want to continue and let the script make the above mentioned changes (yes/no)?
Confirmation provided on the command line

The user chose yes
User chose to skip passphrase related questions.
Creating .ssh directory on local host, if not present already
Creating authorized_keys file on local host
Changing permissions on authorized_keys to 644 on local host
Creating known_hosts file on local host
Changing permissions on known_hosts to 644 on local host
Creating config file on local host
If a config file exists already at /root/.ssh/config, it would be backed up to /root/.ssh/config.backup.
Removing old private/public keys on local host
Running SSH keygen on local host with empty passphrase
Generating public/private rsa key pair.
Your identification has been saved in /root/.ssh/id_rsa.
Your public key has been saved in /root/.ssh/id_rsa.pub.
The key fingerprint is:
a4:83:da:75:8e:99:a2:57:63:a7:2b:b0:e2:df:4f:09 root@12cnode3.mydomain
The key's randomart image is:
+--[ RSA 1024]----+
|                 |
|                 |
|        .        |
|     . o         |
|    .E+ S        |
|  .o .=Bo        |
|  .ooo+*.        |
|. ..+.o          |
|.ooo ooo         |
+-----------------+
Creating .ssh directory and setting permissions on remote host 12cnode1
THE SCRIPT WOULD ALSO BE REVOKING WRITE PERMISSIONS FOR group AND others ON THE HOME DIRECTORY FOR oracle. THIS IS AN SSH REQUIREMENT.
The script would create ~oracle/.ssh/config file on remote host 12cnode1. If a config file exists already at ~oracle/.ssh/config, it would be backed up to ~oracle/.ssh/config.backup.
The user may be prompted for a password here since the script would be running SSH on host 12cnode1.
Warning: Permanently added '12cnode1,192.168.0.115' (RSA) to the list of known hosts.
oracle@12cnode1's password:
Done with creating .ssh directory and setting permissions on remote host 12cnode1.
Creating .ssh directory and setting permissions on remote host 12cnode2
THE SCRIPT WOULD ALSO BE REVOKING WRITE PERMISSIONS FOR group AND others ON THE HOME DIRECTORY FOR oracle. THIS IS AN SSH REQUIREMENT.
The script would create ~oracle/.ssh/config file on remote host 12cnode2. If a config file exists already at ~oracle/.ssh/config, it would be backed up to ~oracle/.ssh/config.backup.
The user may be prompted for a password here since the script would be running SSH on host 12cnode2.
Warning: Permanently added '12cnode2,192.168.0.116' (RSA) to the list of known hosts.
oracle@12cnode2's password:
Done with creating .ssh directory and setting permissions on remote host 12cnode2.
Creating .ssh directory and setting permissions on remote host 12cnode3
THE SCRIPT WOULD ALSO BE REVOKING WRITE PERMISSIONS FOR group AND others ON THE HOME DIRECTORY FOR oracle. THIS IS AN SSH REQUIREMENT.
The script would create ~oracle/.ssh/config file on remote host 12cnode3. If a config file exists already at ~oracle/.ssh/config, it would be backed up to ~oracle/.ssh/config.backup.
The user may be prompted for a password here since the script would be running SSH on host 12cnode3.
Warning: Permanently added '12cnode3' (RSA) to the list of known hosts.
oracle@12cnode3's password:
Done with creating .ssh directory and setting permissions on remote host 12cnode3.
Copying local host public key to the remote host 12cnode1
The user may be prompted for a password or passphrase here since the script would be using SCP for host 12cnode1.
oracle@12cnode1's password:
Permission denied, please try again.
oracle@12cnode1's password:
Done copying local host public key to the remote host 12cnode1
Copying local host public key to the remote host 12cnode2
The user may be prompted for a password or passphrase here since the script would be using SCP for host 12cnode2.
oracle@12cnode2's password:
Done copying local host public key to the remote host 12cnode2
Copying local host public key to the remote host 12cnode3
The user may be prompted for a password or passphrase here since the script would be using SCP for host 12cnode3.
oracle@12cnode3's password:
Done copying local host public key to the remote host 12cnode3
Creating keys on remote host 12cnode1 if they do not exist already. This is required to setup SSH on host 12cnode1.

Creating keys on remote host 12cnode2 if they do not exist already. This is required to setup SSH on host 12cnode2.

Creating keys on remote host 12cnode3 if they do not exist already. This is required to setup SSH on host 12cnode3.
Generating public/private rsa key pair.
Your identification has been saved in .ssh/id_rsa.
Your public key has been saved in .ssh/id_rsa.pub.
The key fingerprint is:
de:87:40:a9:83:7d:92:22:7e:01:cf:95:4d:25:7b:52 oracle@12cnode3.mydomain
The key's randomart image is:
+--[ RSA 1024]----+
|        o.E      |
|       + =       |
|  .   o * .      |
|   + + + o       |
|  . * * S        |
| . . o = o .     |
|  . .   . o .    |
|   .       .     |
|                 |
+-----------------+
Updating authorized_keys file on remote host 12cnode1
Updating known_hosts file on remote host 12cnode1
Updating authorized_keys file on remote host 12cnode2
Updating known_hosts file on remote host 12cnode2
Updating authorized_keys file on remote host 12cnode3
Updating known_hosts file on remote host 12cnode3
SSH setup is complete.

------------------------------------------------------------------------
Verifying SSH setup
===================
The script will now run the date command on the remote nodes using ssh
to verify if ssh is setup correctly. IF THE SETUP IS CORRECTLY SETUP,
THERE SHOULD BE NO OUTPUT OTHER THAN THE DATE AND SSH SHOULD NOT ASK FOR
PASSWORDS. If you see any output other than date or are prompted for the
password, ssh is not setup correctly and you will need to resolve the
issue and set up ssh again.
The possible causes for failure could be:
1. The server settings in /etc/ssh/sshd_config file do not allow ssh
for user oracle.
2. The server may have disabled public key based authentication.
3. The client public key on the server may be outdated.
4. ~oracle or ~oracle/.ssh on the remote host may not be owned by oracle.
5. User may not have passed -shared option for shared remote users or
may be passing the -shared option for non-shared remote users.
6. If there is output in addition to the date, but no password is asked,
it may be a security alert shown as part of company policy. Append the
additional text to the <OMS HOME>/sysman/prov/resources/ignoreMessages.txt file.
------------------------------------------------------------------------
--12cnode1:--
Running /usr/bin/ssh -x -l oracle 12cnode1 date to verify SSH connectivity has been setup from local host to 12cnode1.
IF YOU SEE ANY OTHER OUTPUT BESIDES THE OUTPUT OF THE DATE COMMAND OR IF YOU ARE PROMPTED FOR A PASSWORD HERE, IT MEANS SSH SETUP HAS NOT BEEN SUCCESSFUL. Please note that being prompted for a passphrase may be OK but being prompted for a password is ERROR.
Wed Mar 16 20:14:26 IST 2016
------------------------------------------------------------------------
--12cnode2:--
Running /usr/bin/ssh -x -l oracle 12cnode2 date to verify SSH connectivity has been setup from local host to 12cnode2.
IF YOU SEE ANY OTHER OUTPUT BESIDES THE OUTPUT OF THE DATE COMMAND OR IF YOU ARE PROMPTED FOR A PASSWORD HERE, IT MEANS SSH SETUP HAS NOT BEEN SUCCESSFUL. Please note that being prompted for a passphrase may be OK but being prompted for a password is ERROR.
Wed Mar 16 20:14:26 IST 2016
------------------------------------------------------------------------
--12cnode3:--
Running /usr/bin/ssh -x -l oracle 12cnode3 date to verify SSH connectivity has been setup from local host to 12cnode3.
IF YOU SEE ANY OTHER OUTPUT BESIDES THE OUTPUT OF THE DATE COMMAND OR IF YOU ARE PROMPTED FOR A PASSWORD HERE, IT MEANS SSH SETUP HAS NOT BEEN SUCCESSFUL. Please note that being prompted for a passphrase may be OK but being prompted for a password is ERROR.
Wed Mar 16 20:14:27 IST 2016
------------------------------------------------------------------------
------------------------------------------------------------------------
Verifying SSH connectivity has been setup from 12cnode1 to 12cnode1
IF YOU SEE ANY OTHER OUTPUT BESIDES THE OUTPUT OF THE DATE COMMAND OR IF YOU ARE PROMPTED FOR A PASSWORD HERE, IT MEANS SSH SETUP HAS NOT BEEN SUCCESSFUL.
Wed Mar 16 20:14:28 IST 2016
------------------------------------------------------------------------
------------------------------------------------------------------------
Verifying SSH connectivity has been setup from 12cnode1 to 12cnode2
IF YOU SEE ANY OTHER OUTPUT BESIDES THE OUTPUT OF THE DATE COMMAND OR IF YOU ARE PROMPTED FOR A PASSWORD HERE, IT MEANS SSH SETUP HAS NOT BEEN SUCCESSFUL.
Wed Mar 16 20:14:27 IST 2016
------------------------------------------------------------------------
------------------------------------------------------------------------
Verifying SSH connectivity has been setup from 12cnode1 to 12cnode3
IF YOU SEE ANY OTHER OUTPUT BESIDES THE OUTPUT OF THE DATE COMMAND OR IF YOU ARE PROMPTED FOR A PASSWORD HERE, IT MEANS SSH SETUP HAS NOT BEEN SUCCESSFUL.
Warning: Permanently added the RSA host key for IP address '192.168.0.120' to the list of known hosts.
Wed Mar 16 20:14:28 IST 2016
------------------------------------------------------------------------
-Verification from complete-
SSH verification complete.
[root@12cnode3 u03]#
Though the script says that verification of passwordless ssh is verified, I would like to check this out with a small test.
[oracle@12cnode1 ~]$ ssh 12cnode2 date
Wed Mar 16 20:15:53 IST 2016
[oracle@12cnode1 ~]$
[oracle@12cnode1 ~]$
[oracle@12cnode1 ~]$ ssh 12cnode3 date
Wed Mar 16 20:15:59 IST 2016
[oracle@12cnode1 ~]$
[oracle@12cnode1 ~]$
[oracle@12cnode1 ~]$ ssh 12cnode1 date
Wed Mar 16 20:16:05 IST 2016
[oracle@12cnode1 ~]$
[oracle@12cnode2 ~]$ ssh 12cnode1 date
Wed Mar 16 20:16:15 IST 2016
[oracle@12cnode2 ~]$
[oracle@12cnode2 ~]$
[oracle@12cnode2 ~]$ ssh 12cnode3 date
Warning: Permanently added the RSA host key for IP address '192.168.0.120' to the list of known hosts.
Wed Mar 16 20:16:19 IST 2016
[oracle@12cnode2 ~]$
[oracle@12cnode2 ~]$
[oracle@12cnode2 ~]$ ssh 12cnode2 date
Wed Mar 16 20:16:25 IST 2016
[oracle@12cnode3 dev]$ ssh 12cnode1 date
Wed Mar 16 20:16:37 IST 2016
[oracle@12cnode3 dev]$
[oracle@12cnode3 dev]$ ssh 12cnode2 date
Wed Mar 16 20:16:42 IST 2016
[oracle@12cnode3 dev]$
[oracle@12cnode3 dev]$
[oracle@12cnode3 dev]$ ssh 12cnode3 date
Wed Mar 16 20:16:48 IST 2016
Run the CLUVFY utility with the options “pre nodeadd” to check the pre-requisites on the new node. This needs to be run from the node which is already part of the cluster.
Here, it’s being run from node “12cnode1”.
[oracle@12cnode1 bin]$ cd /u01/app/12.1.0.2/grid/bin
[oracle@12cnode1 bin]$ ./cluvfy stage -pre nodeadd -n 12cnode3 -verbose > /u02/12cnode3prenodeadd.txt
[oracle@12cnode1 bin]$
Let me check what all conditions are not met.
[oracle@12cnode1 bin]$ grep -i "failed" /u02/12cnode3prenodeadd.txt
  12cnode3      2.6.32-71.el6.x86_64      2.6.39                    failed
  12cnode1      2.6.32-71.el6.x86_64      2.6.39                    failed
Result: Kernel version check failed
Result: Clock synchronization check using Network Time Protocol(NTP) failed
  12cnode1                              failed
  12cnode3                              failed
Check for integrity of file "/etc/resolv.conf" failed
The above 2 conditions have failed. We can ignore the Kernel version if it’s greater than or equal to 2.6.32. The integrity check of file “/etc/resolv.conf” for DNS has failed and I would ignore this as I’m not using any DNS.
Let’s move on with the node addition. In 12c, the location of “addnode.sh” is quite different than that of in 11gR2. In 11gR2, it was located under GRID_HOME/oui/bin, but in 12c, it’s located under “GRID_HOME/addnode”. On the node which is already a part of the cluster, run the “addnode.sh” script. Here, it’s been run from 12cnode1 in silent mode (and not through GUI). Specify the new node name and new node VIP name. Since the above mentioned 2 conditions have failed, I’m running “addnode.sh” with the “ignorePrereq” option.
[oracle@12cnode1 ~]$ cd /u01/app/12.1.0.2/grid/addnode/
[oracle@12cnode1 addnode]$ ./addnode.sh "CLUSTER_NEW_NODES={12cnode3}" "CLUSTER_NEW_VIRTUAL_HOSTNAMES={12cnode3-vip}" -silent -ignorePrereq
Starting Oracle Universal Installer...

Checking Temp space: must be greater than 120 MB.   Actual 44743 MB    Passed
Checking swap space: must be greater than 150 MB.   Actual 8138 MB    Passed

Prepare Configuration in progress.

Prepare Configuration successful.
..................................................   8% Done.
You can find the log of this install session at:
 /u01/app/oraInventory/logs/addNodeActions2016-03-23_05-18-17PM.log

Instantiate files in progress.

Instantiate files successful.
..................................................   14% Done.

Copying files to node in progress.

Copying files to node successful.
..................................................   73% Done.

Saving cluster inventory in progress.
..................................................   80% Done.

Saving cluster inventory successful.
The Cluster Node Addition of /u01/app/12.1.0.2/grid was successful.
Please check '/tmp/silentInstall.log' for more details.

Setup Oracle Base in progress.

Setup Oracle Base successful.
..................................................   88% Done.

As a root user, execute the following script(s):
        1. /u01/app/oraInventory/orainstRoot.sh
        2. /u01/app/12.1.0.2/grid/root.sh

Execute /u01/app/oraInventory/orainstRoot.sh on the following nodes:
[12cnode3]
Execute /u01/app/12.1.0.2/grid/root.sh on the following nodes:
[12cnode3]

The scripts can be executed in parallel on all the nodes.

..........
Update Inventory in progress.
..................................................   100% Done.

Update Inventory successful.
Successfully Setup Software.
[oracle@12cnode1 addnode]$
Run as ROOT user the scripts “/u01/app/oraInventory/orainstRoot.sh” and “/u01/app/12.1.0.2/grid/root.sh” on the new node 12cnode3.
Here is the execution of the script “orainstRoot.sh”
[root@12cnode3 grid]# /u01/app/oraInventory/orainstRoot.sh
Changing permissions of /u01/app/oraInventory.
Adding read,write permissions for group.
Removing read,write,execute permissions for world.

Changing groupname of /u01/app/oraInventory to oinstall.
The execution of the script is complete.
Execution of “root.sh” is as follows:
[root@12cnode3 grid]# /u01/app/12.1.0.2/grid/root.sh
Check /u01/app/12.1.0.2/grid/install/root_12cnode3.mydomain_2016-03-23_18-49-49.log for the output of root script
[root@12cnode3 grid]#
[root@12cnode3 ~]# cat /u01/app/12.1.0.2/grid/install/root_12cnode3.mydomain_2016-03-23_18-49-49.log
Performing root user operation.

The following environment variables are set as:
    ORACLE_OWNER= oracle
    ORACLE_HOME=  /u01/app/12.1.0.2/grid
   Copying dbhome to /usr/local/bin ...
   Copying oraenv to /usr/local/bin ...
   Copying coraenv to /usr/local/bin ...

Entries will be added to the /etc/oratab file as needed by
Database Configuration Assistant when a database is created
Finished running generic part of root script.
Now product-specific root actions will be performed.
Relinking oracle with rac_on option
Using configuration parameter file: /u01/app/12.1.0.2/grid/crs/install/crsconfig_params
2016/03/23 18:49:51 CLSRSC-4001: Installing Oracle Trace File Analyzer (TFA) Collector.

2016/03/23 18:49:52 CLSRSC-4002: Successfully installed Oracle Trace File Analyzer (TFA) Collector.

2016/03/23 18:49:56 CLSRSC-363: User ignored prerequisites during installation

OLR initialization - successful
2016/03/23 18:52:28 CLSRSC-330: Adding Clusterware entries to file 'oracle-ohasd.conf'

CRS-4133: Oracle High Availability Services has been stopped.
CRS-4123: Oracle High Availability Services has been started.
CRS-4133: Oracle High Availability Services has been stopped.
CRS-4123: Oracle High Availability Services has been started.
CRS-2791: Starting shutdown of Oracle High Availability Services-managed resources on '12cnode3'
CRS-2673: Attempting to stop 'ora.drivers.acfs' on '12cnode3'
CRS-2677: Stop of 'ora.drivers.acfs' on '12cnode3' succeeded
CRS-2793: Shutdown of Oracle High Availability Services-managed resources on '12cnode3' has completed
CRS-4133: Oracle High Availability Services has been stopped.
CRS-4123: Starting Oracle High Availability Services-managed resources
CRS-2672: Attempting to start 'ora.mdnsd' on '12cnode3'
CRS-2672: Attempting to start 'ora.evmd' on '12cnode3'
CRS-2676: Start of 'ora.mdnsd' on '12cnode3' succeeded
CRS-2676: Start of 'ora.evmd' on '12cnode3' succeeded
CRS-2672: Attempting to start 'ora.gpnpd' on '12cnode3'
CRS-2676: Start of 'ora.gpnpd' on '12cnode3' succeeded
CRS-2672: Attempting to start 'ora.gipcd' on '12cnode3'
CRS-2676: Start of 'ora.gipcd' on '12cnode3' succeeded
CRS-2672: Attempting to start 'ora.cssdmonitor' on '12cnode3'
CRS-2676: Start of 'ora.cssdmonitor' on '12cnode3' succeeded
CRS-2672: Attempting to start 'ora.cssd' on '12cnode3'
CRS-2672: Attempting to start 'ora.diskmon' on '12cnode3'
CRS-2676: Start of 'ora.diskmon' on '12cnode3' succeeded
CRS-2676: Start of 'ora.cssd' on '12cnode3' succeeded
CRS-2672: Attempting to start 'ora.cluster_interconnect.haip' on '12cnode3'
CRS-2672: Attempting to start 'ora.ctssd' on '12cnode3'
CRS-2676: Start of 'ora.ctssd' on '12cnode3' succeeded
CRS-2676: Start of 'ora.cluster_interconnect.haip' on '12cnode3' succeeded
CRS-2672: Attempting to start 'ora.asm' on '12cnode3'
CRS-2676: Start of 'ora.asm' on '12cnode3' succeeded
CRS-2672: Attempting to start 'ora.storage' on '12cnode3'
CRS-2676: Start of 'ora.storage' on '12cnode3' succeeded
CRS-2672: Attempting to start 'ora.crf' on '12cnode3'
CRS-2676: Start of 'ora.crf' on '12cnode3' succeeded
CRS-2672: Attempting to start 'ora.crsd' on '12cnode3'
CRS-2676: Start of 'ora.crsd' on '12cnode3' succeeded
CRS-6017: Processing resource auto-start for servers: 12cnode3
CRS-2672: Attempting to start 'ora.net1.network' on '12cnode3'
CRS-2672: Attempting to start 'ora.FRA.dg' on '12cnode3'
CRS-2676: Start of 'ora.net1.network' on '12cnode3' succeeded
CRS-2672: Attempting to start 'ora.ons' on '12cnode3'
CRS-2676: Start of 'ora.ons' on '12cnode3' succeeded
CRS-2676: Start of 'ora.FRA.dg' on '12cnode3' succeeded
CRS-6016: Resource auto-start has completed for server 12cnode3
CRS-6024: Completed start of Oracle Cluster Ready Services-managed resources
CRS-4123: Oracle High Availability Services has been started.
2016/03/23 19:01:12 CLSRSC-343: Successfully started Oracle Clusterware stack

clscfg: EXISTING configuration version 5 detected.
clscfg: version 5 is 12c Release 1.
Successfully accumulated necessary OCR keys.
Creating OCR keys for user 'root', privgrp 'root'..
Operation successful.
2016/03/23 19:02:21 CLSRSC-325: Configure Oracle Grid Infrastructure for a Cluster ... succeeded
Let’s check the CRS status and the resources on the new node.
[root@12cnode3 ~]# cd /u01/app/12.1.0.2/grid/bin/
[root@12cnode3 bin]# ./crsctl check crs
CRS-4638: Oracle High Availability Services is online
CRS-4537: Cluster Ready Services is online
CRS-4529: Cluster Synchronization Services is online
CRS-4533: Event Manager is online
[root@12cnode3 bin]# ./crsctl stat res -t
--------------------------------------------------------------------------------
Name           Target  State        Server                   State details
--------------------------------------------------------------------------------
Local Resources
--------------------------------------------------------------------------------
ora.DATA.dg
               ONLINE  ONLINE       12cnode1                 STABLE
               ONLINE  ONLINE       12cnode2                 STABLE
               ONLINE  ONLINE       12cnode3                 STABLE
ora.FRA.dg
               ONLINE  ONLINE       12cnode1                 STABLE
               ONLINE  ONLINE       12cnode2                 STABLE
               ONLINE  ONLINE       12cnode3                 STABLE
ora.LISTENER.lsnr
               ONLINE  ONLINE       12cnode1                 STABLE
               ONLINE  ONLINE       12cnode2                 STABLE
               ONLINE  ONLINE       12cnode3                 STABLE
ora.asm
               ONLINE  ONLINE       12cnode1                 Started,STABLE
               ONLINE  ONLINE       12cnode2                 Started,STABLE
               ONLINE  ONLINE       12cnode3                 Started,STABLE
ora.net1.network
               ONLINE  ONLINE       12cnode1                 STABLE
               ONLINE  ONLINE       12cnode2                 STABLE
               ONLINE  ONLINE       12cnode3                 STABLE
ora.ons
               ONLINE  ONLINE       12cnode1                 STABLE
               ONLINE  ONLINE       12cnode2                 STABLE
               ONLINE  ONLINE       12cnode3                 STABLE
--------------------------------------------------------------------------------
Cluster Resources
--------------------------------------------------------------------------------
ora.12cnode1.vip
      1        ONLINE  ONLINE       12cnode1                 STABLE
ora.12cnode2.vip
      1        ONLINE  ONLINE       12cnode2                 STABLE
ora.12cnode3.vip
      1        ONLINE  ONLINE       12cnode3                 STABLE
ora.LISTENER_SCAN1.lsnr
      1        ONLINE  ONLINE       12cnode2                 STABLE
ora.MGMTLSNR
      1        ONLINE  ONLINE       12cnode1                 169.254.3.189 192.16
                                                             8.1.107,STABLE
ora.cvu
      1        ONLINE  ONLINE       12cnode1                 STABLE
ora.mgmtdb
      1        ONLINE  ONLINE       12cnode1                 Open,STABLE
ora.oc4j
      1        ONLINE  ONLINE       12cnode2                 STABLE
ora.scan1.vip
      1        ONLINE  ONLINE       12cnode2                 STABLE
ora.srprim.db
      1        ONLINE  ONLINE       12cnode1                 Open,STABLE
      2        ONLINE  ONLINE       12cnode2                 Open,STABLE
--------------------------------------------------------------------------------
[root@12cnode3 bin]#
Cluster status on all the nodes:
[oracle@12cnode1 ~]$ cd /u01/app/12.1.0.2/grid/bin/
[oracle@12cnode1 bin]$ ./crsctl check cluster -all
**************************************************************
12cnode1:
CRS-4537: Cluster Ready Services is online
CRS-4529: Cluster Synchronization Services is online
CRS-4533: Event Manager is online
**************************************************************
12cnode2:
CRS-4537: Cluster Ready Services is online
CRS-4529: Cluster Synchronization Services is online
CRS-4533: Event Manager is online
**************************************************************
12cnode3:
CRS-4537: Cluster Ready Services is online
CRS-4529: Cluster Synchronization Services is online
CRS-4533: Event Manager is online
**************************************************************
[oracle@12cnode1 bin]$
Now it’s time to add the RDBMS home on to the new node. This is done in the same way as above by running the “addNode.sh” script from the RDBMS home on the existing node and not from the new node. (Of-course, it cannot be run on the new node as the RDBMS Home is still not available in it 🙂 )
The script is located at $ORACLE_HOME/addnode and here it’s being run from 12cnode1. Here too, I’m ignoring the pre-requisite as the pre-requisite for “resolve.conf” is not met.
[oracle@12cnode1 ~]$ cd /u01/app/oracle/product/12.1.0.2/db_1/addnode/
[oracle@12cnode1 addnode]$ ./addnode.sh "CLUSTER_NEW_NODES={12cnode3}" -silent -ignorePrereq
Starting Oracle Universal Installer...

Checking Temp space: must be greater than 120 MB.   Actual 44736 MB    Passed
Checking swap space: must be greater than 150 MB.   Actual 8189 MB    Passed

Prepare Configuration in progress.

Prepare Configuration successful.
..................................................   8% Done.
You can find the log of this install session at:
 /u01/app/oraInventory/logs/addNodeActions2016-03-24_11-18-10AM.log

Instantiate files in progress.

Instantiate files successful.
..................................................   14% Done.

Copying files to node in progress.

Copying files to node successful.
..................................................   73% Done.

Saving cluster inventory in progress.
..................................................   80% Done.

Saving cluster inventory successful.
The Cluster Node Addition of /u01/app/oracle/product/12.1.0.2/db_1 was successful.
Please check '/tmp/silentInstall.log' for more details.

Setup Oracle Base in progress.

Setup Oracle Base successful.
..................................................   88% Done.

As a root user, execute the following script(s):
        1. /u01/app/oracle/product/12.1.0.2/db_1/root.sh

Execute /u01/app/oracle/product/12.1.0.2/db_1/root.sh on the following nodes:
[12cnode3]

..........
Update Inventory in progress.

..................................................   100% Done.

Update Inventory successful.
Successfully Setup Software.
[oracle@12cnode1 addnode]$
Now, run the “ROOT.SH” script from the new node as ROOT user. Here is the execution of the script.
[root@12cnode3 ~]# /u01/app/oracle/product/12.1.0.2/db_1/root.sh
Check /u01/app/oracle/product/12.1.0.2/db_1/install/root_12cnode3.mydomain_2016-03-24_12-01-16.log for the output of root script
[root@12cnode3 ~]# cat /u01/app/oracle/product/12.1.0.2/db_1/install/root_12cnode3.mydomain_2016-03-24_12-01-16.log
Performing root user operation.

The following environment variables are set as:
    ORACLE_OWNER= oracle
    ORACLE_HOME=  /u01/app/oracle/product/12.1.0.2/db_1
   Copying dbhome to /usr/local/bin ...
   Copying oraenv to /usr/local/bin ...
   Copying coraenv to /usr/local/bin ...

Entries will be added to the /etc/oratab file as needed by
Database Configuration Assistant when a database is created
Finished running generic part of root script.
Now product-specific root actions will be performed.
[root@12cnode3 ~]#
We now need to add a new instance “srprim3” on the cluster database that needs to be run on the new node 12cnode3. But before we do that, we need to have few of the cluster parameters modified according to the instance.
instance_number
Thread
Online Redo log groups for the new thread
UNDO_TABLESPACE
Let’s get the current log group and it’s members’ details based on which we can add new groups to the new thread.
SYS@srprim1>select group#,thread#,bytes/1024/1024,members from v$log;

    GROUP#    THREAD# BYTES/1024/1024    MEMBERS
---------- ---------- --------------- ----------
         1          1              50          2
         2          1              50          2
         3          2              50          2
         4          2              50          2

SYS@srprim1>select group#,member from v$logfile order by group#;

    GROUP# MEMBER
---------- -------------------------------------------------------
         1 +FRA/SRPRIM/ONLINELOG/group_1.257.904395571
         1 +DATA/SRPRIM/ONLINELOG/group_1.282.904395571
         2 +FRA/SRPRIM/ONLINELOG/group_2.258.904395577
         2 +DATA/SRPRIM/ONLINELOG/group_2.283.904395575
         3 +DATA/SRPRIM/ONLINELOG/group_3.289.904396373
         3 +FRA/SRPRIM/ONLINELOG/group_3.259.904396375
         4 +DATA/SRPRIM/ONLINELOG/group_4.290.904396377
         4 +FRA/SRPRIM/ONLINELOG/group_4.260.904396379
Let me add new groups to the new thread 3.
SYS@srprim1>alter database add logfile thread 3 group 5 size 50M;

Database altered.

SYS@srprim1>alter database add logfile thread 3 group 6 size 50M;

Database altered.

SYS@srprim1>select group#,thread#,bytes/1024/1024,members from v$log;

    GROUP#    THREAD# BYTES/1024/1024    MEMBERS
---------- ---------- --------------- ----------
         1          1              50          2
         2          1              50          2
         3          2              50          2
         4          2              50          2
         5          3              50          2
         6          3              50          2

6 rows selected.

SYS@srprim1>select group#,member from v$logfile order by group#;

    GROUP# MEMBER
---------- -------------------------------------------------------
         1 +DATA/SRPRIM/ONLINELOG/group_1.282.904395571
         1 +FRA/SRPRIM/ONLINELOG/group_1.257.904395571
         2 +DATA/SRPRIM/ONLINELOG/group_2.283.904395575
         2 +FRA/SRPRIM/ONLINELOG/group_2.258.904395577
         3 +DATA/SRPRIM/ONLINELOG/group_3.289.904396373
         3 +FRA/SRPRIM/ONLINELOG/group_3.259.904396375
         4 +DATA/SRPRIM/ONLINELOG/group_4.290.904396377
         4 +FRA/SRPRIM/ONLINELOG/group_4.260.904396379
         5 +DATA/SRPRIM/ONLINELOG/group_5.296.907330775
         5 +FRA/SRPRIM/ONLINELOG/group_5.261.907330777
         6 +DATA/SRPRIM/ONLINELOG/group_6.297.907330877

    GROUP# MEMBER
---------- -------------------------------------------------------
         6 +FRA/SRPRIM/ONLINELOG/group_6.262.907330879

12 rows selected.
Getting the UNDO tablespace details in order to know the undo tabelspaces assigned to the instances of the database.
SYS@srprim1>select inst_id,name,value from gv$parameter where name like 'undo_tablespa%';

   INST_ID NAME                                     VALUE
---------- ---------------------------------------- ----------------------------------------
         2 undo_tablespace                          UNDOTBS2
         1 undo_tablespace                          UNDOTBS1
Now, let me create a new UNDO tablespace called “undotbs3” and is assign it to the new instance “srprim3”.
SYS@srprim1>create undo tablespace UNDOTBS3 datafile size 400M;

Tablespace created.

SYS@srprim1>alter system set undo_tablespace=UNDOTBS3 scope=spfile sid='srprim3';

System altered.
Assign an instance number to the new instance.
SYS@srprim1>alter system set instance_number=3 SCOPE=SPFILE SID='srprim3';

System altered.
Assign the newly created Redo Log thread to the new instance.
SYS@srprim1>alter system set thread=3 scope=spfile sid='srprim3';

System altered.
The current configuration of the “srprim” database is as follows:
[oracle@12cnode1 admin]$ srvctl config database -db srprim
Database unique name: srprim
Database name: srprim
Oracle home: /u01/app/oracle/product/12.1.0.2/db_1
Oracle user: oracle
Spfile: +DATA/SRPRIM/PARAMETERFILE/spfile.291.904396381
Password file: +DATA/SRPRIM/PASSWORD/pwdsrprim.276.904395317
Domain:
Start options: open
Stop options: immediate
Database role: PRIMARY
Management policy: AUTOMATIC
Server pools:
Disk Groups: FRA,DATA
Mount point paths:
Services:
Type: RAC
Start concurrency:
Stop concurrency:
OSDBA group: oinstall
OSOPER group: oinstall
Database instances: srprim1,srprim2
Configured nodes: 12cnode1,12cnode2
Database is administrator managed
[oracle@12cnode1 admin]$
[oracle@12cnode1 admin]$
It’s time to add the instance “srprim3” to the database “srprim” using srvctl utility.
[oracle@12cnode1 admin]$
[oracle@12cnode1 admin]$
[oracle@12cnode1 admin]$ srvctl add instance -db srprim -instance srprim3 -node 12cnode3
Now, check the updated database configuration.
[oracle@12cnode1 admin]$ srvctl config database -db srprim
Database unique name: srprim
Database name: srprim
Oracle home: /u01/app/oracle/product/12.1.0.2/db_1
Oracle user: oracle
Spfile: +DATA/SRPRIM/PARAMETERFILE/spfile.291.904396381
Password file: +DATA/SRPRIM/PASSWORD/pwdsrprim.276.904395317
Domain:
Start options: open
Stop options: immediate
Database role: PRIMARY
Management policy: AUTOMATIC
Server pools:
Disk Groups: FRA,DATA
Mount point paths:
Services:
Type: RAC
Start concurrency:
Stop concurrency:
OSDBA group: oinstall
OSOPER group: oinstall
Database instances: srprim1,srprim2,srprim3
Configured nodes: 12cnode1,12cnode2,12cnode3
Database is administrator managed
[oracle@12cnode1 admin]$
Since the PFILE of instance srprim1 has nothing but only the location of the SPFILE, copy it to the new node and rename it accordingly to the new instance name (srprim3).
[oracle@12cnode1 ~]$ cd $ORACLE_HOME/dbs
[oracle@12cnode1 dbs]$ ls -lrt initsrprim*
-rw-r-----. 1 oracle oinstall 39 Feb 21 13:15 initsrprim1.ora
[oracle@12cnode1 dbs]$
[oracle@12cnode1 dbs]$ cat initsrprim1.ora
SPFILE='+DATA/srprim/spfilesrprim.ora'
[oracle@12cnode1 dbs]$
[oracle@12cnode1 dbs]$
[oracle@12cnode1 dbs]$ scp initsrprim1.ora oracle@12cnode3:/u01/app/oracle/product/12.1.0.2/db_1/dbs/initsrprim3.ora
initsrprim1.ora                                                                                                                      100%   39     0.0KB/s   00:00
[oracle@12cnode1 dbs]$
[oracle@12cnode3 ~]$ cd /u01/app/oracle/product/12.1.0.2/db_1/dbs
[oracle@12cnode3 dbs]$ ls -lrt initsrprim*
-rw-r-----. 1 oracle oinstall 39 Mar 24 12:38 initsrprim3.ora
[oracle@12cnode3 dbs]$
[oracle@12cnode3 dbs]$
[oracle@12cnode3 dbs]$ cat initsrprim3.ora
SPFILE='+DATA/srprim/spfilesrprim.ora'
[oracle@12cnode3 dbs]$
Finally, before starting the instance, enable the newly created Redo Log thread 3 that was assigned to instance srprim3.
SYS@srprim1>alter database enable public thread 3;

Database altered.

SYS@srprim>
Start the instance srprim3 using SRVCTL utility.
[oracle@12cnode1 ~]$ srvctl status database -db srprim
Instance srprim1 is running on node 12cnode1
Instance srprim2 is running on node 12cnode2
Instance srprim3 is not running on node 12cnode3
[oracle@12cnode1 ~]$
[oracle@12cnode1 ~]$
[oracle@12cnode1 ~]$ srvctl start instance -db srprim -instance srprim3
[oracle@12cnode1 ~]$
[oracle@12cnode1 ~]$
[oracle@12cnode1 ~]$ srvctl status database -db srprim
Instance srprim1 is running on node 12cnode1
Instance srprim2 is running on node 12cnode2
Instance srprim3 is running on node 12cnode3
Below is just a list of the databases and the listeners running on the new node 12cnode3.
[oracle@12cnode3 ~]$ ps -ef | grep pmon
oracle    4266     1  0 10:24 ?        00:00:00 asm_pmon_+ASM3
oracle    7749     1  0 10:28 ?        00:00:00 mdb_pmon_-MGMTDB
oracle   23632     1  0 12:42 ?        00:00:00 ora_pmon_srprim3
oracle   25350  3534  0 12:47 pts/0    00:00:00 grep pmon
[oracle@12cnode3 ~]$ ps -ef | grep tns
root         9     2  0 10:15 ?        00:00:00 [netns]
oracle    5774     1  0 10:26 ?        00:00:00 /u01/app/12.1.0.2/grid/bin/tnslsnr MGMTLSNR -no_crs_notify -inherit
oracle    5853     1  0 10:26 ?        00:00:00 /u01/app/12.1.0.2/grid/bin/tnslsnr LISTENER_SCAN1 -no_crs_notify -inherit
oracle    5856     1  0 10:26 ?        00:00:00 /u01/app/12.1.0.2/grid/bin/tnslsnr LISTENER -no_crs_notify -inherit
oracle   25406  3534  0 12:47 pts/0    00:00:00 grep tns
[oracle@12cnode3 ~]$
If the addnode.sh is run through GUI mode without using the “silent” option, then the instance addition too would be taken care by the GUI tool and there would be no requirement to go through the above manual steps.
COPYRIGHT
© Shivananda Rao P, 2012 to 2018. Unauthorized use and/or duplication of this material without express and written permission from this blog’s author and/or owner is strictly prohibited. Excerpts and links may be used, provided that full and clear credit is given to Shivananda Rao and http://www.shivanandarao-oracle.com with appropriate and specific direction to the original content.
DISCLAIMER
The views expressed here are my own and do not necessarily reflect the views of any other individual, business entity, or organization. The views expressed by visitors on this blog are theirs solely and may not reflect mine.
This post demonstrates on how to perform a GI upgrade from 11.2.0.3 version to 12.1.0.2 on a standalone machine. Usually the upgrade is performed via a GUI, but here I’m demonstrating the upgrade through silent mode using the response file.
Environment:
Hostname                                  :   ora1-4
Current GI version                        :   11.2.0.3
GI response file location                 :   /u02/grid_install.rsp
Existing 11.2.0.3 GI Home                 :   /u01/app/oracle/product/11.2.0.3/grid
To be installed 12.1.0.2 GI Home location :   /u01/app/oracle/product/12.1.0.2/grid/
As you know, GI on a standalone machine makes use of High Availability Service (HAS) and not Cluster Ready Service (CRS). Let’s query the current HAS version.
[oracle@ora1-4 bin]$ ./crsctl query has releaseversion
Oracle High Availability Services release version on the local node is [11.2.0.3.0]
[oracle@ora1-4 bin]$
[oracle@ora1-4 bin]$
[oracle@ora1-4 bin]$ ./crsctl query has softwareversion
Oracle High Availability Services version on the local node is [11.2.0.3.0]
[oracle@ora1-4 bin]$
Unzip the 12.1.0.2 GI software pack and take a copy of the response file grid_install.rsp located at “<unzipped location>/grid/response”. Here I have copied it to “/u02”.
Make necessary changes to the copied response file. The changes for a standalone GI upgrade include:
1. ORACLE_HOSTNAME
     - Specify the hostname on which the GI upgrade is being performed.
2. INVENTORY_LOCATION
     - Specify the Inventory location.
3. oracle.install.option
     - Choose the option as UPGRADE as this is what we are performing
4. ORACLE_BASE
     - Specify the ORACLE_BASE location.
5. ORACLE_HOME
     - Specify the location where GI 12.1.0.2 needs to be installed.
6. Specify the OS groups for OSDBA, OSOPER and OSASM

7. Since this is a standalone, SCAN and Cluster has no role to play. So skipping these.

8. ASM part is also skipped because the GI on 11.2.0.3 is already having an ASM instance using DATA_NEW and FRA_NEW as diskgroups. Since I do not want a fresh ASM instance or a fresh diskgroup to be created, this has been skipped.

9. Under the UPGRADE section, if you would want the GI to be managed by OEM Grid Control, then select oracle.install.config.managementOption to CLOUD_CONTROL, else choose NONE. If CLOUD_CONTROL is chosen, then provide more details that has been asked for like OMS host name, OMS Port. In this demo, I do not want the GI to be managed by Grid Control and hence chosen as NONE.
Here is the response file with the updated values used to perform the upgrade to 12.1.0.2.
GI respone file.
Run the “runInstaller” with the silent option and providing the complete path of the response file. Make sure that ORACLE_HOME and ORA_CRS_HOME are unset else you may face the below error message.
[oracle@ora1-4 grid]$ ./runInstaller -silent -responseFile /u02/grid_install.rsp -showProgress
Starting Oracle Universal Installer...

Checking Temp space: must be greater than 415 MB. Actual 8756 MB Passed
Checking swap space: must be greater than 150 MB. Actual 10236 MB Passed
Preparing to launch Oracle Universal Installer from /tmp/OraInstall2016-01-10_06-29-38PM. Please wait ...[oracle@ora1-4 grid]$ [FATAL] [INS-30131] Initial setup required for the execution of installer validations failed.
CAUSE: Failed to access the temporary location.
ACTION: Ensure that the current user has required permissions to access the temporary location.
*ADDITIONAL INFORMATION:*
Exception details
 - PRVG-1561 : Setting ORA_CRS_HOME variable is not supported
Unset the ORACLE_HOME and ORA_CRS_HOME and run the runInstaller with silent option. If the pre-requisite checks fail, then the installation throws error.
If so, then take necessary actions accordingly.
[oracle@ora1-4 grid]$ unset ORACLE_HOME
[oracle@ora1-4 grid]$ unset ORA_CRS_HOME
[oracle@ora1-4 grid]$
[oracle@ora1-4 grid]$ ./runInstaller -silent -responseFile /u02/grid_install.rsp -showProgress
Starting Oracle Universal Installer...

Checking Temp space: must be greater than 415 MB. Actual 8756 MB Passed
Checking swap space: must be greater than 150 MB. Actual 10236 MB Passed
Preparing to launch Oracle Universal Installer from /tmp/OraInstall2016-01-10_06-30-53PM. Please wait ...
You can find the log of this install session at:
/u01/app/oraInventory/logs/installActions2016-01-10_06-30-53PM.log

Prepare in progress.
.................................................. 7% Done.

Prepare successful.

Copy files in progress.
.................................................. 12% Done.
.................................................. 22% Done.
.................................................. 27% Done.
.................................................. 32% Done.
.................................................. 40% Done.
.................................................. 48% Done.
.................................................. 53% Done.
.................................................. 58% Done.
.................................................. 63% Done.
....................
Copy files successful.

Link binaries in progress.
..........
Link binaries successful.

Setup files in progress.
.................................................. 68% Done.

Setup files successful.

Setup Inventory in progress.

Setup Inventory successful.
.................................................. 73% Done.

Finish Setup successful.
The installation of Oracle Grid Infrastructure 12c was successful.
Please check '/u01/app/oraInventory/logs/silentInstall2016-01-10_06-30-53PM.log' for more details.

Setup Oracle Base in progress.

Setup Oracle Base successful.
.................................................. 82% Done.

Prepare for configuration steps in progress.

Prepare for configuration steps successful.
..........
Update Inventory in progress.

Update Inventory successful.
.................................................. 95% Done.

As a root user, execute the following script(s):
1. /u01/app/oracle/product/12.1.0.2/grid/rootupgrade.sh
Run the script on the local node.

.................................................. 100% Done.
Successfully Setup Software.
Run the rootupgrade.sh script as ROOT user from the new 12.1.0.2 GI home. Here is outcome of the rootupgrade.sh script.
[root@ora1-4 ~]# /u01/app/oracle/product/12.1.0.2/grid/rootupgrade.sh
Check /u01/app/oracle/product/12.1.0.2/grid/install/root_ora1-4.mydomain_2016-01-10_18-50-05.log for the output of root script

[root@ora1-4 ~]#
Let’s check the output for the rootupgrade script.
[oracle@ora1-4 ~]$ cat /u01/app/oracle/product/12.1.0.2/grid/install/root_ora1-4.mydomain_2016-01-10_18-50-05.log
Performing root user operation.

The following environment variables are set as:
ORACLE_OWNER= oracle
ORACLE_HOME= /u01/app/oracle/product/12.1.0.2/grid
Copying dbhome to /usr/local/bin ...
Copying oraenv to /usr/local/bin ...
Copying coraenv to /usr/local/bin ...

Entries will be added to the /etc/oratab file as needed by
Database Configuration Assistant when a database is created
Finished running generic part of root script.
Now product-specific root actions will be performed.
Using configuration parameter file: /u01/app/oracle/product/12.1.0.2/grid/crs/install/crsconfig_params

ASM Configuration upgraded successfully.

Creating OCR keys for user 'oracle', privgrp 'oinstall'..
Operation successful.
LOCAL ONLY MODE
Successfully accumulated necessary OCR keys.
Creating OCR keys for user 'root', privgrp 'root'..
Operation successful.
CRS-4664: Node ora1-4 successfully pinned.
2016/01/10 18:51:37 CLSRSC-329: Replacing Clusterware entries in file 'oracle-ohasd.conf'

2016/01/10 18:52:40 CLSRSC-329: Replacing Clusterware entries in file 'oracle-ohasd.conf'

2016/01/10 18:54:10 CLSRSC-482: Running command: 'upgrade model -s 11.2.0.3.0 -d 12.1.0.2.0 -p first'

2016/01/10 18:54:18 CLSRSC-482: Running command: 'upgrade model -s 11.2.0.3.0 -d 12.1.0.2.0 -p last'

ora1-4 2016/01/10 18:54:19 /u01/app/oracle/product/12.1.0.2/grid/cdata/ora1-4/backup_20160110_185419.olr 0

ora1-4 2016/01/09 13:02:23 /u01/app/oracle/product/11.2.0.3/grid/cdata/ora1-4/backup_20160109_130223.olr -
CRS-2791: Starting shutdown of Oracle High Availability Services-managed resources on 'ora1-4'
CRS-2673: Attempting to stop 'ora.evmd' on 'ora1-4'
CRS-2673: Attempting to stop 'ora.LISTENER.lsnr' on 'ora1-4'
CRS-2677: Stop of 'ora.LISTENER.lsnr' on 'ora1-4' succeeded
CRS-2677: Stop of 'ora.evmd' on 'ora1-4' succeeded
CRS-2673: Attempting to stop 'ora.cssd' on 'ora1-4'
CRS-2677: Stop of 'ora.cssd' on 'ora1-4' succeeded
CRS-2793: Shutdown of Oracle High Availability Services-managed resources on 'ora1-4' has completed
CRS-4133: Oracle High Availability Services has been stopped.
CRS-4123: Oracle High Availability Services has been started.
2016/01/10 18:56:03 CLSRSC-327: Successfully configured Oracle Restart for a standalone server

[oracle@ora1-4 ~]$
ASM too has been upgraded. Let’s check the HAS version from the 12.1.0.2 GI home.
[oracle@ora1-4 grid]$ cd /u01/app/oracle/product/12.1.0.2/grid/bin/
[oracle@ora1-4 bin]$
[oracle@ora1-4 bin]$
[oracle@ora1-4 bin]$ ./crsctl query has releaseversion
Oracle High Availability Services release version on the local node is [12.1.0.2.0]
[oracle@ora1-4 bin]$
[oracle@ora1-4 bin]$
[oracle@ora1-4 bin]$ ./crsctl query has softwareversion
Oracle High Availability Services version on the local node is [12.1.0.2.0]
The ASM home too would be updated in the ORATAB file automatically during the upgrade.
[oracle@ora1-4 bin]$ cat /etc/oratab | grep ASM
+ASM:/u01/app/oracle/product/12.1.0.2/grid:N # line added by Agent
Let’s connect to ASM instance and verify ther version and the state of it’s diskgroups.
[oracle@ora1-4 ~]$ sqlplus / as sysasm

SQL*Plus: Release 12.1.0.2.0 Production on Sun Jan 10 19:33:28 2016

Copyright (c) 1982, 2014, Oracle. All rights reserved.
Connected to:
Oracle Database 12c Enterprise Edition Release 12.1.0.2.0 - 64bit Production
With the Automatic Storage Management option

SQL> select name,state from v$asm_diskgroup;

NAME                           STATE
------------------------------ -----------
DATA_NEW                       MOUNTED
FRA_NEW                        MOUNTED

SQL> select banner from v$version;

BANNER
--------------------------------------------------------------------------------
Oracle Database 12c Enterprise Edition Release 12.1.0.2.0 - 64bit Production
PL/SQL Release 12.1.0.2.0 - Production
CORE 12.1.0.2.0 Production
TNS for Linux: Version 12.1.0.2.0 - Production
NLSRTL Version 12.1.0.2.0 - Production
As seen above, the GI has been upgraded successfully from 11.2.0.3 to 12.1.0.2.
COPYRIGHT
© Shivananda Rao P, 2012 to 2018. Unauthorized use and/or duplication of this material without express and written permission from this blog’s author and/or owner is strictly prohibited. Excerpts and links may be used, provided that full and clear credit is given to Shivananda Rao and http://www.shivanandarao-oracle.com with appropriate and specific direction to the original content.
DISCLAIMER
The views expressed here are my own and do not necessarily reflect the views of any other individual, business entity, or organization. The views expressed by visitors on this blog are theirs solely and may not reflect mine.
While checking the DG Broker configuration status, I was surprised to see that DGMGRL was throwing out “ORA-16629: database reports a different protection level from the protection mode” warning message.
Though the standby database was in sync with its primary database, DGMGRL was making noise by throwing the above warning message. This could have been happened if the standby redo log files were incorrectly sized from that of the online redo log files or if there is a lag on the standby database with MAXAVAILABILITY mode.. But in my case, none of these symptoms were seen as the SRLs were of the same size as that of the ORLs and nor was there a lag on the standby database.
Environment:
Primary database : srpstb
Primary node     : ora1-2
Standby database : srprim
Standby node     : ora1-1
DGMGRL> show configuration;

Configuration - dgtest

Protection Mode: MaxAvailability
Databases:
srpstb - Primary database
Warning: ORA-16629: database reports a different protection level from the protection mode

srprim - Physical standby database

Fast-Start Failover: DISABLED

Configuration Status:
WARNING
I just went through re-reading the error message. The message is being reported for the primary database and it clearly says that the Protection Level of the database is different from that of it’s protection mode. A protection level is an aggregation of the protection mode currently being used for the database.
This let me to query and check what difference do I see with the Protection Mode and the Protection Level for the primary and standby databases.
On the primary, when I query, I see that the protection level reports as RESYNCHRONIZATION and the protection mode as MaxAvailability
SYS@srpstb> select protection_mode,protection_level from v$database;

PROTECTION_MODE      PROTECTION_LEVEL
-------------------- --------------------
MAXIMUM AVAILABILITY RESYNCHRONIZATION
But on the standby database, the protection mode and protection level were reporting as MAXIMUM PERFORMANCE. Quite strange !!
SYS@srprim> select protection_mode,protection_level from v$database;

PROTECTION_MODE      PROTECTION_LEVEL
-------------------- --------------------
MAXIMUM PERFORMANCE  MAXIMUM PERFORMANCE
To set the protection mode same across the primary and physical standby database, I changed the protection mode to MAXPERFORMANCE at the broker level.
DGMGRL> edit configuration set protection mode as MAXPERFORMANCE;
Succeeded.
DGMGRL> show configuration;

Configuration - dgtest

Protection Mode: MaxPerformance
Databases:
srpstb - Primary database
srprim - Physical standby database

Fast-Start Failover: DISABLED

Configuration Status:
SUCCESS
Now that the broker status shows as “SUCCESS”, let me query the protection mode and level individually for the primary and physical standby database.
On the primary, as expected, the protection mode and level is now reporting as MAX PERFORMANCE.
SYS@srpstb> select protection_mode,protection_level from v$database;

PROTECTION_MODE      PROTECTION_LEVEL
-------------------- --------------------
MAXIMUM PERFORMANCE  MAXIMUM PERFORMANCE
On the standby too, the protection mode and level were reporting as MAX PERFORMANCE.
SYS@srprim> select protection_mode,protection_level from v$database;

PROTECTION_MODE      PROTECTION_LEVEL
-------------------- --------------------
MAXIMUM PERFORMANCE  MAXIMUM PERFORMANCE
COPYRIGHT
© Shivananda Rao P, 2012 to 2018. Unauthorized use and/or duplication of this material without express and written permission from this blog’s author and/or owner is strictly prohibited. Excerpts and links may be used, provided that full and clear credit is given to Shivananda Rao and http://www.shivanandarao-oracle.com with appropriate and specific direction to the original content.
DISCLAIMER
The views expressed here are my own and do not necessarily reflect the views of any other individual, business entity, or organization. The views expressed by visitors on this blog are theirs solely and may not reflect mine.
As you are aware that rolling forward a physical standby via an incremental SCN backup method is the simplest method of getting your standby database with lag into sync with the primary database. The lag can be due to missing archives on the primary which haven’t been shipped or applied on the standby.
With 12c, the roll forward technique is a bit different. In the prior versions, we had to initially take an incremental backup of the primary database from the SCN where the standby was stalled and then on copy these backup pieces to the standby server and recover the standby using them. Here is a detailed steps of how to roll forward your physical standby database in 11g or 10g.
Roll Forward Physical Standby in 10g/11g
But, with 12c, it’s different. The entire operation of restore and recovery can be performed through RMAN over the network using the “net service name”.
The syntax would be as “recover database…from service”. This has reduced the multi steps of manual method of rolling forward a standby database. Let’s move on in rolling forward a physical standby database. The environment is of a 2 node Primary database and a 2 node standby database which uses ASM as a storage media and has the broker configuration enabled (not mandatory).
Environment:
Primary:
Primary database nodes     : ora12c-node1, ora12c-node2
Database name              : srprim
Primary DB UNIQUE NAME     : srprim
Primary database instances : srprim1, srprim2
Standby:
Standby database nodes     : ora12cdr1, ora12cdr2
Database name              : srprim
Standby DB UNIQUE NAME     : srpstb
Standby database instances : srpstb1, srpstb2
The details of the primary and standby instances are as follows:
Primary:
[oracle@ora12c-node1 ~]$ srvctl status database -db srprim -v -f
Instance srprim1 is running on node ora12c-node1. Instance status: Open.
Instance srprim2 is running on node ora12c-node2. Instance status: Open.
Standby:
[oracle@ora12cdr1 ~]$ srvctl status database -db srpstb -v -f
Instance srpstb1 is running on node ora12cdr1. Instance status: Mounted (Closed).
Instance srpstb2 is running on node ora12cdr2. Instance status: Mounted (Closed).
Broker configuration Details and Status:
[oracle@ora12c-node1 ~]$ dgmgrl /
DGMGRL for Linux: Version 12.1.0.1.0 - 64bit Production

Copyright (c) 2000, 2012, Oracle. All rights reserved.

Welcome to DGMGRL, type "help" for information.
Connected as SYSDG.
DGMGRL>
DGMGRL> show configuration;

Configuration - dgsrp

  Protection Mode: MaxPerformance
  Databases:
  srprim - Primary database
    srpstb - Physical standby database

Fast-Start Failover: DISABLED

Configuration Status:
SUCCESS
On the primary, the last sequence generated is 217 and 175 for thread 1 and 2 respectively.
SYS@srprim1 > select thread#,max(sequence#) from v$archived_log group by thread#;

   THREAD# MAX(SEQUENCE#)
---------- --------------
         1            217
         2            175
While on the standby, the last sequence applied is 216 and 175 for thread 1 and 2 respectively.
SYS@srpstb1 > select thread#,max(sequence#) from v$archived_log where applied='YES' group by thread#;

   THREAD# MAX(SEQUENCE#)
---------- --------------
         1            216
         2            175
Now, due to missing archives on the primary, there has been a gap detected on the standby and it’s waiting for log sequence 219 of thread 1.
SYS@srpstb1 > select process,status,sequence#,thread# from gv$managed_standby;

PROCESS   STATUS        SEQUENCE#    THREAD#
--------- ------------ ---------- ----------
ARCH      CLOSING             225          1
ARCH      CLOSING             217          1
ARCH      CONNECTED             0          0
ARCH      CLOSING             178          2
MRP0      WAIT_FOR_GAP        219          1
RFS       IDLE                  0          0
RFS       IDLE                  0          0
RFS       IDLE                179          2
RFS       IDLE                  0          0
RFS       IDLE                  0          0
RFS       IDLE                  0          0

PROCESS   STATUS        SEQUENCE#    THREAD#
--------- ------------ ---------- ----------
ARCH      CONNECTED             0          0
ARCH      CLOSING             226          1
ARCH      CONNECTED             0          0
ARCH      CONNECTED             0          0
RFS       IDLE                227          1
RFS       IDLE                  0          0

17 rows selected.
A gap exists from log sequence 219 to 221 of thread 1 and this is what is been informed in the alert log of the standby database.
FAL[client]: Failed to request gap sequence
 GAP - thread 1 sequence 219-221
 DBID 307664432 branch 891722994
FAL[client]: All defined FAL servers have been attempted.
Now, let’s compare the checkpoint change# for each of the datafiles on the primary database with the corresponding datafiles on the standby database to understand which all need recovery on the standby database.
On the primary:
SYS@srprim1 > select file#,checkpoint_change# from v$datafile;

     FILE# CHECKPOINT_CHANGE#
---------- ------------------
         1            3111435
         3            3111435
         4            3111435
         5            1739965
         6            3111435
         7            1739965
         8            3111435
        30            3050385
        31            3050385

9 rows selected.
On the standby database:
SYS@srpstb1 > select file#,checkpoint_change# from v$datafile;

     FILE# CHECKPOINT_CHANGE#
---------- ------------------
         1            3110480
         3            3110480
         4            3110480
         5            1739965
         6            3110480
         7            1739965
         8            3110480
        30            3050385
        31            3050385

9 rows selected.
From the above outcomes, it’s clear that datafiles 1,3,4,6 and 8 have a different checkpoint change# value on the standby when compared to the corresponding files on the primary database. This means, that the archive log sequence 219 to 221 contain the changes that need to be applied to these 5 (1,3,4,6,8) datafiles.
To move on, cancel the recovery on the standby database.
SYS@srpstb1 > alter database recover managed standby database cancel;

Database altered.
Connect the standby database through RMAN as “target” and issue the “recover database from service <primary net alias>” command.
This command, recovers the target database (standby database) from the service name that you specify (primary database). You can also specify the “using compressed backupset” clause along with the above command so that RMAN takes a compressed backupset from the primary database and restores and recovers the standby database.
RMAN takes a backup of the corresponding datafile, transfers it over the network to the standby server and restores the file.
Secondly, RMAN is clever enough to restore only those datafiles whose checkpoint change# on the standby database is different from that of the primary database. This is a great feature in 12c, where as in prior versions, we had to manually take the incremental SCN backup of the entire primary database, manually ship the backups to the standby site and then recover. But here, RMAN does in one single command.
From the below outcome, it can be noticed that RMAN is skipping datafiles 5,7,30 and 31 as they have the same checkpoint change# across the primary and the standby sites and restoring only datafiles 1,3,4,6 and 8.
[oracle@ora12cdr1 ~]$ rman target /

Recovery Manager: Release 12.1.0.1.0 - Production on Wed Dec 2 13:17:00 2015

Copyright (c) 1982, 2013, Oracle and/or its affiliates.  All rights reserved.

connected to target database: SRPRIM (DBID=307664432, not open)

RMAN> recover database from service srprim noredo using compressed backupset;

Starting recover at 02-DEC-15
using target database control file instead of recovery catalog
allocated channel: ORA_DISK_1
channel ORA_DISK_1: SID=53 instance=srpstb1 device type=DISK
skipping datafile 5; already restored to SCN 1739965
skipping datafile 7; already restored to SCN 1739965
skipping datafile 30; already restored to SCN 3050385
skipping datafile 31; already restored to SCN 3050385
channel ORA_DISK_1: starting incremental datafile backup set restore
channel ORA_DISK_1: using compressed network backup set from service srprim
destination for restore of datafile 00001: +DATA/SRPSTB/DATAFILE/system.270.893882851
channel ORA_DISK_1: restore complete, elapsed time: 00:00:25
channel ORA_DISK_1: starting incremental datafile backup set restore
channel ORA_DISK_1: using compressed network backup set from service srprim
destination for restore of datafile 00003: +DATA/SRPSTB/DATAFILE/sysaux.268.893882883
channel ORA_DISK_1: restore complete, elapsed time: 00:00:25
channel ORA_DISK_1: starting incremental datafile backup set restore
channel ORA_DISK_1: using compressed network backup set from service srprim
destination for restore of datafile 00004: +DATA/SRPSTB/DATAFILE/undotbs1.266.893882909
channel ORA_DISK_1: restore complete, elapsed time: 00:00:07
channel ORA_DISK_1: starting incremental datafile backup set restore
channel ORA_DISK_1: using compressed network backup set from service srprim
destination for restore of datafile 00006: +DATA/SRPSTB/DATAFILE/users.264.893882923
channel ORA_DISK_1: restore complete, elapsed time: 00:00:01
channel ORA_DISK_1: starting incremental datafile backup set restore
channel ORA_DISK_1: using compressed network backup set from service srprim
destination for restore of datafile 00008: +DATA/SRPSTB/DATAFILE/undotbs2.262.893882949
channel ORA_DISK_1: restore complete, elapsed time: 00:00:07

Finished recover at 02-DEC-15

RMAN>
So, now the datafiles have been restored and recovered, but remember that the controlfile needs to be updated. Hence we need to restore the controlfile from the primary site.
To achieve this, stop the standby database and start one instance of it in nomount state.
[oracle@ora12cdr1 ~]$ srvctl stop database -db srpstb
[oracle@ora12cdr1 ~]$ sqlplus / as sysdba

SQL*Plus: Release 12.1.0.1.0 Production on Wed Dec 2 13:21:26 2015

Copyright (c) 1982, 2013, Oracle.  All rights reserved.

Connected to an idle instance.

SYS@srpstb1 > startup nomount

ORACLE instance started.

Total System Global Area 1286066176 bytes
Fixed Size                  2287960 bytes
Variable Size             536872616 bytes
Database Buffers          738197504 bytes
Redo Buffers                8708096 bytes
SYS@srpstb1 > exit
Disconnected from Oracle Database 12c Enterprise Edition Release 12.1.0.1.0 - 64bit Production
With the Partitioning, Real Application Clusters, OLAP, Advanced Analytics
and Real Application Testing options
Connect the standby database through RMAN as target and restore the controlfile from primary using the ‘service’ clause.
[oracle@ora12cdr1 ~]$ rman target /

Recovery Manager: Release 12.1.0.1.0 - Production on Wed Dec 2 13:21:40 2015

Copyright (c) 1982, 2013, Oracle and/or its affiliates.  All rights reserved.

connected to target database: SRPRIM (not mounted)

RMAN> restore standby controlfile from service srprim;

Starting restore at 02-DEC-15
using target database control file instead of recovery catalog
allocated channel: ORA_DISK_1
channel ORA_DISK_1: SID=36 instance=srpstb1 device type=DISK

channel ORA_DISK_1: starting datafile backup set restore
channel ORA_DISK_1: using network backup set from service srprim
channel ORA_DISK_1: restoring control file
channel ORA_DISK_1: restore complete, elapsed time: 00:00:15
output file name=+DATA/SRPSTB/CONTROLFILE/current.267.893882827
output file name=+FRA1/SRPSTB/CONTROLFILE/current.258.893882827
Finished restore at 02-DEC-15
Shutdown the standby instance that was started earlier before the restore of the controlfile and start the complete standby database in MOUNT state.
[oracle@ora12cdr1 ~]$ srvctl start database -db srpstb
[oracle@ora12cdr1 ~]$ srvctl status database -db srpstb -v -f
Instance srpstb1 is running on node ora12cdr1. Instance status: Mounted (Closed).
Instance srpstb2 is running on node ora12cdr2. Instance status: Mounted (Closed).
If the datafiles locations on the primary and standby database are different, then you may have to follow this step. Since that we have restored the controlfile from the primary database, the datafiles locations will still be pointing to the location of the datafiles that we have on the primary site.
To overcome this, you need to catalog the standby datafile locations.
Connect the standby database through RMAN and catalog the location of it’s datafiles. In my environment, the datafiles of the standby are placed in “+DATA/SRPSTB” location.
RMAN> catalog start with '+DATA/SRPSTB/';

searching for all files that match the pattern +DATA/SRPSTB/

List of Files Unknown to the Database
=====================================
File Name: +DATA/SRPSTB/spfilesrpstb.ora
File Name: +DATA/SRPSTB/orapwsrpstb
File Name: +DATA/SRPSTB/243D4D0CCA302D9BE0537200A8C03F95/DATAFILE/SYSTEM.315.895493381
File Name: +DATA/SRPSTB/243D4D0CCA302D9BE0537200A8C03F95/DATAFILE/SYSAUX.316.895493429
File Name: +DATA/SRPSTB/241D296020C9234AE0537200A8C02179/DATAFILE/SYSTEM.309.895350841
File Name: +DATA/SRPSTB/241D296020C9234AE0537200A8C02179/DATAFILE/SYSAUX.310.895350855
File Name: +DATA/SRPSTB/23F4F3269D3E2C5FE0537200A8C07E9C/DATAFILE/SYSTEM.286.895175737
File Name: +DATA/SRPSTB/TEMPFILE/TEMP.283.895009995
File Name: +DATA/SRPSTB/DATAGUARDCONFIG/srpstb.282.894924201
File Name: +DATA/SRPSTB/241D296020C8234AE0537200A8C02179/DATAFILE/SYSTEM.307.895347841
File Name: +DATA/SRPSTB/241D296020C8234AE0537200A8C02179/DATAFILE/SYSAUX.308.895348445
File Name: +DATA/SRPSTB/ONLINELOG/group_1.274.893883017
File Name: +DATA/SRPSTB/ONLINELOG/group_2.273.893883019
File Name: +DATA/SRPSTB/ONLINELOG/group_3.272.893883019
File Name: +DATA/SRPSTB/ONLINELOG/group_4.271.893883021
File Name: +DATA/SRPSTB/ONLINELOG/group_5.257.893886219
File Name: +DATA/SRPSTB/ONLINELOG/group_6.275.893886225
File Name: +DATA/SRPSTB/ONLINELOG/group_7.276.893886227
File Name: +DATA/SRPSTB/ONLINELOG/group_8.277.893886233
File Name: +DATA/SRPSTB/ONLINELOG/group_9.278.893886235
File Name: +DATA/SRPSTB/ONLINELOG/group_10.279.893886237
File Name: +DATA/SRPSTB/ONLINELOG/group_5.287.895259785
File Name: +DATA/SRPSTB/ONLINELOG/group_7.288.895259787
File Name: +DATA/SRPSTB/ONLINELOG/group_6.289.895259795
File Name: +DATA/SRPSTB/ONLINELOG/group_10.290.895259837
File Name: +DATA/SRPSTB/ONLINELOG/group_8.291.895259837
File Name: +DATA/SRPSTB/ONLINELOG/group_9.292.895259841
File Name: +DATA/SRPSTB/ONLINELOG/group_1.293.895260099
File Name: +DATA/SRPSTB/ONLINELOG/group_2.294.895260103
File Name: +DATA/SRPSTB/ONLINELOG/group_3.295.895260103
File Name: +DATA/SRPSTB/ONLINELOG/group_4.296.895260107
File Name: +DATA/SRPSTB/ONLINELOG/group_1.297.895261173
File Name: +DATA/SRPSTB/ONLINELOG/group_2.298.895261175
File Name: +DATA/SRPSTB/ONLINELOG/group_3.299.895261179
File Name: +DATA/SRPSTB/ONLINELOG/group_4.300.895261181
File Name: +DATA/SRPSTB/ONLINELOG/group_7.301.895261323
File Name: +DATA/SRPSTB/ONLINELOG/group_5.302.895261323
File Name: +DATA/SRPSTB/ONLINELOG/group_6.303.895261329
File Name: +DATA/SRPSTB/ONLINELOG/group_8.304.895261343
File Name: +DATA/SRPSTB/ONLINELOG/group_10.305.895261343
File Name: +DATA/SRPSTB/ONLINELOG/group_9.306.895261345
File Name: +DATA/SRPSTB/ONLINELOG/group_7.261.895492899
File Name: +DATA/SRPSTB/ONLINELOG/group_5.260.895492899
File Name: +DATA/SRPSTB/ONLINELOG/group_10.259.895492907
File Name: +DATA/SRPSTB/ONLINELOG/group_6.258.895492907
File Name: +DATA/SRPSTB/ONLINELOG/group_8.313.895492911
File Name: +DATA/SRPSTB/ONLINELOG/group_9.314.895492915
File Name: +DATA/SRPSTB/ONLINELOG/group_1.317.895493507
File Name: +DATA/SRPSTB/ONLINELOG/group_2.318.895493509
File Name: +DATA/SRPSTB/ONLINELOG/group_3.319.895493513
File Name: +DATA/SRPSTB/ONLINELOG/group_4.320.895493515
File Name: +DATA/SRPSTB/ONLINELOG/group_10.312.895515035
File Name: +DATA/SRPSTB/ONLINELOG/group_8.311.895496139
File Name: +DATA/SRPSTB/ONLINELOG/group_9.321.895496147
File Name: +DATA/SRPSTB/ONLINELOG/group_5.322.895496149
File Name: +DATA/SRPSTB/ONLINELOG/group_6.323.895496153
File Name: +DATA/SRPSTB/ONLINELOG/group_7.324.895496157
File Name: +DATA/SRPSTB/ONLINELOG/group_1.325.895496313
File Name: +DATA/SRPSTB/ONLINELOG/group_2.326.895496317
File Name: +DATA/SRPSTB/ONLINELOG/group_3.327.895496321
File Name: +DATA/SRPSTB/ONLINELOG/group_4.328.895496325
File Name: +DATA/SRPSTB/20E576F1A6FE02E0E0537200A8C01581/TEMPFILE/TEMP.285.895010041
File Name: +DATA/SRPSTB/20E55957E61A7D6CE0537200A8C09297/TEMPFILE/TEMP.284.895009997
File Name: +DATA/SRPSTB/20E55957E61A7D6CE0537200A8C09297/DATAFILE/SYSTEM.265.893882915
File Name: +DATA/SRPSTB/20E55957E61A7D6CE0537200A8C09297/DATAFILE/SYSAUX.263.893882923
File Name: +DATA/SRPSTB/DATAFILE/SYSTEM.270.893882851
File Name: +DATA/SRPSTB/DATAFILE/SYSAUX.268.893882883
File Name: +DATA/SRPSTB/DATAFILE/UNDOTBS1.266.893882909
File Name: +DATA/SRPSTB/DATAFILE/USERS.264.893882923
File Name: +DATA/SRPSTB/DATAFILE/UNDOTBS2.262.893882949
File Name: +DATA/SRPSTB/CONTROLFILE/Current.269.893882795

Do you really want to catalog the above files (enter YES or NO)? YES
cataloging files...
cataloging done

List of Cataloged Files
=======================
File Name: +DATA/SRPSTB/243D4D0CCA302D9BE0537200A8C03F95/DATAFILE/SYSTEM.315.895493381
File Name: +DATA/SRPSTB/243D4D0CCA302D9BE0537200A8C03F95/DATAFILE/SYSAUX.316.895493429
File Name: +DATA/SRPSTB/241D296020C9234AE0537200A8C02179/DATAFILE/SYSTEM.309.895350841
File Name: +DATA/SRPSTB/241D296020C9234AE0537200A8C02179/DATAFILE/SYSAUX.310.895350855
File Name: +DATA/SRPSTB/23F4F3269D3E2C5FE0537200A8C07E9C/DATAFILE/SYSTEM.286.895175737
File Name: +DATA/SRPSTB/TEMPFILE/TEMP.283.895009995
File Name: +DATA/SRPSTB/241D296020C8234AE0537200A8C02179/DATAFILE/SYSTEM.307.895347841
File Name: +DATA/SRPSTB/241D296020C8234AE0537200A8C02179/DATAFILE/SYSAUX.308.895348445
File Name: +DATA/SRPSTB/20E576F1A6FE02E0E0537200A8C01581/TEMPFILE/TEMP.285.895010041
File Name: +DATA/SRPSTB/20E55957E61A7D6CE0537200A8C09297/TEMPFILE/TEMP.284.895009997
File Name: +DATA/SRPSTB/20E55957E61A7D6CE0537200A8C09297/DATAFILE/SYSTEM.265.893882915
File Name: +DATA/SRPSTB/20E55957E61A7D6CE0537200A8C09297/DATAFILE/SYSAUX.263.893882923
File Name: +DATA/SRPSTB/DATAFILE/SYSTEM.270.893882851
File Name: +DATA/SRPSTB/DATAFILE/SYSAUX.268.893882883
File Name: +DATA/SRPSTB/DATAFILE/UNDOTBS1.266.893882909
File Name: +DATA/SRPSTB/DATAFILE/USERS.264.893882923
File Name: +DATA/SRPSTB/DATAFILE/UNDOTBS2.262.893882949
Switch the standby database to the copy.
RMAN> switch database to copy;

datafile 1 switched to datafile copy "+DATA/SRPSTB/DATAFILE/system.270.893882851"
datafile 3 switched to datafile copy "+DATA/SRPSTB/DATAFILE/sysaux.268.893882883"
datafile 4 switched to datafile copy "+DATA/SRPSTB/DATAFILE/undotbs1.266.893882909"
datafile 5 switched to datafile copy "+DATA/SRPSTB/20E55957E61A7D6CE0537200A8C09297/DATAFILE/system.265.893882915"
datafile 6 switched to datafile copy "+DATA/SRPSTB/DATAFILE/users.264.893882923"
datafile 7 switched to datafile copy "+DATA/SRPSTB/20E55957E61A7D6CE0537200A8C09297/DATAFILE/sysaux.263.893882923"
datafile 8 switched to datafile copy "+DATA/SRPSTB/DATAFILE/undotbs2.262.893882949"
datafile 30 switched to datafile copy "+DATA/SRPSTB/243D4D0CCA302D9BE0537200A8C03F95/DATAFILE/system.315.895493381"
datafile 31 switched to datafile copy "+DATA/SRPSTB/243D4D0CCA302D9BE0537200A8C03F95/DATAFILE/sysaux.316.895493429"
Now that we are done, check the progress of the recovery on the standby database.
It could be seen that now MRP is applying log sequence 180 of thread 2.
<pre>SYS@srpstb1 > select process,status,sequence#,thread# from gv$managed_standby;

PROCESS   STATUS        SEQUENCE#    THREAD#
--------- ------------ ---------- ----------
ARCH      CLOSING             229          1
ARCH      CONNECTED             0          0
ARCH      CLOSING             227          1
ARCH      CLOSING             228          1
RFS       CLOSING             230          1
RFS       IDLE                  0          0
RFS       IDLE                  0          0
RFS       IDLE                  0          0
MRP0      APPLYING_LOG        180          2
ARCH      CONNECTED             0          0
ARCH      CONNECTED             0          0

PROCESS   STATUS        SEQUENCE#    THREAD#
--------- ------------ ---------- ----------
ARCH      CONNECTED             0          0
ARCH      CONNECTED             0          0
RFS       IDLE                180          2
RFS       IDLE                  0          0

15 rows selected.
Let’s check the sync status of the standby database with the primary database.
On the primary:
SYS@srprim1 > select thread#,max(sequence#) from v$archived_log group by thread#;

   THREAD# MAX(SEQUENCE#)
---------- --------------
         1            231
         2            180
On the standby:
SYS@srpstb1 > select thread#,max(sequence#) from v$archived_log where applied='YES' group by thread#;

   THREAD# MAX(SEQUENCE#)
---------- --------------
         1            230
         2            180
It’s clear that the standby is sync with the primary and we are happy to go !
COPYRIGHT
© Shivananda Rao P, 2012 to 2018. Unauthorized use and/or duplication of this material without express and written permission from this blog’s author and/or owner is strictly prohibited. Excerpts and links may be used, provided that full and clear credit is given to Shivananda Rao and http://www.shivanandarao-oracle.com with appropriate and specific direction to the original content.
DISCLAIMER
The views expressed here are my own and do not necessarily reflect the views of any other individual, business entity, or organization. The views expressed by visitors on this blog are theirs solely and may not reflect mine.
Switchover is a two way process in Oracle Dataguard. This way of role transition where the current primary database starts behaving as a Physical Standby and on the other hand the current Physical standby database starts behaving as a Primary database. Switchover in 12c is still the same, but new features have been incorporated and the usage of the “switchover commands” have in a great change.
Oracle has introduced the “Verify” functionality which does not perform the switchover but does verify if the switchover can be performed to the target standby database.
It mainly does:
1. The redo shipping from the primary to the standby database.
2. Checks if Managed Recovery Process (MRP) is running on the standby.
3. And finally checks if the standby database is in sync with the primary.
The syntax used is “Alter database switchover to <target_standby_database_unique_name> verify;” where in the “target_standby_database_unique_name” is the unique name of the target database to which the switchover needs to be performed.
As an example, below is how the “verify” functionality checks and reports the error.
SYS @ oraprim > alter database switchover to orastb verify;
alter database switchover to orastb verify
*
ERROR at line 1:
ORA-16470: Redo Apply is not running on switchover target
This error clearly states that Redo Apply (MRP) is not running on the standby database. A copy of the error message will also be written on the alert log file and necessary action can be taken up.
Another set of example is:
SYS @ oraprim > alter database switchover to orastb verify;
alter database switchover to orastb verify
*
ERROR at line 1:
ORA-16467: switchover target is not synchronized
Here, the error message reads out that the target standby database is not in sync with the primary database for the switchover to take place.
Necessary action will have to be taken out and get the standby in sync with the primary before moving on with the switchover.
Now, let’s move on with the demonstration of the switchover process in 12c.
Environment:
Primary Database Name  :  oraprim
Standby Database Name  :  orastb
Database Version       :  12.1.0.1
Primary Database Details:
SYS @ oraprim > select status,instance_name,database_role from v$database,v$instance;

STATUS       INSTANCE_NAME    DATABASE_ROLE
------------ ---------------- ----------------
OPEN         oraprim          PRIMARY
Physical standby database details:
SYS @ orastb > select status,instance_name,database_role from v$database,v$instance;

STATUS       INSTANCE_NAME    DATABASE_ROLE
------------ ---------------- ----------------
MOUNTED      orastb           PHYSICAL STANDBY
Now, let’s verify if the switchover of “oraprim” to “orastb” is possible or not using the “verify” functionality.
SYS @ oraprim > alter database switchover to orastb verify;

Database altered.
There has been no error message reported which signifies that we are good to go with the switchover.
The alert log on the primary database would read out the message something as below.
Sat Oct 31 11:49:22 2015
alter database switchover to orastb verify
Sat Oct 31 11:49:22 2015
SWITCHOVER VERIFY: Send VERIFY request to switchover target ORASTB
SWITCHOVER VERIFY COMPLETE
Completed: alter database switchover to orastb verify
Now, perform the actual switchover to the standby. With the legacy database versions (until 11.2), the syntax of the switchvoer from the primary to physical standby database used to be as “alter database commit to switchvoer to physical standby with session shutdown;” and then on the standby server, you had to switchover the physical standby to primary database which required to fire “alter database commit to switchover to primary with session shutdown;” commands, but with 12c, it’s a single command that does everything for us.
“Alter database switchover to <target_standby_db_unique_name>;” this command switches first the primary to the standby database and on the standby server, switches the physical standby database to primary database. So, it’s just a single command that needs to be fired and Oracle does everything for us.
On the primary database server, I run the switchover command.
SYS @ oraprim > alter database switchover to orastb;

Database altered.
This is how the alert log of the primary database would contain the information about the switchover.
The EOR (End Of Redo) is generated at sequence 293.
Sat Oct 31 15:53:09 2015
ALTER DATABASE COMMIT TO SWITCHOVER TO PHYSICAL STANDBY [Process Id: 2612] (oraprim)
Sat Oct 31 15:53:09 2015
Thread 1 cannot allocate new log, sequence 294
Checkpoint not complete
  Current log# 3 seq# 293 mem# 0: /u01/app/oracle/oradata/oraprim/redo03.log
Sat Oct 31 15:53:09 2015
Waiting for target standby to receive all redo
Sat Oct 31 15:53:09 2015
Waiting for all non-current ORLs to be archived...
Sat Oct 31 15:53:09 2015
All non-current ORLs have been archived.
Sat Oct 31 15:53:09 2015
Waiting for all FAL entries to be archived...
Sat Oct 31 15:53:09 2015
All FAL entries have been archived.
Sat Oct 31 15:53:09 2015
Waiting for dest_id 3 to become synchronized...
Sat Oct 31 15:53:09 2015
Active, synchronized Physical Standby switchover target has been identified
Preventing updates and queries at the Primary
Generating and shipping final logs to target standby
Switchover End-Of-Redo Log thread 1 sequence 293 has been fixed
Switchover: Primary highest seen SCN set to 0x0.0x275a24
ARCH: Noswitch archival of thread 1, sequence 293
ARCH: End-Of-Redo Branch archival of thread 1 sequence 293
ARCH: LGWR is actively archiving destination LOG_ARCHIVE_DEST_3
ARCH: Standby redo logfile selected for thread 1 sequence 293 for destination LOG_ARCHIVE_DEST_3
ARCH: Archiving is disabled due to current logfile archival
The alert log on the standby database server would have the following information written down.
If you go through carefully, the EOR is received at sequence 293 and then oracle internally runs the command “Alter database commit to switchvoer to primary” and finally the role transition is done.
RFS[3]: Selected log 4 for thread 1 sequence 293 dbid 4209209247 branch 890507875
Sat Oct 31 15:53:08 2015
Resetting standby activation ID 4209242527 (0xfae3f19f)
Sat Oct 31 15:53:08 2015
Media Recovery End-Of-Redo indicator encountered
Sat Oct 31 15:53:08 2015
Media Recovery Continuing
Media Recovery Waiting for thread 1 sequence 294
Sat Oct 31 15:53:08 2015
Archived Log entry 197 added for thread 1 sequence 293 ID 0xfae3f19f dest 1:
Sat Oct 31 15:53:09 2015
SWITCHOVER: received request 'ALTER DTABASE COMMIT TO SWITCHOVER  TO PRIMARY' from primary database.
Sat Oct 31 15:53:09 2015
ALTER DATABASE SWITCHOVER TO PRIMARY (orastb)
Maximum wait for role transition is 15 minutes.
Switchover: Media recovery is still active
Role Change: Canceling MRP - no more redo to apply
Sat Oct 31 15:53:11 2015
MRP0: Background Media Recovery cancelled with status 16037
Sat Oct 31 15:53:11 2015
Errors in file /u01/app/oracle/diag/rdbms/orastb/orastb/trace/orastb_mrp0_2605.trc:
ORA-16037: user requested cancel of managed recovery operation
Managed Standby Recovery not using Real Time Apply
Recovery interrupted!
Sat Oct 31 15:53:11 2015
MRP0: Background Media Recovery process shutdown (orastb)
Sat Oct 31 15:53:11 2015
Role Change: Canceled MRP
Killing 2 processes (PIDS:2595,2593) (all RFS) in order to disallow current and future RFS connections. Requested by OS process 2627
Backup controlfile written to trace file /u01/app/oracle/diag/rdbms/orastb/orastb/trace/orastb_rmi_2627.trc
SwitchOver after complete recovery through change 2578980
Online logfile pre-clearing operation disabled by switchover
Online log /u01/app/oracle/oradata/orastb/redo01.log: Thread 1 Group 1 was previously cleared
Online log /u01/app/oracle/oradata/orastb/redo02.log: Thread 1 Group 2 was previously cleared
Online log /u01/app/oracle/oradata/orastb/redo03.log: Thread 1 Group 3 was previously cleared
Standby became primary SCN: 2578978
Switchover: Complete - Database mounted as primary
SWITCHOVER: completed request from primary database.
Sat Oct 31 15:57:27 2015
Let’s check the status of the databases. The former standby database (orastb) is now behaving as a Primary database .
SYS @ orastb > select status,instance_name,database_role from v$database,v$instance;

STATUS       INSTANCE_NAME    DATABASE_ROLE
------------ ---------------- ----------------
MOUNTED      orastb           PRIMARY

SYS @ orastb > alter database open;

Database altered.
On the other hand, the former primary database (oraprim) is behaving as a physical standby database.
SYS @ oraprim > select status,instance_name,database_role from v$database,v$instance;

STATUS       INSTANCE_NAME    DATABASE_ROLE
------------ ---------------- ----------------
MOUNTED      oraprim          PHYSICAL STANDBY
Let’s start the MRP on the new standby database.
SYS @ oraprim > alter database recover managed standby database disconnect;

Database altered.

SYS @ oraprim > select process,status,sequence# from v$managed_standby;

PROCESS   STATUS        SEQUENCE#
--------- ------------ ----------
ARCH      CONNECTED             0
ARCH      CONNECTED             0
ARCH      CLOSING             295
ARCH      CLOSING             294
RFS       IDLE                  0
RFS       IDLE                296
RFS       IDLE                  0
MRP0      APPLYING_LOG        296

8 rows selected.
It could be seen that Managed Recovery Process is now running on the new standby database “oraprim” with sequence 296 being applied.
Sync status: On the Primary database:
SYS @ orastb > select max(sequence#) from v$archived_log;

MAX(SEQUENCE#)
--------------
           295
On the Physcial Standby Database:
SYS @ oraprim > select max(sequence#) from v$archived_log where applied='YES';

MAX(SEQUENCE#)
--------------
           295
After the switchover, the corresponding PDBS of the databases will be in the closed state and will have to be opened manually.
On the new primary, we can see that all the PDBs are closed and will have to be opened manually.
SYS @ orastb > select name,open_mode from v$pdbs;

NAME                           OPEN_MODE
------------------------------ ----------
PDB$SEED                       READ ONLY
TESTPDB1                       MOUNTED
TESTPDB3                       MOUNTED
On the new standby as well, they are in closed state.
SYS @ oraprim > select name,open_mode from v$pdbs;

NAME                           OPEN_MODE
------------------------------ ----------
PDB$SEED                       MOUNTED
TESTPDB1                       MOUNTED
TESTPDB3                       MOUNTED
On a note, the physical standby database need not have to be in MOUNT state for switchover to be performed. If Active Dataguard is in place and the standby is in OPEN READ ONLY MODE with APPLY and it’s corresponding PDBs are in READ ONLY mode, it’s still possible to perform the switchvoer and not necessary to have them in MOUNT state.
COPYRIGHT
© Shivananda Rao P, 2012 to 2018. Unauthorized use and/or duplication of this material without express and written permission from this blog’s author and/or owner is strictly prohibited. Excerpts and links may be used, provided that full and clear credit is given to Shivananda Rao and http://www.shivanandarao-oracle.com with appropriate and specific direction to the original content.
DISCLAIMER
The views expressed here are my own and do not necessarily reflect the views of any other individual, business entity, or organization. The views expressed by visitors on this blog are theirs solely and may not reflect mine.
Fast Start Failover is a feature available through oracle dataguard broker which performs an automatic failover to the chosen standby database in case of a primary database crash.
FSFO involves an OBSERVER component which runs on a different machine than that of the primary and the standby database. The observer hardly consumes any resource and requires only a client or database software installed in it’s site and TNS connectivity established to the primary and the standby database. As the name suggests, the observer monitors the availability of the primary database and initiates a fast start failover when the primary database loses the connectivity with the observer and the chosen standby database target.
Before we move with configuring FSFO, there are some required FSFO properties that we need to know of. These include:
FastStartFailoverLaglimit: With FSFO, we can use only MaxAvailability or MaxPerformance mode. When in MaxPerformance mode, this property specifies the maximum amount of data loss that is permissible. This value is in “SECONDS” and the default value is 30 seconds. When in MaxAvailability mode, FSFO ensures that there is no data loss.
FastStartFailoverThreshold: This property specifies the number of seconds that the observer and the target standby database will wait before initiating the failover. By default, the value of this property is 30 seconds.
FastStartFailoverPmyShutdown: If this property is set to true and the primary database is stalled for more than FastStartFailoverThreshold seconds, then the primary database will shutdown.
FastStartFailoverTarget: This property specifies the db_unique_name of the database which would be the target database of the fast start failover.
FastStartFailoverAutoReinstate: If set to true, then the former primary database will be reinstated after the fast-start failover.
On another note, Fast-Start-Failover has a few restrictions:
1. You cannot change the protection mode of the dataguard broker configuration and nor can you change the log shipping mode (logxptmode) of the primary and the target standby database.
2. You cannot perform a switchover or a failover to a standby database which is not the “fast-start-failover target”.
3. The broker configuration cannot be removed if FSFO is eanbled and nor can the target standby database be deleted.
4. FSFO is not possible if the primary database was shutdown without the “abort” option or if the observer is not running.
Now let’s move on with the steps involved in enabling FSFO. This post assumes that a broker configuration already exists it’s creation is not outlined here.
The steps required to configure dataguard broker can be referred here https://shivanandarao-oracle.com/2013/07/10/data-guard-broker-configuration/
The configuration name used here is “dgtest” and uses the MaxAvailability mode.
Environment:
Primary Site:
DB Name            : srprim
DB Unique Name     : srprim
Connect Identifier : srprim
Hostname           : ora1-1
Standby Site:
DB Name            : srprim
DB Unique Name     : srpstb
Connect Identifier : srpstb
Hostname           : ora1-2
Observer Site:
Hostname : ora1-3
The configuration is enabled and it’s status is as below.
DGMGRL> show configuration;

Configuration - dgtest

  Protection Mode: MaxAvailability
  Databases:
    srprim - Primary database
    srpstb - Physical standby database

Fast-Start Failover: DISABLED

Configuration Status:
SUCCESS
Make sure that both, primary and the standby databases have the flashback and FRA featured enabled which forms a pre-requisite for FSFO.
Now, let’s try to enable to “FSFO”.
DGMGRL> ENABLE FAST_START FAILOVER;
Error: ORA-16651: requirements not met for enabling fast-start failover

Failed.
This of-course fails. Reason — there are certain pre-requiste properties mentioned earlier which needs to be set.
Set the FastStartFailoverTarget to the target database (srpstb) for the primary database (srprim)
DGMGRL> edit database srprim set property 'FastStartFailoverTarget'='srpstb';
Property "FastStartFailoverTarget" updated
DGMGRL>
Similarly, set the FastStartFailoverTarget to the target database (srprim) for the database srpstb. This will be used if srpstb starts behaving as a primary database and srprim as a standby after the role transition.
DGMGRL> edit database srpstb set property 'FastStartFailoverTarget'='srprim';
Property "FastStartFailoverTarget" updated
DGMGRL>
Verfiy the property set above.
DGMGRL> show database srprim 'FastStartFailoverTarget';
  FastStartFailoverTarget = 'srpstb'
Now set the property FastStartFailoverThreshold to 60 seconds which will be time in seconds that the observer will wait before initiating the failover.
DGMGRL> EDIT CONFIGURATION SET PROPERTY FastStartFailoverThreshold = 60;
Property "faststartfailoverthreshold" updated
Observer process is a continuous process and does not return the prompt at the DGMGRL session until you stop the observer from another DGMGRL session.
Due to this, it’s preferred to run the observer in background using the “nohup”.
In order to run the observer in the background, just connect to the broker configuration from the observer site and run the “start observer” command.
[oracle@ora1-3 ~]$ nohup dgmgrl sys/oracle@srprim "start observer" &amp;
If willing to run in the foreground, then connect to the broker configuration from the observer site and run the “start observer” command to start the observer.
[oracle@ora1-3 ~]$ dgmgrl sys/oracle@srprim
DGMGRL for Linux: Version 11.2.0.2.0 - 64bit Production

Copyright (c) 2000, 2009, Oracle. All rights reserved.

Welcome to DGMGRL, type "help" for information.
Connected.
DGMGRL> start observer;
Observer started
Once that the observer is running, let me enable FSFO. To do so, connect to the broker configuration and execute “enable fast_start failover” command.
DGMGRL> enable fast_start failover;
Enabled.
DGMGRL>
DGMGRL> show configuration;

Configuration - dgtest

  Protection Mode: MaxAvailability
  Databases:
    srprim - Primary database
    srpstb - (*) Physical standby database

Fast-Start Failover: ENABLED

Configuration Status:
SUCCESS
It’s clear from the above outcome that FSFO is enabled.
Let’s get the details of the properties set for FSFO.
DGMGRL> show fast_start failover;

Fast-Start Failover: ENABLED

  Threshold:        60 seconds
  Target:           srpstb
  Observer:         ora1-3.mydomain
  Lag Limit:        30 seconds (not in use)
  Shutdown Primary: TRUE
  Auto-reinstate:   TRUE

Configurable Failover Conditions
  Health Conditions:
    Corrupted Controlfile          YES
    Corrupted Dictionary           YES
    Inaccessible Logfile            NO
    Stuck Archiver                  NO
    Datafile Offline               YES

  Oracle Error Conditions:
    (none)
It can be noticed that FastStartFailoverThreshold is set to 60 seconds with FastStartFailoverTarget as SRPSTB, Observer being running at “ora1-3” host, FastStartFailoverLaglimit with the default value (30 seconds) which is currently not used in this configuration as the protection mode is set to MaxAvailability and most importantly FastStartFailoverPmyShutdown and FastStartFailoverAutoReinstate being set to TRUE.
FSFO can also be triggered with certain additional (optional) conditions. There has been no conditions specified from my end. So the values you see above are the default ones.
FSFO will occur if the Controlfile is corrupted or if the dictionary is corrupted or if a datafile is offline due to write error. In addition, you can configure other conditions such as Struck archiver (FSFO will occur if archive process is unable to archive the redo due to write error or the disk being full), Inaccessible logfile (LGWR is unable to write to the redo logs due to write error).
Query the primary database to check the FSFO and the observer status.
SQL> select  FS_FAILOVER_STATUS,FS_FAILOVER_OBSERVER_PRESENT   from v$database;

FS_FAILOVER_STATUS     FS_FAIL
---------------------- -------
SYNCHRONIZED           YES
To simulate a fast start failover, I crash the primary database by shutting it down using the “Abort” clause so that it looses the connectivity with the observer and the standby database.
SQL> shut abort
ORACLE instance shut down.
Now on checking the status of the configuration, Oracle throws out the error message that the primary database is unavailable and cannot determine it’s status.
DGMGRL> show configuration;

Configuration - dgtest

  Protection Mode: MaxAvailability
  Databases:
    srprim - Primary database
    srpstb - (*) Physical standby database

Fast-Start Failover: ENABLED

Configuration Status:
ORA-01034: ORACLE not available
ORA-16625: cannot reach database "srprim"
DGM-17017: unable to determine configuration status
The observer did not immediately trigger the failover as it has to wait for the FastStartFailoverThreshold number of seconds.
After a few seconds of wait, check the configuration status again. FSFO is in progress as seen below.
DGMGRL> show configuration;

Configuration - dgtest

  Protection Mode: MaxAvailability
  Databases:
    srpstb - Primary database
    srprim - (*) Physical standby database (disabled)

Fast-Start Failover: ENABLED

Configuration Status:
ORA-16610: command "FAILOVER TO srpstb" in progress
DGM-17017: unable to determine configuration status
It’s good to see below that fast start failover has occured and “srpstb” is the primary database.
DGMGRL> show configuration;

Configuration - dgtest

  Protection Mode: MaxAvailability
  Databases:
    srpstb - Primary database
      Warning: ORA-16817: unsynchronized fast-start failover configuration

    srprim - (*) Physical standby database (disabled)
      ORA-16661: the standby database needs to be reinstated

Fast-Start Failover: ENABLED

Configuration Status:
WARNING
Reinstating Former Primary database as New Standby database:
Now, that failover occurred, I’d like to reinstate the former primary database “srprim”. Since FastStartFailoverAutoReinstate was set to True, the observer will
reinstate the former primary database automatically once it is up.
But the below portion is a snippet of reinstating a former primary database as a new standby database if in case FastStartFailoverAutoReinstate was set to FALSE .
Connect to the former primary database “srprim” and mount it up.
[oracle@ora1-1 ~]$ sqlplus sys/oracle@srprim as sysdba

SQL*Plus: Release 11.2.0.2.0 Production on Thu Oct 15 19:30:46 2015

Copyright (c) 1982, 2010, Oracle.  All rights reserved.

Connected to an idle instance.

SQL> startup mount
ORACLE instance started.

Total System Global Area  943669248 bytes
Fixed Size                  2232128 bytes
Variable Size             641728704 bytes
Database Buffers          293601280 bytes
Redo Buffers                6107136 bytes
Database mounted.
Now connect to the broker configuration with the new primary database and execute “reinstate database ‘<former primary database>'”.
In my case it is : “reinstate databsae ‘srprim’;”
[oracle@ora1-2 ~]$ dgmgrl sys/oracle@srpstb
DGMGRL for Linux: Version 11.2.0.2.0 - 64bit Production

Copyright (c) 2000, 2009, Oracle. All rights reserved.

Welcome to DGMGRL, type "help" for information.
Connected.
DGMGRL> reinstate database 'srprim';
Reinstating database "srprim", please wait...
Reinstatement of database "srprim" succeeded
DGMGRL>
Let’s check the configuration.
DGMGRL> show configuration;

Configuration - dgtest

  Protection Mode: MaxAvailability
  Databases:
    srpstb - Primary database
    srprim - (*) Physical standby database

Fast-Start Failover: ENABLED

Configuration Status:
SUCCESS

DGMGRL>
Good to see that srprim has been converted to the new standby database.
COPYRIGHT
© Shivananda Rao P, 2012 to 2018. Unauthorized use and/or duplication of this material without express and written permission from this blog’s author and/or owner is strictly prohibited. Excerpts and links may be used, provided that full and clear credit is given to Shivananda Rao and http://www.shivanandarao-oracle.com with appropriate and specific direction to the original content.
DISCLAIMER
The views expressed here are my own and do not necessarily reflect the views of any other individual, business entity, or organization. The views expressed by visitors on this blog are theirs solely and may not reflect mine.
This article demonstrates on the steps involved in configuring a cascaded physical standby database. A cascading standby environment is one wherein a standby receives the redo data directly from the primary database and then transmits it to the other cascaded standby databases.
This method offloads the primary in transmitting the redo to multiple standbys, instead it just transmits to the single cascading standby which in turn cascades to multiple standbys. Also, the redo received by the cascading physical standby database can cascade it to upto 30 physical or logical or snapshot standbys.
After speaking about the advantages of “Cascaded Standby Databases”, it also has certain restrictions:
1. A cascading environment cannot be used if the primary database is a RAC configuration. (This restriction has been removed from 11.2.0.2)
2. If dataguard broker is configured, then cascading redo to other standbys is not allowed.
3. A logical standby database or a snapshot standby database cannot act as a Cascading standby database. In other words, a logical or a snapshot standby cannot retransmit the redo data to a cascaded standby database.
4. Since the redo data on a cascaded standby is received from a cascading standby database and not directly from the primary database, there is always a lag at the cascaded standby database. The redo will be received only when the current redo on the cascading standby will be archived.
To minimize the lag, Standby Redo Logs are needed while implementing Cascaded Standbys to make use of the Real Time Apply feature.
Let’s move on with the steps involved in achieving this. This primary database used here is a standalone database with OMF managed datafiles through ASM and the cascading as well as cascaded standbys too are standalone databases with OMF managed datafiles through ASM. Also, this post assumes that a physical standby is setup for the primary which would be acting as a cascading standby and the standby redo logs are configured on both primary and the cascading standby database and it’s creation is not outlined here.
Environment:
Primary Site:
DB Name        : srprim
DB Unique name : srprim
Hostname       : ora1-1
Cascading Site:
DB Name        : srprim
DB Unique Name : srpstb
Hostname       : ora1-2
Cascaded Site:
DB Name        : srprim
DB Unique Name : srcstb
Hostname       : ora1-3
The configuration uses “Flash Recovery Area” on all (primary, cascading and cascaded standby databases). To graphically help you understand, the cascaded environment looks as below:
SRPRIM —– > SRPSTB —– > SRCSTB

Create a pfile for the cascaded database “srcstb” with all the required parameters. Below is how the PFILE for the “srcstb” instance looks.
[oracle@ora1-3 ~]$ cat /u02/initsrcstb.ora
srcstb.__db_cache_size=381681664
srcstb.__java_pool_size=4194304
srcstb.__large_pool_size=4194304
srcstb.__pga_aggregate_target=381681664
srcstb.__sga_target=566231040
srcstb.__shared_io_pool_size=0
srcstb.__shared_pool_size=159383552
srcstb.__streams_pool_size=0
*.audit_file_dest='/u01/app/oracle/admin/srcstb/adump'
*.audit_trail='DB'
*.compatible='11.2.0.0.0'
*.control_files='+DATA1','+FRA1'
*.core_dump_dest='/u01/app/oracle/diag/rdbms/srcstb/srpstb/cdump'
*.db_block_size=8192
*.db_create_file_dest='+DATA1'
*.db_domain=''
*.db_file_name_convert='+DATA_NEW','+DATA1'
*.db_name='srprim'
*.db_recovery_file_dest='+FRA1'
*.db_recovery_file_dest_size=4032M
*.db_unique_name='srcstb'
*.diagnostic_dest='/u01/app/oracle'
*.dispatchers='(PROTOCOL=TCP) (SERVICE=srcstbXDB)'
*.fal_server='srprim'
*.log_archive_dest_1='location=use_db_recovery_file_dest valid_for=(all_logfiles,all_roles) db_unique_name=srcstb'
*.log_buffer=5820416# log buffer update
*.log_file_name_convert='+FRA_NEW','+FRA1'
*.memory_target=904M
*.open_cursors=300
*.optimizer_dynamic_sampling=2
*.optimizer_mode='ALL_ROWS'
*.plsql_warnings='DISABLE:ALL'# PL/SQL warnings at init.ora
*.processes=150
*.query_rewrite_enabled='TRUE'
*.remote_login_passwordfile='EXCLUSIVE'
*.result_cache_max_size=2336K
*.skip_unusable_indexes=TRUE
Make sure that the TNS entries for SRPRIM, SRPSTB and SRCSTB exist on each of the 3 (ora1-1, ora1-2 and ora1-3) servers.
SRPRIM =
(DESCRIPTION =
  (ADDRESS = (PROTOCOL = TCP)(HOST = ora1-1.mydomain)(PORT = 1521))
  (CONNECT_DATA =
     (SERVER = DEDICATED)
     (SERVICE_NAME = srprim)
  )
)

SRPSTB =
(DESCRIPTION =
  (ADDRESS = (PROTOCOL = TCP)(HOST = ora1-2.mydomain)(PORT = 1521))
  (CONNECT_DATA =
     (SERVER = DEDICATED)
     (SERVICE_NAME = srpstb)
  )
)

SRCSTB =
(DESCRIPTION =
  (ADDRESS = (PROTOCOL = TCP)(HOST = ora1-3.mydomain)(PORT = 1521))
  (CONNECT_DATA =
   (SERVER = DEDICATED)
   (SERVICE_NAME = srcstb)
  )
)
Add a static entry about the details of SRCSTB instance to the listener.ora file on the cascaded standby host “ora1-3”.
SID_LIST_LISTENER =
(SID_LIST =
  (SID_DESC =
     (ORACLE_HOME = /u01/app/oracle/product/11.2.0.2/db1)
     (SID_NAME = srcstb)
  )
)
Copy the password file from “srpstb” to the cascading standby site “ora1-3” and rename it according to the cascading standby database name “srcstb”.
[oracle@ora1-2 ~]$ scp /u01/app/oracle/product/11.2.0.2/db_1/dbs/orapwsrpstb oracle@ora1-3:/u01/app/oracle/product/11.2.0.2/db1/dbs/orapwsrcstb
The authenticity of host 'ora1-3 (192.168.56.107)' can't be established.
RSA key fingerprint is 26:01:48:55:e9:ae:ae:9a:f9:fd:38:db:29:b7:fa:4e.
Are you sure you want to continue connecting (yes/no)? yes
Warning: Permanently added 'ora1-3' (RSA) to the list of known hosts.
oracle@ora1-3's password:
orapwsrpstb 100% 1536 1.5KB/s 00:00
[oracle@ora1-2 ~]$
Start the instance “srcstb” in nomount stage using the PFILE created earlier.
[oracle@ora1-3 ~]$ sqlplus sys/oracle@srcstb as sysdba

SQL*Plus: Release 11.2.0.2.0 Production on Sat Aug 8 10:04:49 2015

Copyright (c) 1982, 2010, Oracle. All rights reserved.

Connected to an idle instance.

SYS@srcstb> startup nomount
ORA-32004: obsolete or deprecated parameter(s) specified for RDBMS instance
ORACLE instance started.

Total System Global Area 943669248 bytes
Fixed Size 2232128 bytes
Variable Size 553648320 bytes
Database Buffers 381681664 bytes
Redo Buffers 6107136 bytes
Current settings of log shipping parameters on my primary database “srprim” is as :
SYS@srprim> select name,value from v$parameter where name in ('log_archive_dest_1','log_archive_dest_2');

NAME                  VALUE
--------------------- -----------------------------------------------------------------------
log_archive_dest_1    location=use_db_recovery_file_dest valid_for=(all_logfiles,all_roles) d                      b_unique_name=srprim
log_archive_dest_2    service="srpstb", LGWR SYNC AFFIRM delay=0 optional compression=disable                      max_failure=0 max_connections=1 reopen=300 db_unique_name="srpstb" net_                      t imeout=30, valid_for=(all_logfiles,primary_role)
It ships redo data only to the cascading standby database “srpstb”. Also, on “srpstb”, there is no redo shipment parameter configured to ship it to “srcstb”.
The details are as below for “srpstb” instance.
[oracle@ora1-2 ~]$ sqlplus sys/oracle@srpstb as sysdba

SQL*Plus: Release 11.2.0.2.0 Production on Sat Aug 8 10:06:32 2015

Copyright (c) 1982, 2010, Oracle. All rights reserved.

Connected to:
Oracle Database 11g Enterprise Edition Release 11.2.0.2.0 - 64bit Production
With the Partitioning, Automatic Storage Management, OLAP, Data Mining
and Real Application Testing options

SYS@srpstb> select status,instance_name,database_role from v$database,v$instance;

STATUS       INSTANCE_NAME    DATABASE_ROLE
------------ ---------------- ----------------
MOUNTED      srpstb           PHYSICAL STANDBY

SYS@srpstb> select name,value from v$parameter where name in ('log_archive_dest_1','log_archive_dest_2');

NAME                VALUE
------------------- -------------------------------------------------------------------------
log_archive_dest_1  location=use_db_recovery_file_dest valid_for=(all_logfiles,all_roles) db_                    unique_name=srpstb
log_archive_dest_2  service=srprim SYNC valid_for=(all_logfiles,primary_role) db_unique_name=                    srprim
SYS@srpstb> select process,status,sequence# from v$managed_standby;

PROCESS   STATUS         SEQUENCE#
--------- ------------   ----------
ARCH      CONNECTED      0
ARCH      CONNECTED      0
ARCH      CONNECTED      0
ARCH      CLOSING        90
RFS       IDLE           0
RFS       IDLE           0
RFS       IDLE           0
RFS       IDLE           91
MRP0      WAIT_FOR_LOG   91

9 rows selected.
It can be noticed above that, MRP is currently running on “srpstb” waiting for log sequence 91.
Now, create the standby database “srcstb” using RMAN “active” duplication method. Note that, the duplication is being carried out with “srpstb” as a target database. In other words, I’m using a standby database as a source to perform RMAN active duplicate to create a new standby. This option is available from 11.2.0.2 version, provided there are pre-requisties patches that need to be applied on both source and target environment.
If RMAN active duplicate with source as standby is not feasible or un-supported for your version, then you can go with “RMAN active duplicate” from primary database or use the traditional way of RMAN backup restore and recovery to create the cascaded standby “srcstb”.
[oracle@ora1-3 dbs]$ rman target sys/oracle@srpstb auxiliary sys/oracle@srcstb

Recovery Manager: Release 11.2.0.2.0 - Production on Sun Aug 16 11:46:55 2015

Copyright (c) 1982, 2009, Oracle and/or its affiliates. All rights reserved.

connected to target database: SRPRIM (DBID=298418015, not open)
connected to auxiliary database: SRPRIM (not mounted)

RMAN> duplicate target database for standby from active database nofilenamecheck;

Starting Duplicate Db at 16-AUG-15
using target database control file instead of recovery catalog
allocated channel: ORA_AUX_DISK_1
channel ORA_AUX_DISK_1: SID=24 device type=DISK

contents of Memory Script:
{
backup as copy reuse
targetfile '/u01/app/oracle/product/11.2.0.2/db_1/dbs/orapwsrpstb' auxiliary format
'/u01/app/oracle/product/11.2.0.2/db1/dbs/orapwsrcstb' ;
}
executing Memory Script

Starting backup at 16-AUG-15
allocated channel: ORA_DISK_1
channel ORA_DISK_1: SID=40 device type=DISK
Finished backup at 16-AUG-15

contents of Memory Script:
{
backup as copy current controlfile for standby auxiliary format '+DATA1/srcstb/controlfile/current.267.887888833';
restore clone controlfile to '+FRA1/srcstb/controlfile/current.267.887888835' from
'+DATA1/srcstb/controlfile/current.267.887888833';
sql clone "create spfile from memory";
shutdown clone immediate;
startup clone nomount;
sql clone "alter system set control_files =
''+DATA1/srcstb/controlfile/current.267.887888833'', ''+FRA1/srcstb/controlfile/current.267.887888835'' comment=
''Set by RMAN'' scope=spfile";
shutdown clone immediate;
startup clone nomount;
}
executing Memory Script

Starting backup at 16-AUG-15
using channel ORA_DISK_1
channel ORA_DISK_1: starting datafile copy
copying standby control file
output file name=/u01/app/oracle/product/11.2.0.2/db_1/dbs/snapcf_srpstb.f tag=TAG20150816T114714 RECID=18 STAMP=887888836
channel ORA_DISK_1: datafile copy complete, elapsed time: 00:00:03
Finished backup at 16-AUG-15

Starting restore at 16-AUG-15
using channel ORA_AUX_DISK_1

channel ORA_AUX_DISK_1: copied control file copy
Finished restore at 16-AUG-15

sql statement: create spfile from memory

Oracle instance shut down

connected to auxiliary database (not started)
Oracle instance started

Total System Global Area 943669248 bytes

Fixed Size 2232128 bytes
Variable Size 553648320 bytes
Database Buffers 381681664 bytes
Redo Buffers 6107136 bytes

sql statement: alter system set control_files = ''+DATA1/srcstb/controlfile/current.267.887888833'', ''+FRA1/srcstb/controlfile/current.267.887888835'' comment= ''Set by RMAN'' scope=spfile

Oracle instance shut down

connected to auxiliary database (not started)
Oracle instance started

Total System Global Area 943669248 bytes

Fixed Size 2232128 bytes
Variable Size 553648320 bytes
Database Buffers 381681664 bytes
Redo Buffers 6107136 bytes

contents of Memory Script:
{
sql clone 'alter database mount standby database';
}
executing Memory Script

sql statement: alter database mount standby database
RMAN-05529: WARNING: DB_FILE_NAME_CONVERT resulted in invalid ASM names; names changed to disk group only.

contents of Memory Script:
{
set newname for tempfile 1 to
"+data1";
set newname for tempfile 2 to
"+data1";
switch clone tempfile all;
set newname for datafile 1 to
"+data1";
set newname for datafile 2 to
"+data1";
set newname for datafile 3 to
"+data1";
set newname for datafile 4 to
"+data1";
backup as copy reuse
datafile 1 auxiliary format
"+data1" datafile
2 auxiliary format
"+data1" datafile
3 auxiliary format
"+data1" datafile
4 auxiliary format
"+data1" ;
}
executing Memory Script

executing command: SET NEWNAME

executing command: SET NEWNAME

renamed tempfile 1 to +data1 in control file
renamed tempfile 2 to +data1 in control file

executing command: SET NEWNAME

executing command: SET NEWNAME

executing command: SET NEWNAME

executing command: SET NEWNAME

Starting backup at 16-AUG-15
using channel ORA_DISK_1
channel ORA_DISK_1: starting datafile copy
input datafile file number=00001 name=+DATA_NEW/srpstb/datafile/system.258.882637005
output file name=+DATA1/srcstb/datafile/system.276.887888881 tag=TAG20150816T114801
channel ORA_DISK_1: datafile copy complete, elapsed time: 00:00:35
channel ORA_DISK_1: starting datafile copy
input datafile file number=00002 name=+DATA_NEW/srpstb/datafile/sysaux.259.882637031
output file name=+DATA1/srcstb/datafile/sysaux.275.887888917 tag=TAG20150816T114801
channel ORA_DISK_1: datafile copy complete, elapsed time: 00:00:25
channel ORA_DISK_1: starting datafile copy
input datafile file number=00003 name=+DATA_NEW/srpstb/datafile/undotbs1.260.882637057
output file name=+DATA1/srcstb/datafile/undotbs1.274.887888941 tag=TAG20150816T114801
channel ORA_DISK_1: datafile copy complete, elapsed time: 00:00:03
channel ORA_DISK_1: starting datafile copy
input datafile file number=00004 name=+DATA_NEW/srpstb/datafile/users.261.882637061
output file name=+DATA1/srcstb/datafile/users.273.887888945 tag=TAG20150816T114801
channel ORA_DISK_1: datafile copy complete, elapsed time: 00:00:01
Finished backup at 16-AUG-15

contents of Memory Script:
{
switch clone datafile all;
}
executing Memory Script

datafile 1 switched to datafile copy
input datafile copy RECID=18 STAMP=887888946 file name=+DATA1/srcstb/datafile/system.276.887888881
datafile 2 switched to datafile copy
input datafile copy RECID=19 STAMP=887888946 file name=+DATA1/srcstb/datafile/sysaux.275.887888917
datafile 3 switched to datafile copy
input datafile copy RECID=20 STAMP=887888946 file name=+DATA1/srcstb/datafile/undotbs1.274.887888941
datafile 4 switched to datafile copy
input datafile copy RECID=21 STAMP=887888946 file name=+DATA1/srcstb/datafile/users.273.887888945
Finished Duplicate Db at 16-AUG-15

RMAN> exit

Recovery Manager complete.
[oracle@ora1-3 dbs]$
Now that the standby is created, set the log shipping parameters on the primary and the cascading standby databases accordingly.
On the primary, I set “log_archive_dest_3” parameter to ship the redo to “srcstb”. Of-course, the “log_archive_dest_state_3” would be deffered as I do not want the primary to ship the redo to the cascaded standby.
By doing so, the concept of “cascaded standby” does not come into picture.
I set “log_archive_dest_3” on primary to ship the redo to “srcstb”, so that, if in case, “srpstb” goes down or is unreachable, then there wouldn’t be any DR database. So, as an alternate option, I have set this parameter.
[oracle@ora1-1 admin]$ sqlplus sys/oracle@srprim as sysdba

SQL*Plus: Release 11.2.0.2.0 Production on Sun Aug 16 12:16:14 2015

Copyright (c) 1982, 2010, Oracle. All rights reserved.

Connected to:
Oracle Database 11g Enterprise Edition Release 11.2.0.2.0 - 64bit Production
With the Partitioning, Automatic Storage Management, OLAP, Data Mining
and Real Application Testing options

SYS@srprim> sho parameter dest_3

NAME                                 TYPE        VALUE
------------------------------------ ----------- ------------------------------
db_create_online_log_dest_3          string
log_archive_dest_3                   string
log_archive_dest_30                  string
log_archive_dest_31                  string
SYS@srprim>
SYS@srprim> alter system set log_archive_dest_3='service=srcstb valid_for=(standby_logfiles,standby_role) db_unique_name=srcstb';

System altered.

SYS@srprim> alter system set log_archive_dest_state_3=defer;

System altered.
SYS@srprim> sho parameter log_archive_dest_3

NAME                                 TYPE        VALUE
------------------------------------ ----------- ------------------------------
log_archive_dest_3                   string      service=srcstb valid_for=(onli
                                                 ne_logfiles,primary_role) db_u
                                                 nique_name=srcstb
log_archive_dest_30                  string
log_archive_dest_31                  string
SYS@srprim>
SYS@srprim>
SYS@srprim> sho parameter dest_state_3

NAME                                 TYPE        VALUE
------------------------------------ ----------- ------------------------------
log_archive_dest_state_3             string      DEFER
log_archive_dest_state_30            string      enable
log_archive_dest_state_31            string      enable
SYS@srprim>
Set the log_archive_config parameter on all the 3 databases to host the value of all 3 database unique names.
SYS@srprim> alter system set log_archive_config='DG_CONFIG=(srprim,srpstb,srcstb)';

System altered.

SYS@srprim> sho parameter log_archive_config

NAME                                 TYPE        VALUE
------------------------------------ ----------- ------------------------------
log_archive_config                   string      DG_CONFIG=(srprim,srpstb,srcst
                                                 b)
On the cascading standby database “srpstb”, set the parameter “log_archive_dest_3” to ship the redo data to the cascaded standby database “srcstb”.
[oracle@ora1-2 admin]$ sqlplus sys/oracle@srpstb as sysdba

SQL*Plus: Release 11.2.0.2.0 Production on Sun Aug 16 12:20:20 2015

Copyright (c) 1982, 2010, Oracle. All rights reserved.

Connected to:
Oracle Database 11g Enterprise Edition Release 11.2.0.2.0 - 64bit Production
With the Partitioning, Automatic Storage Management, OLAP, Data Mining
and Real Application Testing options

SYS@srpstb> sho parameter dest_2

NAME                                 TYPE        VALUE
------------------------------------ ----------- ------------------------------
db_create_online_log_dest_2          string
log_archive_dest_2                   string      service=srprim val                                                                           id_for=(online_logfiles,primary_role) db_u
                                                 nique_name=srprim

SYS@srpstb> show parameter dest_3

NAME                                 TYPE        VALUE
------------------------------------ ----------- ------------------------------
db_create_online_log_dest_3          string
log_archive_dest_3                   string
SYS@srpstb>
SYS@srpstb> alter system set log_archive_dest_3='service=srcstb valid_for=(standby_logfiles,standby_role) db_unique_name=srcstb';

System altered.
SYS@srpstb> alter system set log_archive_config='DG_CONFIG=(srprim,srpstb,srcstb)';

System altered.
On “srcstb”, set the log_archive_config parameter and “fal_server” parameter.
FAL_SERVER on “srcstb” should use the NET alias name of “srpstb” as it would be receiving the redo data from “srpstb” database.
[oracle@ora1-3 dbs]$ sqlplus sys/oracle@srcstb as sysdba

SQL*Plus: Release 11.2.0.2.0 Production on Sun Aug 16 12:14:58 2015

Copyright (c) 1982, 2010, Oracle. All rights reserved.

Connected to:
Oracle Database 11g Enterprise Edition Release 11.2.0.2.0 - 64bit Production
With the Partitioning, Automatic Storage Management, OLAP, Data Mining
and Real Application Testing options

SYS@srcstb>
SYS@srcstb> select status,instance_name,database_role,open_mode from v$database,v$instance;

STATUS       INSTANCE_NAME    DATABASE_ROLE    OPEN_MODE
------------ ---------------- ---------------- --------------------
MOUNTED      srcstb           PHYSICAL STANDBY MOUNTED

SYS@srcstb> alter system set log_archive_config='DG_CONFIG=(srprim,srpstb,srcstb)';

System altered.

SYS@srcstb> alter system set fal_server='srpstb';

System altered.

SYS@srcstb> alter system set fal_client='srcstb';

System altered.
In this environment, RMAN automatically creates the Standby Redo logs after the duplication as they were configured previously and existed on the primary and cascading standby databases. Verify there existance on the cascaded standby and if in case, do not exist, then create them manually.
Start the Managed Recovery Process on the cascaded standby database “srcstb”.
SYS@srcstb> alter database recover managed standby database disconnect from session using current logfile;

Database altered.

SYS@srcstb> select process,status,sequence# from v$managed_standby;

PROCESS   STATUS       SEQUENCE#
--------- ------------ ----------
ARCH      CONNECTED    0
ARCH      CONNECTED    0
ARCH      CONNECTED    0
ARCH      CLOSING      215
MRP0      WAIT_FOR_LOG 217
RFS       IDLE         0
RFS       IDLE         0
RFS       IDLE         0

8 rows selected.
Verify the sync status of cascading standby “srpstb” and cascaded standby “srcstb” databases.
On the primary, the latest archive sequence is generated is 226:
SYS@srprim> select status,instance_name,database_role from v$database,v$instance;

STATUS       INSTANCE_NAME    DATABASE_ROLE
------------ ---------------- ----------------
OPEN         srprim           PRIMARY

SYS@srprim> select max(sequence#) from v$archived_log;

MAX(SEQUENCE#)
--------------
226
On the cascading standby SRPSTB, the last sequence applied is 226.
SYS@srpstb> select status,instance_name,database_role from v$database,v$instance;

STATUS       INSTANCE_NAME    DATABASE_ROLE
------------ ---------------- ----------------
MOUNTED      srpstb           PHYSICAL STANDBY

SYS@srpstb> select max(sequence#) from v$archived_log where applied='YES';

MAX(SEQUENCE#)
--------------
226
Similarly, on the cascaded standby SRCSTB, the last sequence generated is 225.
SYS@srcstb> select status,instance_name,database_role from v$database,v$instance;

STATUS       INSTANCE_NAME    DATABASE_ROLE
------------ ---------------- ----------------
MOUNTED      srcstb           PHYSICAL STANDBY

SYS@srcstb> select max(sequence#) from v$archived_log where applied='YES';

MAX(SEQUENCE#)
--------------
225
COPYRIGHT
© Shivananda Rao P, 2012 to 2018. Unauthorized use and/or duplication of this material without express and written permission from this blog’s author and/or owner is strictly prohibited. Excerpts and links may be used, provided that full and clear credit is given to Shivananda Rao and http://www.shivanandarao-oracle.com with appropriate and specific direction to the original content.
DISCLAIMER
The views expressed here are my own and do not necessarily reflect the views of any other individual, business entity, or organization. The views expressed by visitors on this blog are theirs solely and may not reflect mine.
